For parents, figuring out how to monitor a kid’s gaming diet can be a tough nut to crack. For years, video game developers and publishers have been participating in a ratings system created by the Entertainment Software Ratings Board, which is intended to keep violent and adult content out of the hands of kids. But with digital downloads, PlayStation Vue and other streaming video content, online play, and user-generated content becoming mainstream with the PlayStation 4, parents have more to worry about than just whether a game’s content includes blood or sex.
Knowing that, the PlayStation 4 features a host of parental controls that can help you guide your children by setting what games, apps, and features they can and cannot use. Here’s a complete guide to setting up parental controls for everything your kids might do with their PS4, from what games and movies they can watch, to what they can do online.
1. Set up user accounts for each person who uses your PlayStation 4
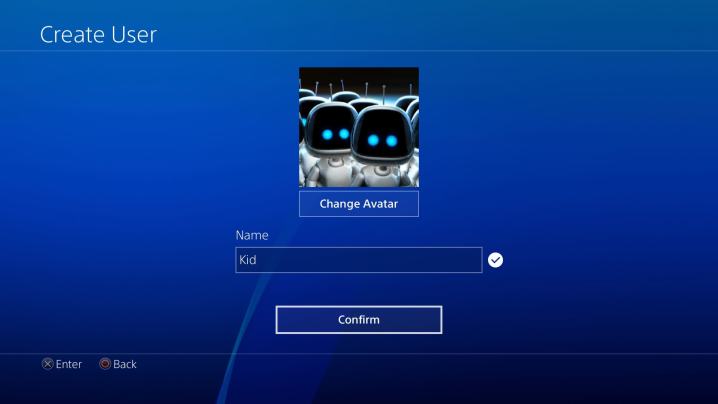
The PlayStation 4 lets its users create specific accounts for themselves that track their games, allow them to customize their PS4 experience, and connect to the PlayStation Network if they have a PSN account. Setting up specific accounts for each player in your household is the best way to set different parental controls for each person. With specific accounts for every person, each player can have unique limits. For example, if you have two children of different ages, one can have access to games with certain types of content, while the other can only play games specifically made for young kids. This also lets you set up a password-protected “adult” account with less restricted user account.
The easiest way to set up a user account is from the login screen when you first boot up your PlayStation 4. You can also reach that screen by holding down the PlayStation button on your controller and choosing “Switch User” or “Log Out.” That’ll put you back on the login screen, where you can choose the “Create User” option to add a new user account.
Follow the on-screen prompts to add an avatar, read the PlayStation terms of service, set a user name, and connect to the PlayStation Network if that user has an account. The process is pretty simple and once it’s done, you can set specific parental controls for each person in your house that uses the PS4.
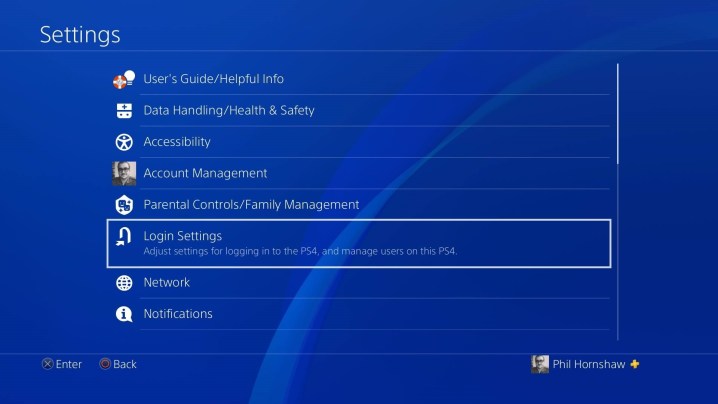
If you need to set a passcode on a user account, you can do so by logging into that account and going to the “Settings” menu, then “Login Settings,” and then “Login Passcode Management.” On that screen, you can create a four-digit passcode that’s required to log in to that particular user account.
2. Head to the “Settings” menu on your PlayStation 4’s home screen

The “Settings” menu includes a ton of options for setting up your PS4 and adjusting how it works.
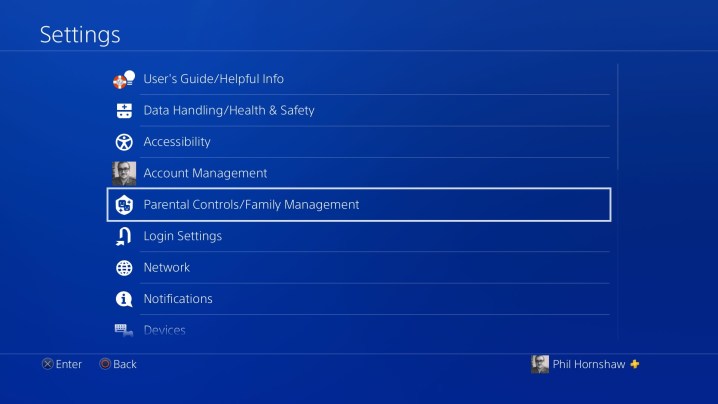
To limit who can use the PS4, what they can do with it, and whether they can spend money on the PlayStation Network store, select the “Parental Controls/Family Management” menu. It’s the fourth option from the top.

Within the parental controls menu, the options for locking down your PlayStation 4 parental settings are divided into three areas. You can set up console-wide restrictions in the “PS4 System Restrictions” menu, create settings for multiple users in your family with the “Family Management” menu, and set parental controls for specific user accounts by selecting them individually at the bottom of the screen.
3. Set your ‘PS4 System Restrictions’
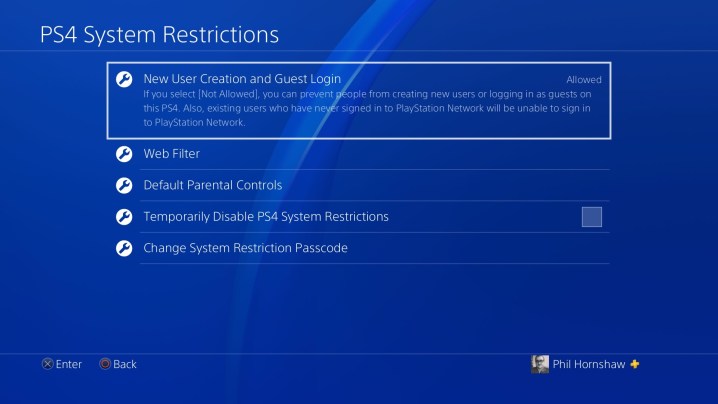
The PS4 System Restrictions menu has the high-level controls that let you set restrictions for the entire system. You only need to use this if you only need one set of parental controls, instead of customizing for each individual user. To access this menu, you’ll need to input a four-digit “restriction passcode.” The default code is “0000,” and you can use the System Restrictions menu to set a new code so no one else can access your restriction settings. Here’s a rundown of the system restriction options:
Restrict new accounts: You can restrict the console from adding new accounts and allowing new players to log in as guests. That means only the accounts you’ve created on the system before enabling this setting, and whatever their parental controls are, can work on the PS4.

Web Filter: This option lets you add content filters to the PS4’s web browser, but requires buying filter subscriptions for the PlayStation 4 store. Follow the on-screen instructions to see which filters are available and what they do. One is specifically geared at blocking adult sites from being viewable on the browser, while another is a security subscription that protects against malicious sites and malware.
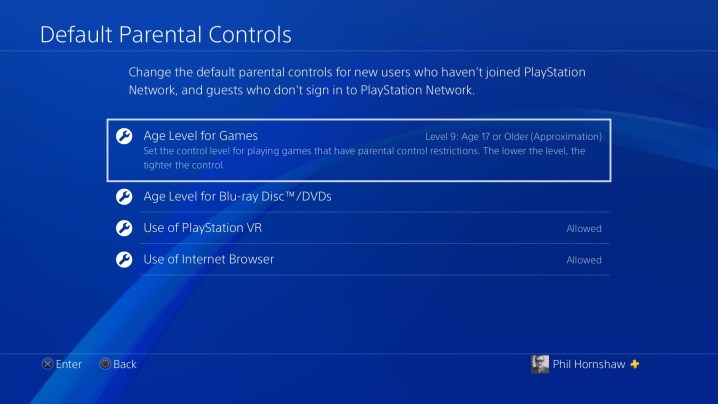
Default Parental Controls: If you don’t want to turn off the ability for people to log in as guests or create new user accounts on your PS4, you can use the “Default Parental Controls” setting to adjust what new account holders and guests are able to do. This is the quickest and easiest way to set blanket parental controls for anyone who creates an account from here forward. You can set an “age level” for games, Blu-rays, and DVDs that will restrict mature content for both. You can also restrict access to the PlayStation VR and the PS4’s onboard web browser on new accounts.
These settings don’t affect accounts that already exist on your PS4, though, so it won’t suddenly stop you from being able to play games or view movies — only newly created accounts or guest accounts will be limited.
Temporarily Disable PS4 Restrictions: This control lets you disable your system restrictions without having to go through a lot of hassle. This button turns off all the restrictions, returning your PS4 to its default, unrestricted state. Click that same button again to instantly re-enable all your set restrictions just the way they were.
Change System Restriction Passcode: The last option on this screen is “Change System Restriction Passcode.” This lets you set a four-digit pin that the PS4 will require before any changes can be made to system restrictions and for any user account restrictions you set up individually. Use this for extra security to stop anyone you don’t want messing with your PS4’s parental controls and restriction settings.
4. ‘Family Management’
The “Family Management” menu allows you to give members of your family access to your PlayStation Network account, but with that access tied to their own user accounts on your PlayStation 4. You can use Family Management to give your kids the ability play games online using their own accounts, complete with things like their own friends lists. It also opens the door for youto set and/or restrict what PlayStation Network features they are able to use while playing online, including purchasing digital games and accessing social features.
Note: To change these settings, You will need to know your PlayStation Network username and password to sign in.
From the “Family Management” screen, you can set user accounts on your PS4 as “family members,” which is what gives them access to your PSN account. The idea is that multiple family members using the same PS4 aren’t going to subscribe to multiple PSN accounts, so defining family members lets you set which users are able to access the PSN on your system.
From the “Family Management” screen, you can also set each user’s age, identifying which users represent children, and which are adults. On children’s accounts, you’ll then be able to set online parental controls that limit what your kids can do online. Designating users as “Parent/Guardian” accounts gives those accounts the ability to change parental and system restrictions, too, provided they have the System Restrictions passcode you set up earlier.
5. ‘Parental controls’

To give a specific user a unique set of restrictions, you can set parental controls for each individual user from the “Parental Controls/Family Management” menu. Below the options for “PS4 System Restrictions” and “Family Management,” you will see a list of all the user accounts on your PS4. Select the account you wish to restrict to access its individual parental controls screen.
The individual user-based parental controls give you the same options as the default parental controls in the “System Restrictions” menu. You can set age levels to restrict access to mature games and video content. You can also bar access to the PlayStation web browser and PlayStation VR.
If you’ve connected the user account to a PlayStation Network account through the “Family Management” menu, you’ll also have options for restricting certain online features and content:
Communicating with other layers: This blanket setting disables all voice chat or messaging between your child and any other online players, including their PlayStation Network friends. There are only two settings: Communication can be either “allowed” or “not allowed.”
Viewing content created by other players: This one controls whether the child can view videos, images, or text that other players make and share over the PlayStation Network. This setting includes Twitch broadcasts shared on the PlayStation Network and text in players’ user profiles. Like the communication setting, it can be either set to “allowed” or “not allowed.”
Age filtering for online content: Depending on the age you set for your child’s user account, this setting will restrict certain online features for games. It will also prevent certain games and other content from appearing when they search the PlayStation Store, depending on the content’s ratings from either the Motion Picture Association of America, the Entertainment Software Rating Board , or TV parental guidelines. Age filtering can either be set to “on” or “off.”
Monthly spending limit: If you want to allow your child to purchase games on the PlayStation Store through their account, you can set a spending limit with this option. There are several options ranging from $0 to $300, as well as an unlimited setting. Accounts with a spending limit can only access money already added to your PlayStation Network wallet: They cannot draw money from stored credit information. The account designated as the “Family Manager” must add money to the wallet from a credit card, debit card, or PayPal account ahead of time for these accounts to be able to spend.


