Removing an object in a photograph is one of Photoshop’s most valuable tricks, but it often requires a bit of finesse and a lot of time to master. To make it less time-consuming for users, Adobe is relying more on artificial intelligence — making the task of removing an object more like a magician’s vanishing act. Adobe Photoshop CC 2019 launched on October 15 with a newly redesigned tool called Content-Aware Fill, powered by Adobe’s Sensei A.I.
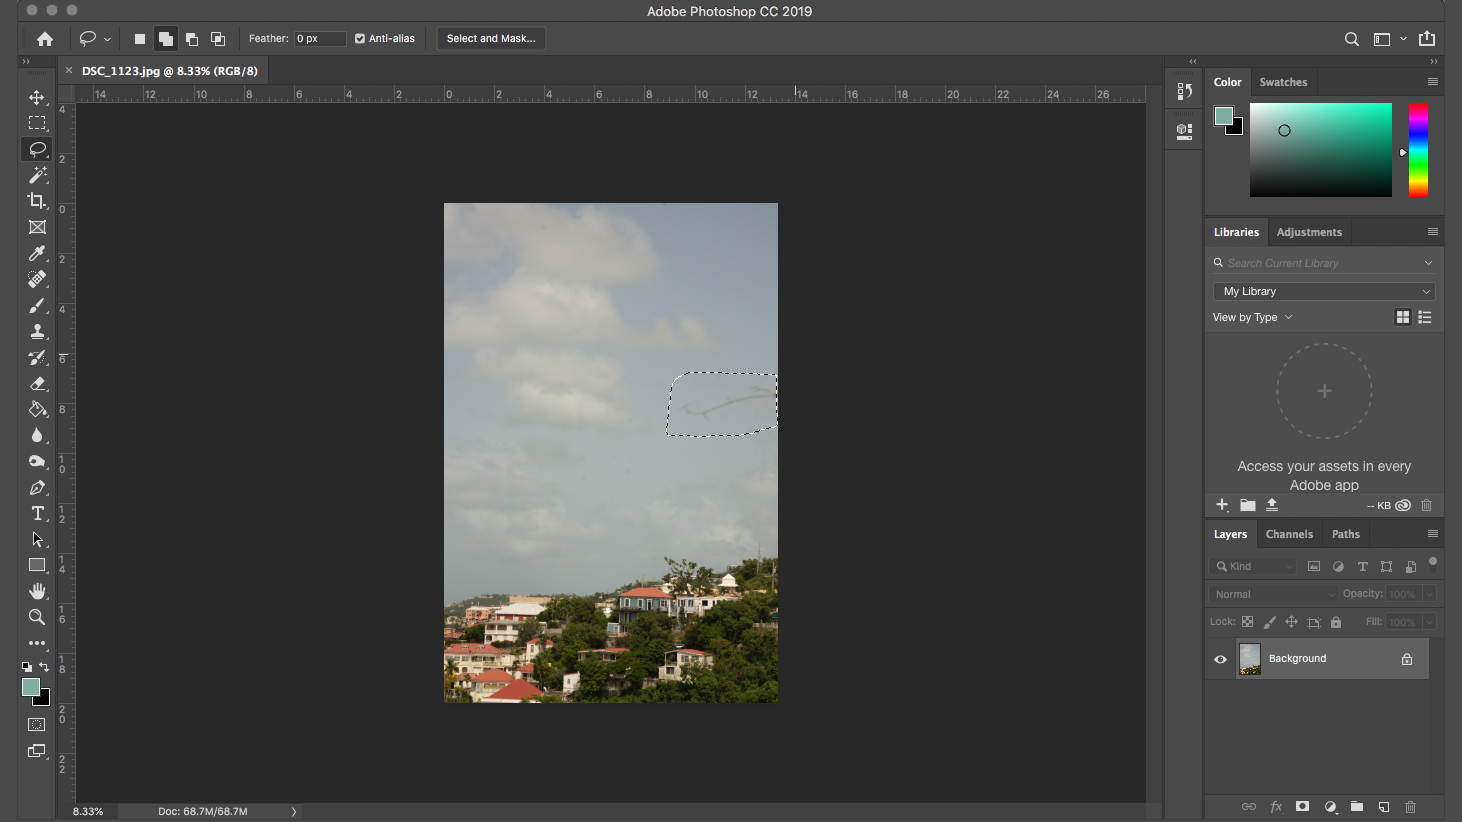
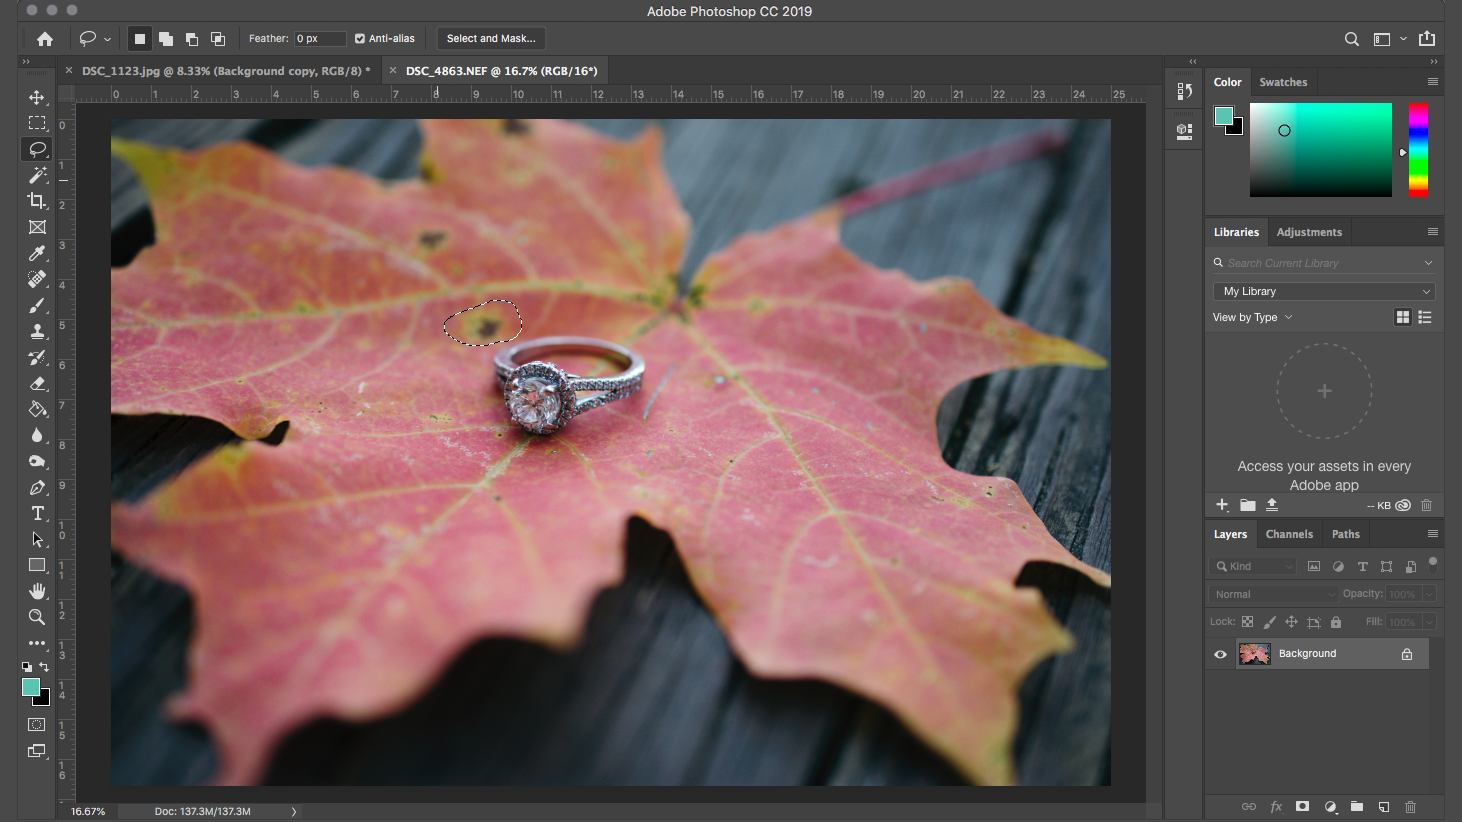
Content-Aware Fill isn’t an entirely new feature, but the earlier version didn’t always get the fix right and there wasn’t a way for photo editors to actually correct what the computer was getting wrong. The new Content-Aware Fill mixes A.I. and good old-fashioned human intelligence, allowing you to fix the software’s goofs. Besides removing objects, the tool can also be used to add in a missing piece, as Adobe demonstrated using a butterfly’s broken wing. We used Content-Aware Fill to remove the damaged areas on a leaf (above), and a photo-bombing tree branch (bottom). Here’s how we did it.
1. Select the object
With the photo open inside Photoshop, select the object that you want to remove. (Alternately, you can also select a gap or hole that you want to fill). You can use any selection tool, but the lasso tool (the third tool in the lefthand toolbar) is often fastest for selecting odd shapes. You don’t have to be exact with the selection — in fact, it’s probably better if you get a small portion of the background in the selection instead of selecting along the exact edges.
2. Open the Content-Aware Fill tool
With the object still selected, open Photoshop’s new Content-Aware Fill tool, which opens in a new window. Go to Edit > Content-Aware Fill.
Note: To use the new version of the Content-Aware Fill tool, make sure you’ve updated to the latest version of Photoshop CC. If you’re looking for the old tool though, you can still find it under Edit > Fill, then selecting Content-Aware from the drop-down menu in the pop-up. Know that the previous version of the tool leaves out several features, and if Photoshop doesn’t automatically get it right, you’re stuck with it unless you undo.
3. Sample the area of the image you would like to repeat
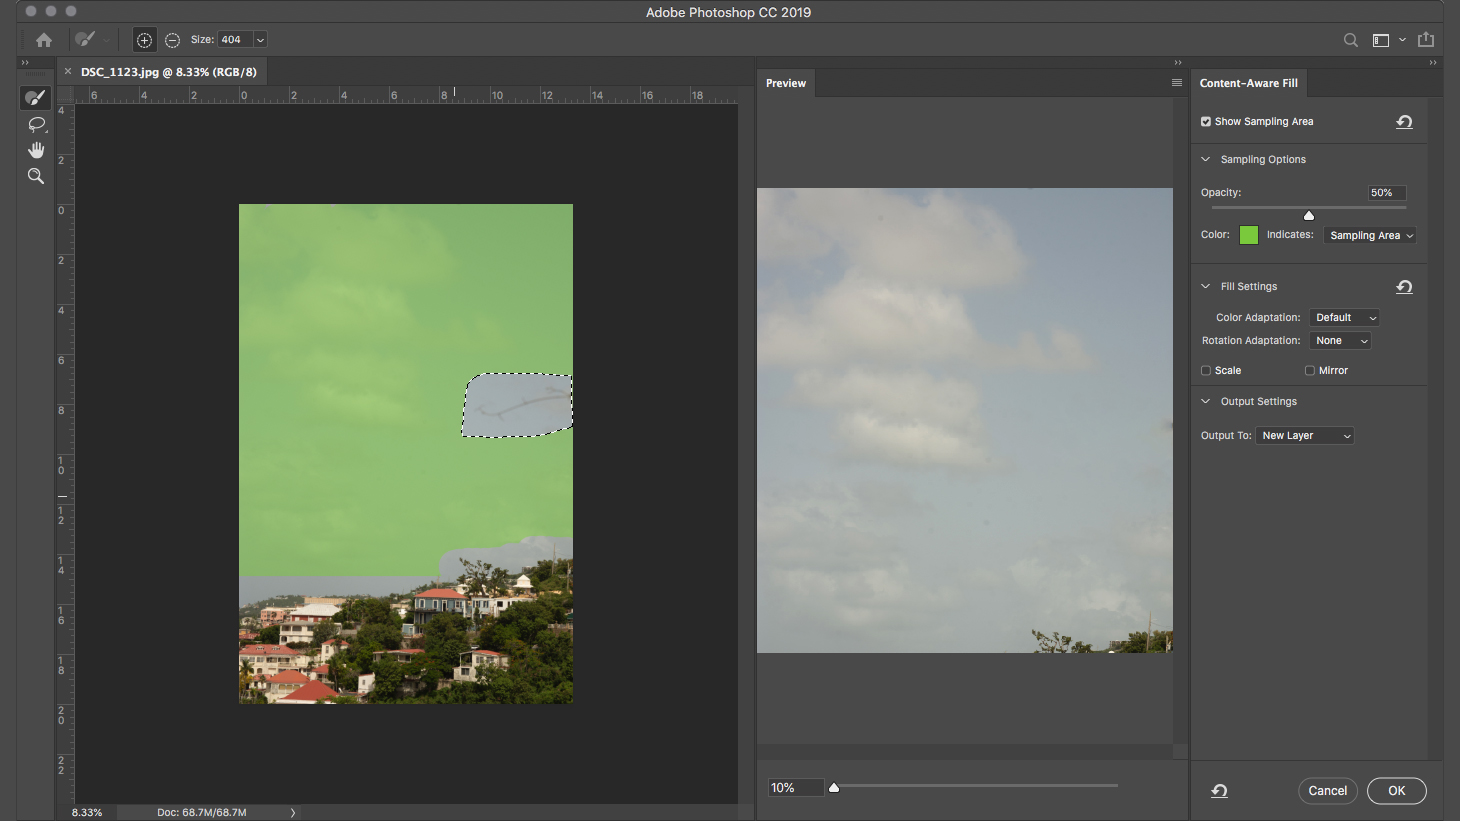
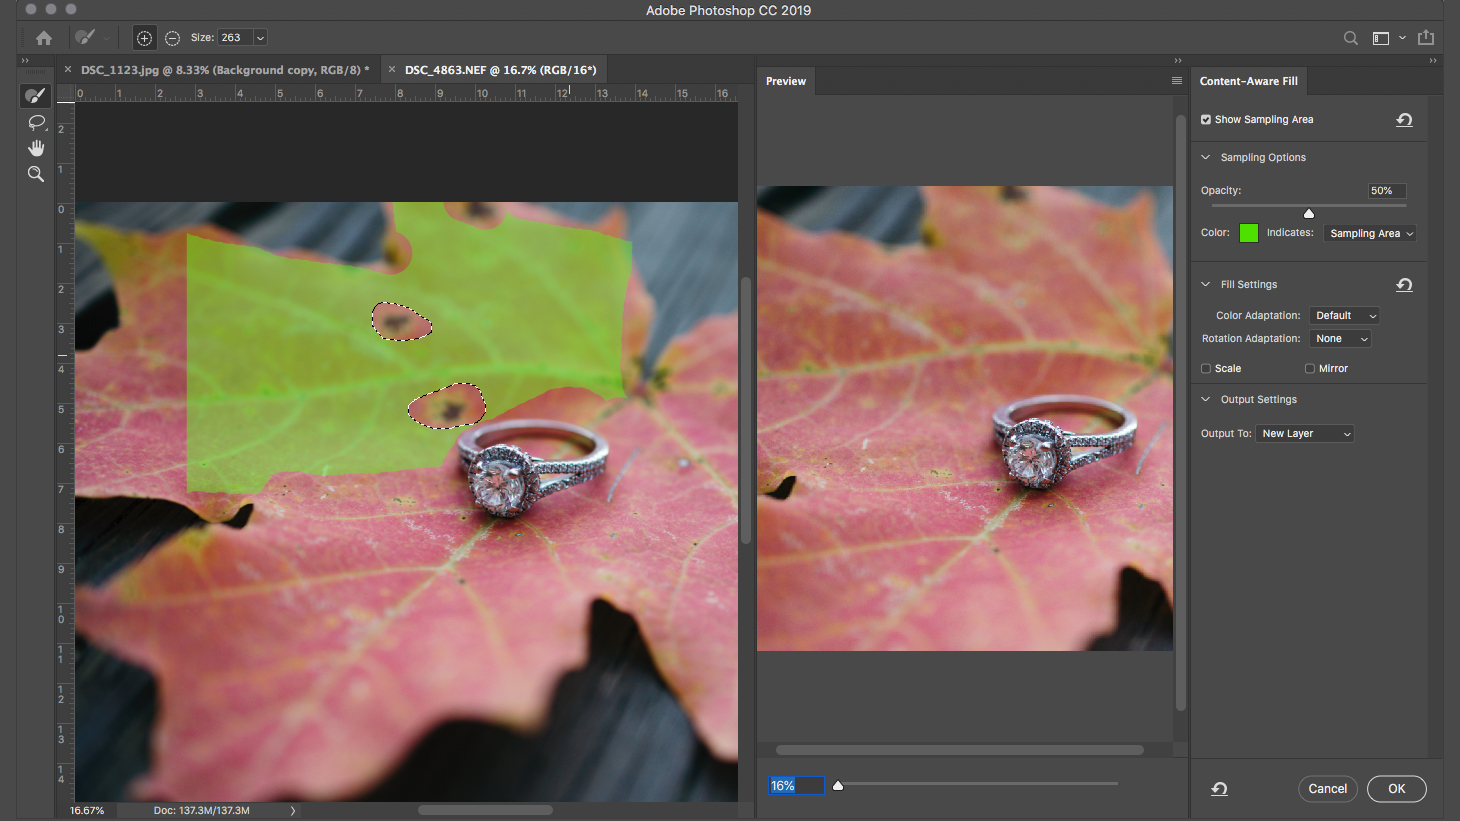
Once the Content-Aware Fill window opens, you’ll see your photo with some green on parts of the image. (Don’t see green? Make sure the “Show Sampling Area” option is checked.) The green area indicates the reference area, or what you want Photoshop to sample from, to fill in the gaps where an object was removed. Photoshop will use whatever pixels reside in that green reference area. By adjusting the reference area to include more, or less, of the image, you tell Photoshop what parts of the image to duplicate to fill that gap.
Once you open the tool, Photoshop has already selected what it thinks is a good area to sample from, but this is where the tool allows you to make adjustments in the event the software gets it wrong.
To the right of that green-filled image, Adobe shows you a preview of the results as you make adjustments. Occasionally, this preview will look great from the start and you won’t need to apply any further adjustments.
If that preview isn’t accurate, you can adjust the sampling area to add some human intervention to the A.I. To make sure Photoshop is filling the gap with the right information, use the brush tool on the left. Select the + icon in the top toolbar if you want to add to the selection, and the – icon to erase from the selection. Next to the + and – icons, you can also change the brush size for faster or more precise work. Erase if you don’t want it included. For example, when we wanted to remove a branch sticking out into the sky, we painted the sky green and left the ground and the area around the branch blank (see example image above). Had we included the ground information, Photoshop would fill the area of the branch incorrectly.
If you’re having a hard time seeing the selection, you can change the color of the sampling and opacity under the sampling options on the right.
4. To add to the selection, use the lasso tool (optional)
If your original selection wasn’t quite accurate or you want to add to it, you can use the lasso tool on the left to select another area in the image or to expand the boundaries of the earlier section. Both sections are sampled from the same area, so if you want to eliminate two objects but you need to fill them with two different fills, it’s best to follow the Content-Aware Fill steps twice — once for each object to remove. If, on the other hand, you’re filling the gap with the same information, you can fill both gaps in the same process.
5. Fine-tune the results

Besides using the brush tool to tell Photoshop what parts of the images to use and what parts to disregard, the new Content-Aware Fill tool also allows for a few more customizations inside the Fill Settings option on the far-right column (or wherever you’ve dragged it to).

Sometimes, you want to remove an object but don’t have an exact reference point in the image — it’s not the right size, flipped the wrong way, or tilted the wrong way. The Scale, Mirror, and Rotation Adaptation tools can help. These tools tell Photoshop how to resize, tilt, or flip the reference point to fill the gap.
If you need to make that sample larger or smaller to fill the gap, check the box for Scale. If the sampled content needs to rotate to create a seamless fill, select one of the different intensities in the Rotation Adaptation menu, based on whether the fill needs to rotate just a bit or a lot.
Checking the Mirror option will flip the reference section (the green-painted section) horizontally to better fill in that gap. The mirror option is handy for filling a gap in a symmetrical object when you don’t have a reference area that matches. For example, to patch a hole in the leaf image above, the only place to take a sample is from the opposite side, but the lines on the opposite side are going in a different direction. By using the Mirror and Rotation options, Photoshop can fill the gap with the lines in the leaf pointing in the right direction. Note, however, that this tool only works for a horizontal flip.
Finally, check your output settings from the drop-down menu. You can choose to export that fill to a new layer, which will allow you to continue refining the adjustment, or you can export right to the background (which allows you to edit the image as a whole, but can’t work further with that gap you filled). Exporting to a duplicate layer will create two layers — one with the original, and one with the Content-Aware Fill adjustment applied to the image.
Once you are happy with the results in the preview, click OK. You’ll be taken back to the main Photoshop work area, where you can continue to make adjustments to the image.

Content-Aware Fill is one of several different ways to remove objects from photos. For example, in the leaf image in this tutorial, after using the Content-Aware Fill on the largest blemishes on the leaf, the healing brush tool made quick work of the smaller spots. Content-Aware Fill is best for larger objects, while the healing brush works well on smaller blemishes like removing acne. Photoshop’s new Content-Aware Fill tool isn’t perfect (it had a hard time fixing a power line running through trees, for example) — but it makes quick work of removing many different types of objects in Photoshop.


