Introducing a background blur to your photos can draw attention to a specific subject, such as an individual in a portrait or an item in a still life, while also adding a professional flair to your image. This beautiful background blur, also known as bokeh, can be achieved even after shooting your photo, thanks to advances in editing software. This guide will walk you through the process on iOS, Android, Windows, and macOS.

Blurring photos on iOS
If you haven’t taken your photograph yet, you can use Portrait Mode to automatically blur the background. Note that while this can sometimes work for other subjects, it’s best for photos of people.
But if you didn’t shoot the photo in Portrait Mode, you can create the effect after the fact using an app. We like Snapseed in the App Store, which is a free app developed by Google.
Step 1: Grant permission to access photos, then select the photo you wish to alter.
Step 2: Select the Portrait button in the lower-right corner.
Step 3: Drag your finger over the subject you wish to keep in focus.
Step 4: If needed, adjust the Intensity and Brush size sliders to better aid your task.
Step 5: Once finished, select the Check mark icon in the lower right.
Step 6: Select the Save button in the upper-right corner to save your work.

Blurring photos on Android
Some Android phones, such as Samsung’s Galaxy lineup, offer similar Portrait Mode abilities to the iPhone for automatically blurring the background of your photographs. Otherwise, if your phone doesn’t provide the capacity within the stock camera app, we would recommend downloading the Canva mobile app from the Google Play Store. Once you have the app installed, follow these steps:
Step 1: Open the Canva app on your Android device. Sign in or create an account if you haven't already.
Step 2: Once you're logged in and you've allowed Canva access to your photos, select the purple Plus sign icon at the bottom of your screen.
Step 3: Then, at the bottom of the next screen, under the Start creating from your media header, choose one of your photos to edit.
Step 4: In the top right of the next screen, select Edit photo.
Step 5: On the photo editor screen, select Effects and then Effects again.
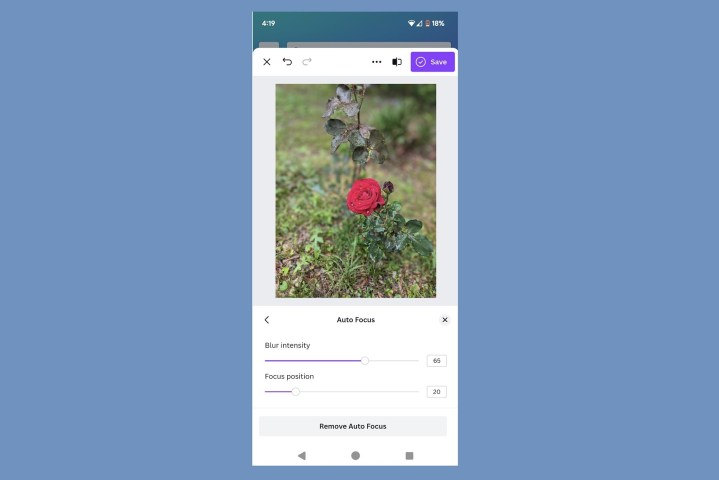
In the Effects menu, you're going to be tempted to select the Blur option. Don't! Since you only want to blur the background of your photo, you actually need to select the Auto focus option. This is because in Canva, the Blur option blurs the entire photo. The Auto focus option, however, actually automatically focuses on the main subject of the photo and allows you to only blur the background.
Step 6: Once you land on the Auto Focus screen, you'll notice that Canva has already blurred your background a bit and kept your foreground sharp. You can use the Blur intensity and Focus position sliders to adjust the focus of the image and intensity of the background blur.
Step 7: Once you're done with your blur edits, you can select the Save button in the top right of your screen. You'll then be presented with three options: Save to Canva, Use in a design, or Download.
You can access your saved edited images in Projects.

Blurring photos on Windows/macOS
While Windows and macOS both contain simple apps to add background blur to images, we’ll be focusing on using one of the most popular photo-editing packages available — Adobe Photoshop. If you would rather use a different application, you can see our list of the best Photoshop alternatives. Otherwise, once Photoshop is installed on your machine, follow these steps to introduce a simple background blur to your image.
Step 1: Open the photo you wish to alter in Photoshop (File > Open).
Step 2: On the right side of the screen, under the Layers section, right-click your photo and select Duplicate layer.
Step 3: Ensure the top layer in the Layers section is chosen, then apply a Gaussian Blur filter (Filter > Blur > Gaussian Blur). For the current radius, enter 50, then select OK.
Step 4: Next, select the Erase tool in the left-hand toolbar. You may wish to adjust the hardness of the tool to around 50% using the top toolbar.
Step 5: Begin to erase the areas that you wish to be clear and sharp. Take your time, as the process may take a bit of patience.
Step 6: If needed, adjust the size of your erase tool as you work, using the Size adjuster in the top toolbar — this will allow you to work on finer details.
Step 7: Save the image (File > Save). You may also want to export a smaller version for the web or social media (File > Export > Export as …).
Tip: While working, you can change the opacity of the blurred layer to better see fine details below. Achieve this by selecting the layer in the Layers section, then using the Opacity selector. Remember to return this setting to a higher number once finished.
This is one of the simplest and fastest ways to blur a background in Photoshop, but it won’t be the most realistic. If you want more control over the blur in your photo, complete with the ability to simulate depth-of-field falloff, see our tutorial on Photoshop’s Field Blur tool.

Fast blurring with web app Fotor
If you don’t want to download and learn a new app or you’re short on time, you can also visit a web app for quick blurring on a photo you’re working on. We recommend the app Fotor for this particular project. Click the link to visit the Fotor web app and get started.
Step 1: Select Open image on the top menu to upload your photo.
Step 2: Go to the Adjust menu on the left-hand side. Then scroll until you see Advanced edits.
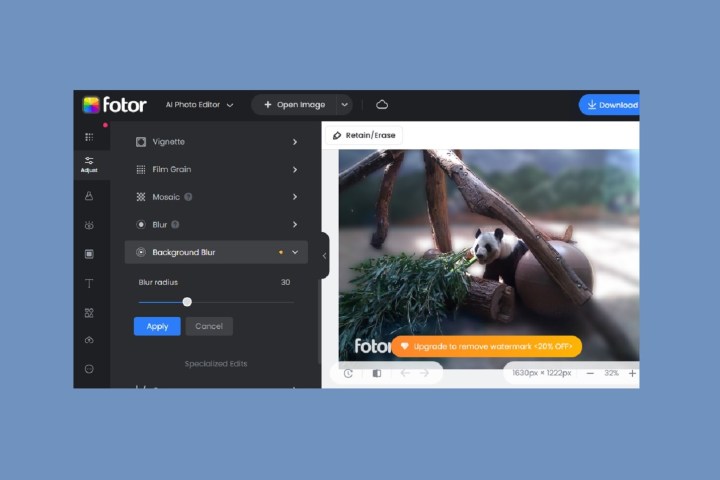
Step 3: Under Advanced Edits, select Background blur. Once you select Background blur, two things will happen:
First, Fotor will automatically blur a bit of your background for you.
Second, Fotor will also apply its watermark to your image. And it looks big, so if you want to remove it, you'll need to sign up for a free trial.
Step 4: The Background blur option does allow you to adjust the intensity of the blur in your photo. To adjust it, use the Blur radius slider.
Once you're done adjusting this, select the blue Apply button.
Step 5: Once you're done editing, select the blue Download button at the top of your screen.
You will have to sign up (with a payment method on file) for a free trial to download your image.
If you don't want to sign up for a free trial but you still want to blur your background a bit on Fotor, you have another option. The reason why you have to sign up for a free trial for the Background blur feature is because it is a premium feature in Fotor. But Fotor does offer another blurring tool, which is just called Blur.
You'll find it listed above Background blur. If you select this option, you'll get a more basic blurring tool, and you'll only have to sign up for a free account to download your image; no payment method on file needed (provided that you didn't use any other premium features in your image). Plus, by just using the Blur tool, you can avoid being stuck with a watermark on your image as well.


