For decades, desktop and laptop owners have been told to defragment their hard drives to get the best performance, especially on Windows-based PCs. Defragging reorganizes the drive so the operating system isn’t spending more time gathering up all the scattered pieces when loading a program or file.
But times have changed. Modern PCs mostly depend on solid-state drives (SSDs), which don’t require or really support old-school defragmentation — indeed, it can actually harm their overall performance and lifespan. Even on computers with hard drives, MacOS and Windows are now more efficient than ever and perform the cleanup in the background. Likewise, Linux-based Chrome OS writes files in an extremely logical manner, requiring very little background defragmentation.
This guide will walk you through how to defrag your PC, but before you do, make sure that it’s worth doing.
Don’t defrag an SSD

SSDs don’t share the same fragmentation problem as hard drives. There are no mechanical parts that move in search of file bits. Files can be fragmented, sure, but you won’t see the performance issues associated with spinning platters and moving heads. SSDs can find scattered blocks of data really fast.
Running a manual defrag on an SSD can be bad for the drive, too. Why? Because data is written to memory cells versus being stored magnetically in tracks on a platter. Over time, these cells wear out — defragmenting will reduce their overall lifespan. Moreover, SSDs use “wear-leveling” to write data across all cells so that they wear out evenly rather than in chunks.
Unlike hard drives, data is written to SSDs in pages — 128 pages equals one data block. Without the TRIM command, the SSD controller will temporarily move pages of wanted, valid data into memory, delete the pages of unwanted, invalid data, wipe the block clean, and then write the valid pages back into the block. Garbage collection takes place when the computer is idle.
The TRIM command is more efficient. It tells the SSD controller which pages of a block can be erased. Thus, instead of erasing the entire block and rewriting the valid data, the controller marks the invalid pages for garbage collection. This method prolongs the life of the SSD.
Ultimately, an SSD doesn’t need defragmenting. Moreover, manually defragmenting the drive will reduce its overall lifespan, so just let Windows and the SSD do their trash collection dance in the background.
You don’t need to defrag a Mac or Chromebook

Modern Macs do not rely on hard drives but rather SSDs. However, if your Mac does have a hard drive, MacOS silently defrags the drive in the background, just like Windows 10.
On a deeper level, Apple’s older Hierarchical File System (HFS+) uses Hot File Adaptive Clustering, which automatically prevents file fragmentation by moving files that are frequently accessed (and mostly unchanged) to a special section. The newer APFS system, initially only supporting SSDs but expanded to hard drives and Fusion drives in Mojave (10.14), creates file snapshots instead.
While there isn’t a native defrag application built into MacOS like there is in Windows, you can find a few third-party tools to manually defrag the drive. Problem is, they don’t work with the newer Apple File System (APFS) built into High Sierra (10.13) and newer. These include:
Meanwhile, like modern Macs, Chromebooks don’t need defragging, as they rely on flash-based storage. Moreover, Chrome OS is based on Linux, which uses the ext2, ext3, and ext4 file systems. These platforms save files in different places with enough blank space around them to accommodate growth. If files become fragmented, the platform will move these files around to combine the scattered bits.
If performance is an issue, one extreme fix it to set both devices to their factory defaults. We have separate guides for MacOS and Chrome OS (aka Powerwash).
How to defrag a hard drive in Windows 10

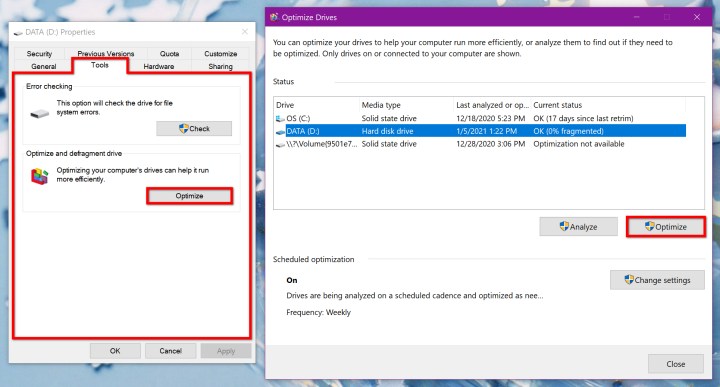
Again, Windows 10 defrags your hard drive in the background. When you open the Optimize Devices tool, you’ll likely see that the drive is 0% fragmented. However, here’s how to manually defragment the drive if needed:
Step 1: Open File Explorer.
Step 2: The “This PC” panel should appear on the screen by default, displaying your drive(s). If not, click on This PC listed on the left.
Step 3: Right-click on the hard drive you want to defragment.
Step 4: Select Properties on the pop-up menu.
Step 5: Click the Tools tab on the following pop-up window.
Step 6: Click the Optimize button displayed under Optimize and Defragment Drive.
Step 7: If you have multiple drives, select the drive you want to optimize. Otherwise, move on to Step 8.
Step 8: Click the Analyze button. If the drive doesn’t need defragmenting, then click the Close button. If your drive needs defragging, click the Optimize button instead.
Step 9: Click the Close button to finish.


