If you want to have a bit of music playing in the background or want to have your favorite YouTube video running in the corner of your screen, then the picture-in-picture YouTube feature needs to be on your radar. This allows you to turn your YouTube videos into a tiny pop-up window that can be moved and repositioned around your screen.
Mac users have several ways to activate the feature, including support on both Safari and Google Chrome. There's also a nifty Chrome extension that simplifies the task to a single button press. Here's a look at how to enable picture-in-picture for YouTube on your Mac.
Use Safari
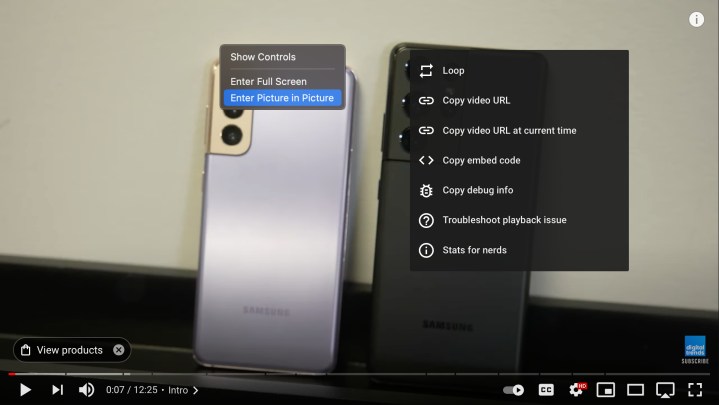
Step 1: With the YouTube video open in Safari, right-click on the actual video. However, you won’t see the PIP option on this menu. Instead, you must right-click again elsewhere on the video to bring up a second pop-up menu, as shown above, while the first one is still visible on the screen.
On a MacBook, press and hold the Control key while tapping the touchpad. Do it again to access the second menu.
Step 2: Select the Enter Picture in Picture option listed on the pop-up menu.
Step 3: Unlike YouTube’s Miniplayer option found on the video’s embedded toolbar, the video should appear in a separate window at a smaller scale outside the Safari browser. You can open any app, desktop program, or browser tab and the video will continue to play. However, you must keep the parent tab open else the PIP window will close.
Step 4: To relocate the window, simply move the mouse cursor over it, click and hold the mouse button, and then drag the mouse. Release the button to finish placing the window. On a MacBook, tap one finger on the touchpad and then tap and drag another finger to move the window. Lift both fingers to place the window.
Step 5: To return the video back to its YouTube page in Safari, either click or tap on the X button or the PIP button next to Play/Pause inside the PIP window.
Use Google Chrome
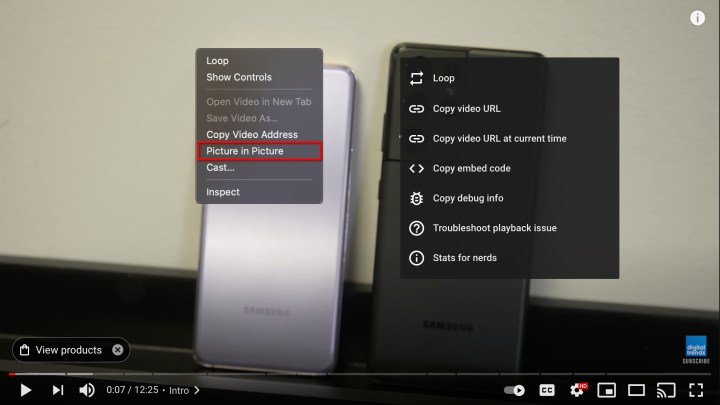
Step 1: With the YouTube video open in Google Chrome, right-click on the actual video. However, you won’t see the PIP option on this menu. Instead, you must right-click again elsewhere on the video to bring up a second pop-up menu, as shown above, while the first one is still visible on the screen.
On a MacBook, press and hold the Control key while tapping the touchpad. Do it again to access the second menu.
Step 2: Select the Picture in Picture option listed on the second menu.
Just like the PIP option in Safari, the video should appear in a separate window at a smaller scale outside the Google Chrome browser. You can open any app, program, or new tab, just don’t close the video’s parent tab.
Step 3: To relocate the window, simply move the mouse cursor over it, click and hold the mouse button, and then drag the Mouse. Release the button to finish placing the window. On a MacBook, tap one finger on the touchpad and then tap and drag another finger to move the window. Lift both fingers to place the window.
Step 4: The methods to return the video back to the parent YouTube page are identical: Either click or tap on the X button or the PIP button next to Play/Pause.
Use Google’s Chrome extension
If all that right-clicking is too annoying (in Chrome), you could always install Google’s extension.
Step 1: Go to the Chrome Web Store and install Google’s Picture-in-Picture Extension by clicking Add to Chrome.
Step 2: With Chrome still open, load the YouTube video you want in PIP mode.
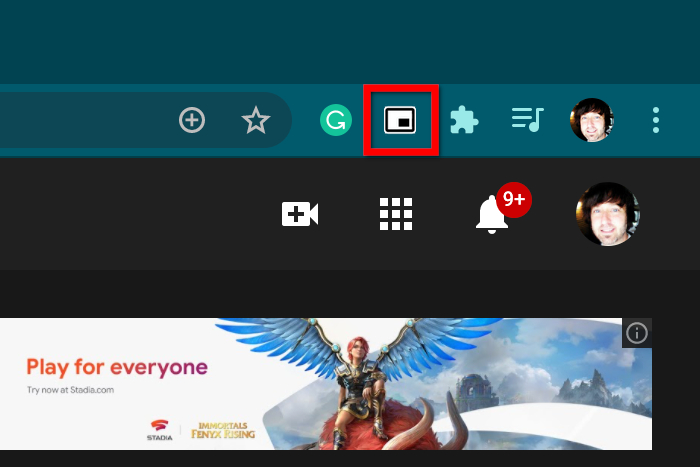
Step 3: The Picture-in-Picture Extension’s icon should reside next to your Google profile picture in the browser’s top right corner. If not, click or tap on the Extensions icon (it resembles a puzzle piece) and then click the pin next to the extension listed on the drop-down menu.
Step 4: Click the Picture-in-Picture Extension icon. The video should appear in a separate window at a smaller scale outside the Google Chrome browser — no right-clicking required.
Step 5: To relocate the window, simply move the mouse cursor over it, click and hold the mouse button, and then drag the mouse. Release the button to finish placing the window. On a MacBook, tap one finger on the touchpad and then tap and drag another finger to move the window. Lift both fingers to place the window.
Step 6: The methods to return the video back to the parent YouTube page are identical: Either click or tap on the X button or the PIP button next to Play/Pause.