Apple’s Family Sharing feature is not available for just iOS devices; you can also set it up on MacOS. The service allows you to share applications you’ve personally purchased, as well as letting family members use your books, movies, and more. Let’s take a look at how to use Family Sharing on a Mac.
Setting up Family Sharing
Step 1: On your Mac, open System Preferences under the Apple icon tab in the top-left corner of the desktop. If you’re logged into your Apple ID account on your Mac, then Family Sharing should show up. However, if you can’t see the icon, simply log in to your Apple ID and go back to System Preferences.

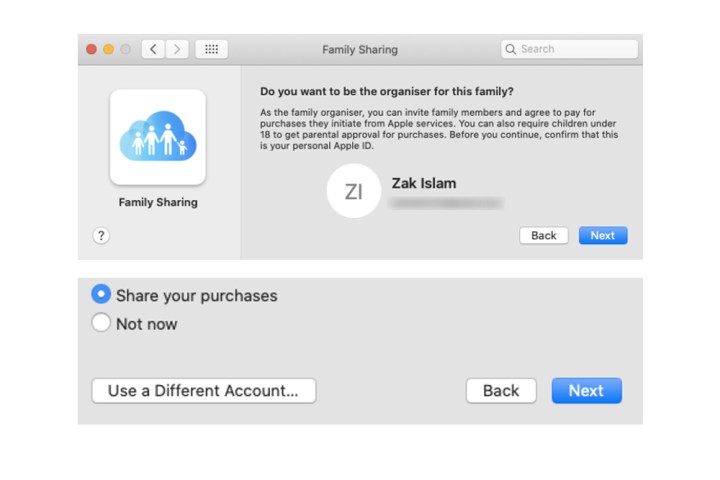
Step 2: Click Family Sharing. In this window, you will be asked if you want to be the organizer for the family. Click the Next button to confirm. In the next window, you’ll be asked if you want to Share your purchases. You also have the option to use a different account. Click Next.

Step 3: In the payment window, your payment information with your Apple ID account will be shown. There’s also the ability to use a different payment method via a button at the bottom adjacent to Next. All the purchases made by your family members you add to the service will be connected to your card to buy such apps. Click Next. Agree to the terms and conditions and click Agree.

Step 4: Alongside sharing apps and the like, Family Sharing on a Mac also allows you to share the location of your connected devices with family members. Click Done.

Step 5: Now you can add people to your Mac’s Family Sharing. Click the Add family member button, type in their name or email address, and then select Continue. You’ll have to confirm your own Apple ID password to proceed, as well as confirming some details pertaining to your account’s payment card.
Once they’re added, they’ll be sent an email. After they accept the invitation, their status within the family group will be changed accordingly.
If you want to add more members to the group, click the + button and follow the same steps listed above.

Customizing Family Sharing settings
Step 1: Click the Purchase sharing tab. You can choose to turn off the option to Share my purchases, as well as changing card details. You can also completely disable Purchase sharing by selecting the Turn off button.

Step 2: Click the iCloud storage tab. It will tell you to upgrade to a higher iCloud subscription plan in order to share your account with family members.

Step 3: Click the Location sharing tab. If you didn’t enable it during the initial Family Sharing setup process, open the Find My app on your Mac. Once you’ve set it up, select the People tab, and then select a family member's name. Lastly, click the Share my location option.

Step 4: Click the Screen Time tab. Here, you can manage Screen Time with your family members added to the group by selecting the Open Screen Time settings button.
Check our guide on how to use Screen Time to learn more about this useful Mac feature.

If you're not too familiar with Mac's various features or have just bought a new Mac or MacBook, head over to our guides for using multiple desktops on your Mac, and checking your Mac for viruses and malware.


