A bibliography is an important part of any well-structured college essay, dissertation, article, or other researched writing sample. It lets your readers know what sources you used as building blocks for your work, and isn’t too difficult to make without a template tool. Still, if you’d like to skip a few steps, there’s a terrific bibliography generator built right into Microsoft Word.
If you already know how to use Microsoft Word, it's useful to also know how to build a quick and easy bibliography for your next assignment or presentation.
Add a new citation in Microsoft Word
To add a new citation in Word for a source you’ve never used before, you’ll need the basic details for it, whether it's a book, article, website, or another source. So, make sure you have the information handy and then follow these steps.
Step 1: Go to the References tab and the Citations & bibliography section of the ribbon.
Step 2: Choose your writing format in the Style drop-down menu, which likely displays as APA by default. You’ll find the most common formats in the list, like MLA, Chicago, and others.

Step 3: Select Insert citation in the same section of the ribbon and pick Add new source.
Use the Type of source drop-down box to pick the kind, and you’ll see the fields beneath update to accommodate the source type.
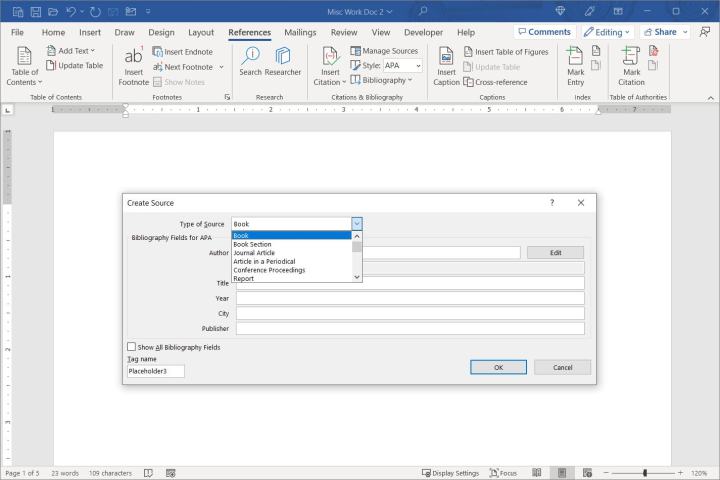
Step 4: Add the necessary details for your source. Optionally, you can check the box for Show all bibliography fields if the ones you want don’t display.
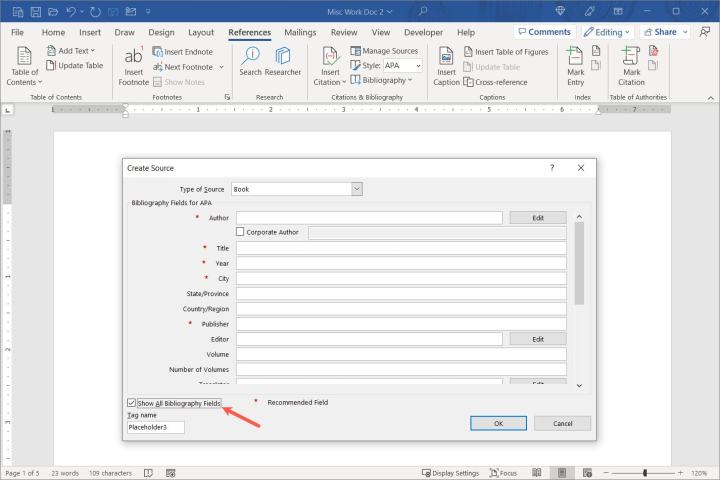
Step 5: When you finish, select OK to save the source, and you’ll see it added to your content in the format you selected.

Manage your sources in Word
After you add a source to your paper, you can make edits to it or reuse it. Plus, your sources are saved to a master list that allows you to use them in other Word documents.
Step 1: On the References tab, select Manage sources in the Citations & bibliography section of the ribbon.

Step 2: When the box opens, you’ll see the Master list of sources on the left. If you added one using the section above, you’ll see it in this list as well.
- To add an existing source to the current document, select it and pick Copy in the center. This moves it to the Current list so that you can easily insert it into your current document (explained below).
- To edit a source, select it and choose Edit. Then, make your changes and pick OK to save them.
- To add a new source, select the New button, enter the details, and pick OK to save the source.

Step 3: When you finish with the Source Manager, select Close.
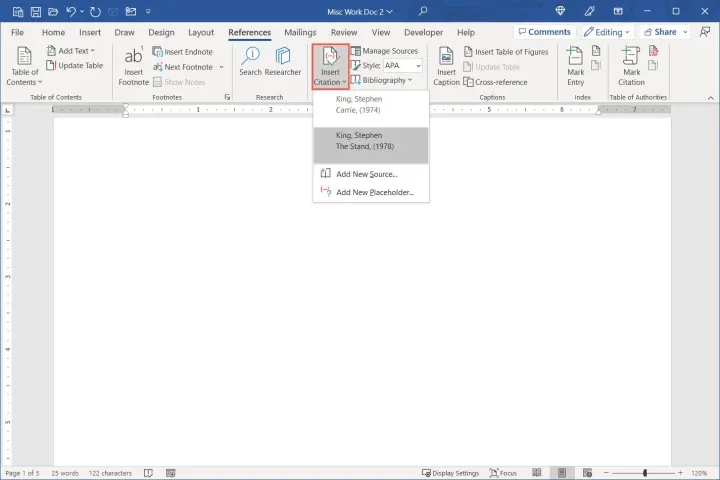
With sources in the Current List in the Source Manager, you can quickly add an in-text citation. Select the Insert citation button on the References tab and pick the source from the drop-down list.
Create a bibliography in Word
When you’re ready to insert a bibliography, Word automatically uses the sources you’ve added to the Source Manager list.
Step 1: Place your cursor in the document where you want the bibliography and go to the References tab.
Step 2: Confirm the writing format is correct in the Style drop-down box, whether you’re using APA, MLA, or another style.
Step 3: Select the Bibliography drop-down menu in the Citations & bibliography section of the ribbon. You’ll see a few built-in options you can choose from with different headings.
If you prefer one without a heading, choose Insert bibliography.
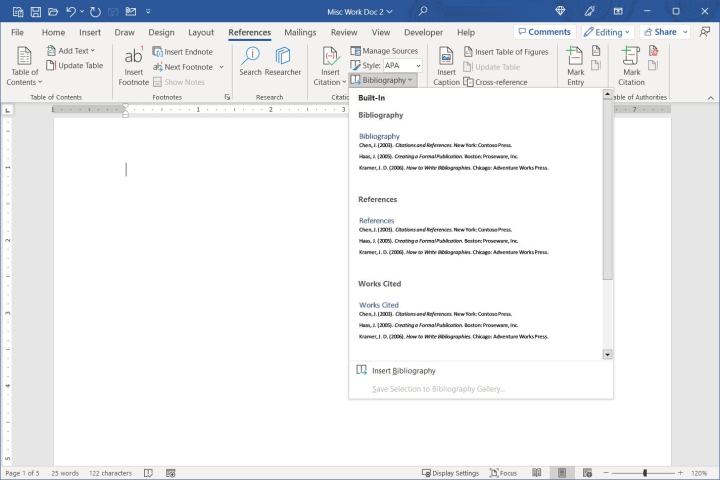
Step 4: Pick the option you want and it’ll pop into your document.
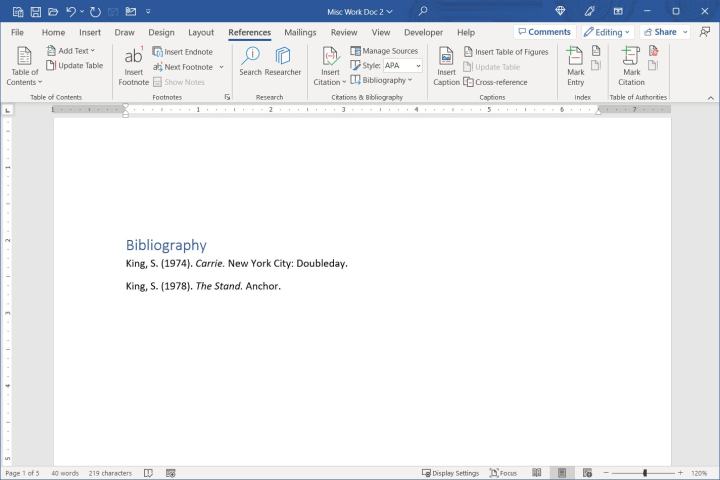
Update a bibliography in Word
Because Word creates your bibliography automatically, you can update it easily if needed, just like when you include a table of contents. You might add more citations or edit the details for a source. Alternatively, you might have made a structural change, such as deleting a page from the Word document. Either way, you can update the bibliography it with just a few clicks.
Step 1: Select the bibliography and then choose the Update citations and bibliography button on the top left.
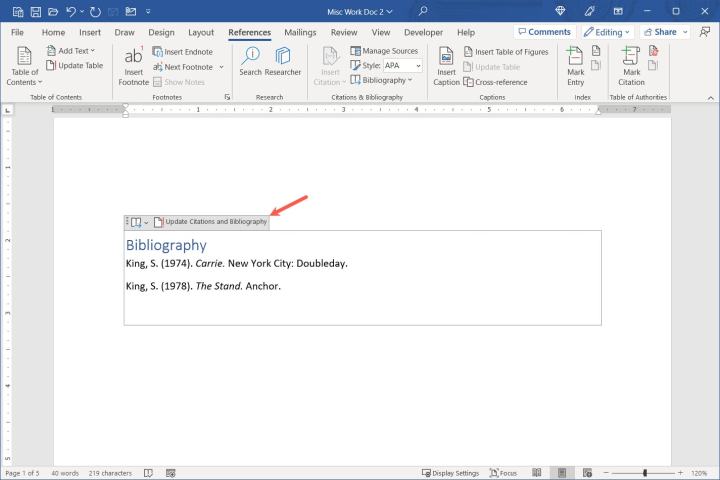
Step 2: You’ll see the list of references update to include any additions or changes.

College is tough enough without worrying about how to create a bibliography for your paper. Hopefully, this how-to gets you off to a great start!
Now that you know how to create a bibliography in Word, take a look at how to double-space your paper or how to add page numbers in Word.


