One of the main interface elements of the macOS experience is the Dock. Located at the bottom of the screen by default, the Dock is your Mac or MacBook’s nerve center. It’s where all of your most used apps are located, and having the ability to just click an icon to launch a program is quite the convenience. But how do you customize the Dock to display the apps you love?
Fortunately, customizing your macOS Dock couldn’t be easier, and we’ve put together this guide to show you how it’s done.
Drag to add apps to the Dock
The quickest way to add an app to the Dock on Mac is by dragging it there. You can do this using the app’s icon on your desktop or in the Applications folder.
Note: Be aware of the section locations mentioned below if your Dock is vertical on the right or left of your screen rather than horizontal.
Step 1: Select the app that you want to place in your Dock.
Step 2: Drag it to the Dock and place it in the spot where you want it. Just be sure it’s to the left of the separator line for recently used apps (described below) or the file and folder section if you don’t display recently used apps.
If you’re placing it between other apps, those apps will slide over to make room.
Step 3: Then, release to drop the app in the Dock. When you do so, this creates an alias of the application. You can still access the original app in the Applications folder.

Show and keep recent apps in the Dock using Options
Another way to add an app to your Dock is by using the Options menu. You can do this for one in the recently used applications section of the Dock or for one currently in use.
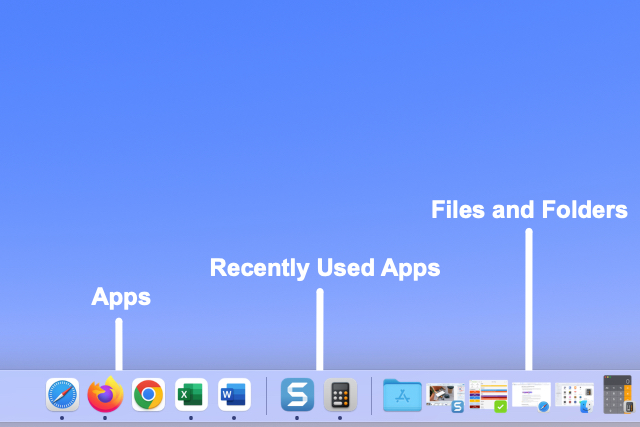
You can display recently used apps in your Dock in their own dedicated section, as described next.
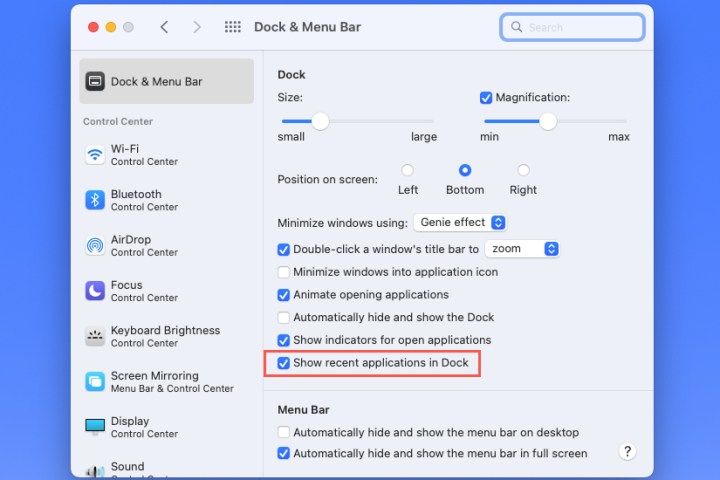
Step 1: Open System preferences using the icon in the Dock or the Apple icon in the menu bar.
Step 2: Select Dock & menu bar.
Step 3: Confirm that Dock & menu bar is selected on the left, and then check the box for Show recent applications in Dock on the right.
If you decide later you’re not fond of this section in the Dock, simply return to this same place and uncheck the box.
Step 4: You’ll then see this section of the Dock separated by lines to the right of your apps and to the left of your open files and folders. Adjust its position in the Dock accordingly if you use the vertical view.
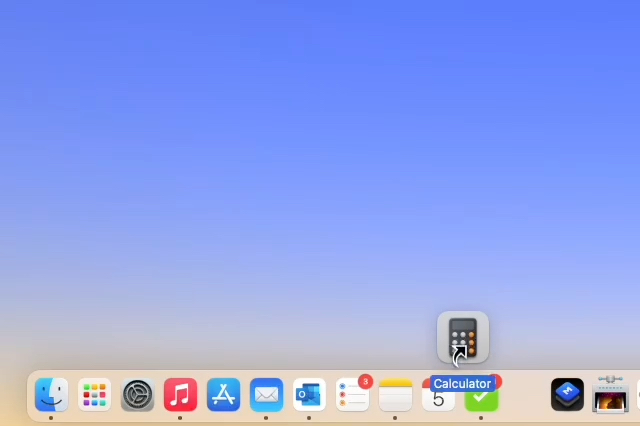
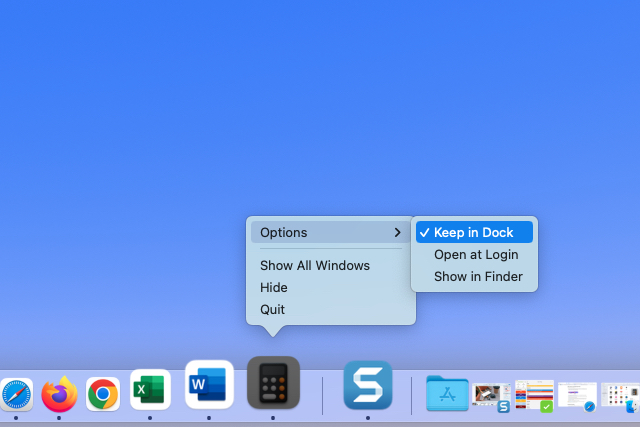
Step 5: To keep one of these apps in the Dock moving forward, right-click or hold Control and select the app. Then, move your cursor to Options and pick Keep in Dock.
The app then moves from the recently used app section to the app section on the left.
You can do the same with apps currently in use in your Dock. Right-click, move to Options, and pick Keep in Dock.

Drag to remove apps from the Dock
While you might be interested in some other ways to customize the macOS Dock, it's a good idea to know how to remove any apps you added. Removing an app from the Dock is just as easy as adding one to it.
Step 1: Select the app you want to remove from the Dock.
Step 2: Drag it out of the Dock toward a blank spot on your desktop.
Step 3: When you see “Remove” display above the app, release your finger from it.
This only takes the app out of your Dock. As mentioned, the app in your Dock is simply an alias, so removing it here doesn’t delete it from your Mac.

Remove apps from the Dock using Options
Just like adding a recent app to your Dock using Options described earlier, you can remove one.
Step 1: Right-click or hold Control and select the app in your Dock.
Step 2: Move your cursor to Options.
Step 3: Deselect Keep in Dock.
Having those apps you use daily in your Dock saves you time from hunting them down in Finder or the Applications folder.
For more ways to improve productivity on your Mac, look at how to use multiple desktops.