Stable Diffusion is an exciting and increasingly popular AI generative art tool that takes simple text prompts and creates incredible images seemingly from nothing. While there are controversies over where it gets its inspiration from, it's proven to be a great tool for generating character model art for RPGs, wall art for those unable to afford artist commissions, and cool concept art to inspire writers and other creative endeavors.
If you're interested in exploring how to use Stable Diffusion on a PC, here's our guide on getting started.
If you're more of an Apple fan, we also have a guide on how to run Stable Diffusion on a Mac, instead.
How to run Stable Diffusion on your PC
You can use Stable Diffusion online easily enough by visiting any of the many online services, like StableDiffusionWeb. If you run stable diffusion yourself, though, you can skip the queues, and use it as many times as you like with the only delay being how fast your PC can generate the images.
Here's how to run Stable Diffusion on your PC.
Step 1: Download the latest version of Python from the official website. At the time of writing, this is Python 3.10.10. Look at the file links at the bottom of the page and select the Windows Installer (64-bit) version. When it's ready, install it like you would any other application.
Note: Your web browser may flag this file as potentially dangerous, but as long as you're downloading from the official website, you should be fine to ignore that.
Step 2: Download the latest version of Git for Windows from the official website. Install it as you would any other application, and keep all settings at their default selections. You will also likely need to add Python to the PATH variable. To do so, follow the instructions from Educative.io, here.
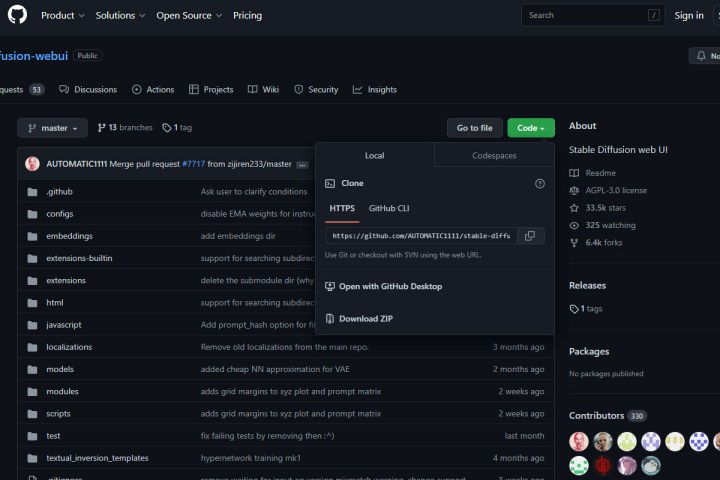
Step 3: Download the Stable Diffusion project file from its GitHub page by selecting the green Code button, then select Download ZIP under the Local heading. Extract it somewhere memorable, like the desktop, or in the root of the C:\ directory.

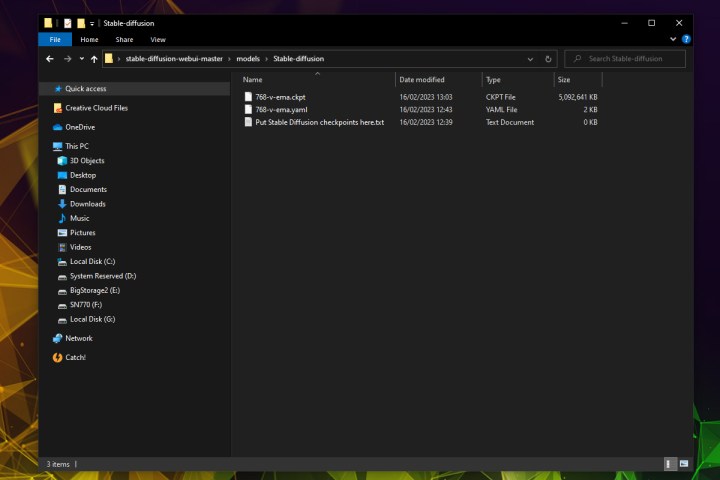
Step 4: Download the checkpoint file “768-v-ema.ckpt” from AI company, Hugging Face, here. It's a large download so might take a while to complete. When it does, extract it into the "stable-diffusion-webui\models\Stable-diffusion\" folder. You'll know you found the right one because it has a text file in it called "Put Stable Diffusion checkpoints here."
Step 5: Download the config yaml file (you might need to right click the page and select Save as.) and copy and paste it in the same location as the other checkpoint file. Rename it to the same name (768-v-ema.ckpt) and remove its .txt file extension.

Step 6: Navigate back to the stable-diffusion-webui folder, and run the webui-user.bat file. Wait until all the dependencies are installed. This can take some time, even on fast computers with high-speed internet, but the process is well documented and you'll see it progress through it in real time.
Step 7: Once it's finished, you should see a Command Prompt window like the one above, with a URL at the end similar to "http://127.0.0.1:7860". Copy and paste that URL into a web browser of your choice, and it should be greeted with the Stable Diffusion web interface.

Step 8: Input your image text prompt and adjust any of the settings you like, then select the Generate button to create an image with Stable Diffusion. You can adjust the resolution of the image using the Width and Height settings, or increase the sampling steps for a higher-quality image. There are other settings that can change the end result of your AI artwork, too. Play around with it all to see what works for you.
If it all works out, you should have as much AI-generated art as you desire without needing to go online or queue with other users.

Now that you've had a chance to play around with Stable Diffusion, how about trying out the ChatGPT natural language chatbot AI? If you're interested, here's how to use ChatGPT yourself.


