There are only two apps that automatically open when I turn on my PC: Microsoft Teams and Steam. Steam, for many, is just a gateway to play games on PC, but it’s a piece of software dense with features that go beyond tracking playtime and achievements.
I wanted to highlight some of the Steam features that I get the most mileage out of. Keep in mind that there are a ton of options in Steam, and this list barely scratches everything that the platform has to offer. These are just the features I think you should be taking advantage of because they make Steam much more than just a launcher for your games.
File transfer
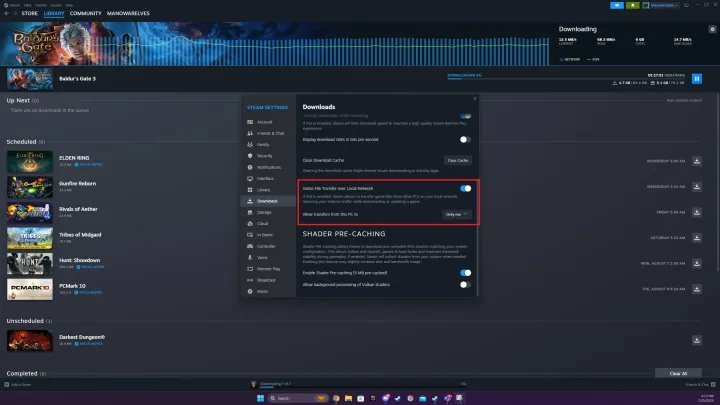
One of the best new features of Steam is local file transfer, but you’d be forgiven if you didn’t hear about it. Steam quietly rolled it out a few months ago, and it’s something you need to manually enable to use. The local file transfer option allows you to transfer game files over your local network instead of re-downloading them. For example, if you have Cyberpunk 2077 installed on your PC and want to also play it on your Steam Deck, you can just copy the files from your PC instead of re-downloading them.
This is usually much faster, especially if you don’t have a great internet connection, and it can avoid overage fees if you have a bandwidth limit. You can even set it up to allow Steam friends to transfer games, which is particularly useful if you want to set up a LAN party like it’s 1999.
To turn it on, click the Steam button in the top left and select Settings. Scroll down to the Downloads tab and tick the Game file transfer over local network option on. You’ll need to have this on for the PC you’re transferring from and to. After that, select if you want to share your connection with others — you shouldn’t in most cases — and you’re good to go.
After that, Steam will automatically transfer files it finds on the local network, as long as the PC you’re transferring from is turned on and Steam is running. You can stop the transfer at any point from the downloads screen, and if the local transfer is too slow, Steam will revert back to a normal download.
Pin the overlay

Steam recently overhauled its overlay, and there are a ton of features in it now. You can access the Steam overlay at any time while playing a game by hitting Shift + Tab. There, you’ll be able to see your friends list, your current and total playtime, and even browse the store through a built-in browser.
That’s all well and good, but with the update, you can now pin items so that they’ll show up even when you close the overlay. This is super useful in a few cases. First, you can pin your achievements so you can keep track of your progress while you play. You can also browse community guides from the overlay and pin them to your screen, which is great if you’re following a walkthrough without a second monitor.
By far my favorite new feature, though, is the notepad. Like the other elements, you can pin the notepad to your screen. There are a ton of uses for this, from writing down a door code to keeping track of a puzzle solution to scratching down a reminder to backtrack to a certain location.
Organize your messy library
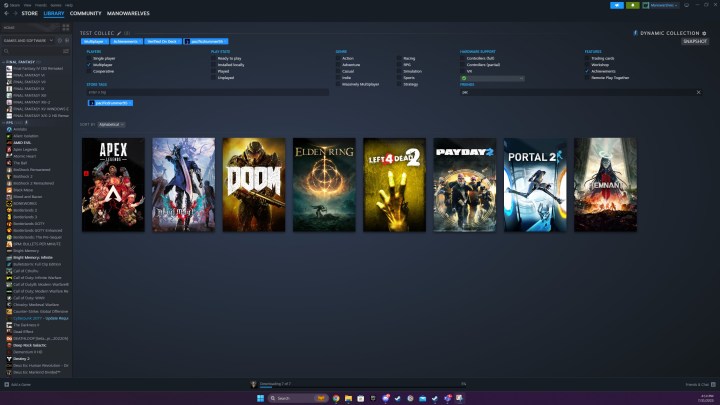
For years, Steam has allowed you to organize your library into collections. You can find them by selecting the Library tab and choosing Collections. You can name it whatever you want and drag the games you want inside, but my preferred way to do it is to create a Dynamic Collection.
Dynamic Collections will automatically find the games in your library that meet the criteria you set. You can filter games out by their genre, if they support single-player and/or multiplayer, and even their store tags. Steam goes further by letting you select controller support, Steam Deck verification, features like Steam Workshop and achievements, and even if a friend owns the same game.
For example, I could instantly create a collection of multiplayer games that are Verified on Steam Deck that supports achievements and that one of my Steam friends also owns. This is a great way to quickly filter your library, especially if you’re looking for a particular type of game to play. And, if there are games you want to add or remove, you can still manually do so in a Dynamic Collection.
Make your games run smoother
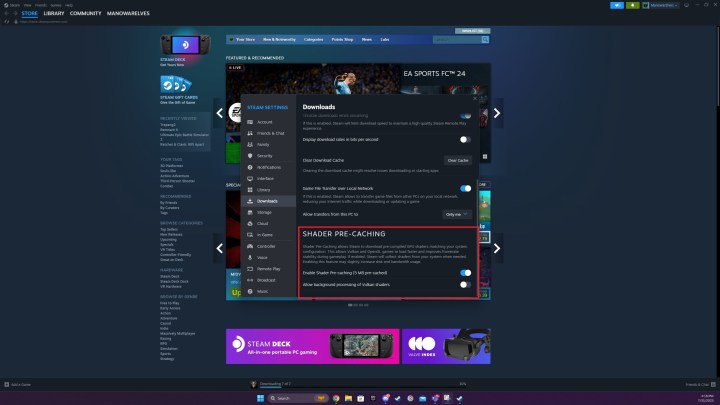
Steam includes a feature called Shader Pre-Caching, and I’d bet that most Steam users aren’t even aware of it. This feature allows Steam to find shaders for your current hardware configuration from similar configurations and automatically store them in the cache, usually only taking up a few megabytes of space on your hard drive.
Why would you want to do this? Whenever you start a new game, your CPU needs to prepare a bunch of shaders for your graphics card. These are basically tiny programs that tell your graphics card what to do. This only happens when you first start a game, though, which can lead to stuttering and long loading times as all of the shaders are gathered. The Shader Pre-Caching feature gathers them before you start the game and stores them in a cache so you can avoid the initial launch issues.
To enable it, select Steam and go to Settings. Scroll down to the Downloads tab and tick the Enable Shader Pre-caching option. After that, you’re good to go. Unfortunately, this feature only works with games that use Vulkan or OpenGL. DirectX shaders can’t be pre-compiled through Steam.
Launch in Big Picture
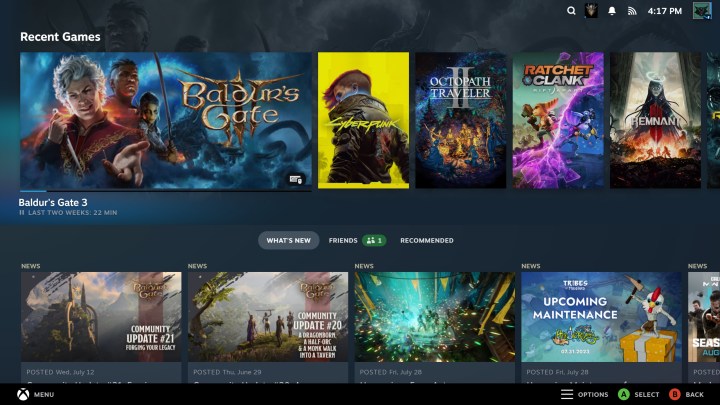
After launching the Steam Deck, Valve gave its Steam Big Picture mode a much-needed update. If you’re unfamiliar, Big Picture is a controller-based interface for Steam, and now, it basically looks identical to a Steam Deck. And if you primarily play with a controller, you can launch Steam into Big Picture mode automatically.
Select the Steam button in the top left corner and navigate to Settings. From there, select Interface and tick the box next to Start Steam in Big Picture mode. This is a great option to have, especially if you have your PC hooked up to a TV and don’t want to fuss around with a keyboard and mouse.
In this same menu, you can configure a bunch of other settings, as well, such as the default location that Steam starts — it normally loads you into the store — and the tabs you want to see at the top of the Steam interface.
Get disappointed in your life

OK, this isn’t a feature of Steam itself, but it is a cool feature that’s enabled by Steam. Steam has an open API, and there’s a ton of data that Steam tracks that you’ll never see in the standard interface. Thankfully, you can access almost all of it through SteamDB.
SteamDB is the unofficial database for everything on Steam. It shows you build IDs, player counts, price history, updates — the list goes on and on. It even tracks sales for games, and if you sign in, you can set up filters and be notified when certain games drop to a price you set.
But, out of all the features SteamDB offers, the best is undoubtedly the Steam Calculator. Enter your Steam profile URL or Steam ID (the number you can find at the end of your Steam profile URL), and click the Get disappointed in your life button to see the value of your Steam library. It shows you the number of games in your library, how much they’re worth at their lowest and highest prices, your average playtime per game, and the amount of money you’ve spent per hour of playtime, among a dozen other metrics.
There are enough features in SteamDB for its own article. We only scratched the surface, but if you’re a staunch PC gamer that plays most of their games on Steam, it’s definitely a great resource to be aware of.


