
$12 on Hulu. $17 on Max. $14 on Disney+. $23 on — wait, twenty-three dollars?! — on Netflix. I’m not the only one who’s reluctantly pulled up a bank statement to see the revolving door of streaming subscriptions slowly draining my account. I have a massive collection of Blu-rays, a treasure trove of digital movies and TV shows, and even more box sets than I care to count. And yet, I’ve been spending anywhere from $50 to $100 each month to watch that same content, all so I don’t have to get off my lazy butt and pop in a disc.
I decided to finally do something about it by building a Plex server.
Plex has been around for years, and I’ve dabbled with it in the past. But this time, I wanted to go all out. I wanted to build a streaming library of movies and TV shows I already own, easily add to that library, and stream from it anywhere I wanted. And ideally, I wanted to do all of this without getting another desk to set up a PC that I would rarely ever interact with. I wanted to front-load the work so I could sit down at any device, load up the Plex app, and stream what I wanted.
After plenty of legwork, I achieved what I set out to do. I’ve canceled Netflix and Hulu, at least, and my Crunchyroll subscription is on its way out the door. I can’t completely give up on streaming, but since setting up my Plex server properly, it’s the only app I’ve loaded up when I sit down to relax.
What we’re not covering

I’m not covering the basics of how to set up Plex here. We have an extremely detailed guide on how to use Plex Media Server, and if you’re a complete beginner, I suggest keeping that bookmarked. I’m focusing on what I found to be the simplest, most cost-effective way to build a Plex server that you don’t need to constantly keep tabs on, and that you can use to stream from anywhere with any device.
The second thing I’m not covering is how you get your media. The proper way to do it is to rip your physical media with a disc drive and software like MakeMKV, but as long as you have a file in one of Plex’s support file types, it’ll stream. I’ll let you figure out how to go about getting those files. And we’re not even scratching the surface of all the free, ad-supported live channels available on Plex.
I also need to add a disclaimer. There are a lot of ways to set up a Plex server, and proper server hardware and technical know-how will ensure reliability and security. Think of this as the poor man’s Plex server. It’ll work for personal purposes, but keep in mind that the way I went about it is only one of many possible ways to set up a Plex server. If you have the money to spare, building a massive NAS with a bunch of drives and a powerful CPU is the way to go — I just don’t think that’s practical for most personal streaming purposes.
The brains of the operation

You might be dissuaded by the idea of a Plex “server,” but don’t worry. A server isn’t defined by hardware. It’s defined by software. All you need is a PC with a CPU powerful enough for transcoding. There are a ton of options, from office clearance sales where you can score a deal on a mini PC all the way up to a custom tower. I chose a with an Intel N100, 16GB of memory, and 500GB of storage, which ran me about $120. If you want something more powerful, you can get something like the for $400, but you really don’t need to invest that much.
Transcoding support is important if you want to access your server outside of your local network. Plex will try to directly play media files from your server on your local network. But outside your network it’ll need to transcode those files. In addition, Plex will sometimes “burn-in” subtitle tracks, which requires transcoding, as well.
After you have a PC to run your server, you need to make a choice — Linux or Windows? Plex is available for both, and Linux is undoubtedly the ideal option. But unless you’re familiar with SSH and generally getting around Linux, I’d recommend Windows. The Windows 11 installation you find on most off-the-shelf mini-PCs is fine, but I chose to flash an image of Tiny11 to make the OS a bit more efficient. It’s just Windows 11 with some of the extras disabled.
The main reason I recommend Windows for most people is remote management. The goal with this Plex server is to run it “headless,” meaning we never need to hook up a keyboard, mouse, or monitor after initially setting it up. Even after going through two power outages, I haven’t had to do that.
Going headless

There are a ton of ways to remotely manage a PC. But the easiest and most convenient is Chrome Remote Desktop. It runs from your browser, you don’t need to manually configure each device that wants to remotely connect, and it’s tied to your Google account. To get started, hook everything up to your mini PC, install Chrome, and sign into your Google account.
Head to the remote desktop website (linked above) and select the download button on your server. It will download an .msi file. Run it, and then return back to your browser. Give your server a name, set a PIN number you can easily remember, and choose Start. Before unhooking everything, use another PC to sign into your Google account and go to the Chrome Remote Desktop page to test that you can access your server remotely.
You’re not done quite yet. Windows 11 requires a login, and Chrome Remote Desktop won’t start unless you’re logged in. That means if your server goes down for any reason, you’ll have to unhook it and reconnect all of your peripherals just to sign in again. Thankfully, there’s a way to bypass the Windows login screen so you don’t need to sign back in.

On your server, search for and open the Registry Editor. Head to the following path:
HKEY_LOCAL_MACHINE\SOFTWARE\Microsoft\Windows NT\CurrentVersion\PasswordLess\Device.
There, find the DevicePasswordLessBuildVersion entry, right-click it, and choose Modify. Change the Value data field to 0. Restart your server, and once you’re back in Windows, open the Settings app and head to Accounts. Choose Sign-in options and uncheck the For improved security, only allow Windows Hello sign-in for Microsoft accounts on this device option. Only one more step.
Finally, use the Windows + R combination to open the Run utility and enter netplwiz. In the window that opens, uncheck the Users must enter a user name and password to use this computer option and hit Apply. You’ll be asked to enter your password, and then you’re done.
This will load directly into Windows when you restart your server. This is not safe at all. It flies in the face of proper cybersecurity practices, so I’d strongly recommend setting the password on your server to something completely different from any other PC or account. Ideally, you’ll also set up your server without a Microsoft account — just a local account — to avoid your Microsoft account potentially being exposed. You can bypass the requirement for a Microsoft account during setup — we have a guide just for that.

Finally, you need to configure your server to stay live at all times. It’ll put itself to sleep by default. Open up the Control Panel — never thought you’d break that back out, did you? — and head to System and Security. Choose Power options and then Change plan settings next to your selected power plan. Finally, select Change advanced power settings.
Expand the Sleep tab. There are four options here. Turn Allow hybrid sleep to off, and set both Sleep after and Hibernate after to 0. That’ll make it so your PC never sleeps or hibernates unless you tell it to.
It’s a lot of setup, but this will make it so your Plex server is always live. You’ll rarely have to use Chrome Remote Desktop, and you certainly won’t have to break out a keyboard and mouse. At this point, you can install and set up Plex on your server, but I did one more thing before setting up my server.
Mapping the network
Media files are big, so you probably aren’t going to store everything directly on your server. I’m using an 8TB external hard drive, but any external storage works so long as you have enough space. Plug it into your server, set up your Plex folders there, and you’re off to the races. The problem comes up when you want to transfer new files to your Plex server. You can use some other form of portable storage and manually copy over your files using Chrome Remote Desktop, but that will wear down your hard drive. And let’s be honest — it’s just a pain in the butt.
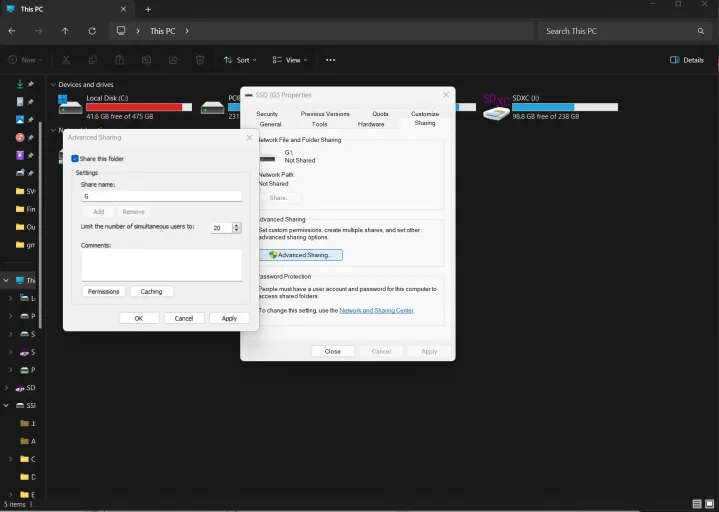
Thankfully, you don’t have to manually transfer your files. You just need to make your server library available on your network. On your server, head to My PC in File Explorer and right-click whatever drive you plan to set up your Plex server on. Select Properties and head to the Sharing tab. Then, choose Advanced sharing. In the window that opens, check the Share this folder box and give the drive a name — I just chose “Plex.” I also limited the number of simultaneous users to 2. Click Apply, then OK, and close the window.
Back in the properties window, you’ll now see a network path — the name of your PC (however Windows sees it) and the name you gave your drive. Copy to this path down somewhere.

On whatever PC you’ll be using to get your media files together, open My PC and select the ellipsis in the toolbar. Then, choose Map network drive. In the window that opens, give the drive a letter and enter the network path of your shared drive exactly as it appeared on your server, including the dashes and capitalization. It should look something like what you see above. Select Finish, enter the username and password of your server, and you’re good to go. You’ll now be able to access your drive from another PC.
Finishing touches

At this point, you can disconnect your server and you shouldn’t have to ever reconnect it to a monitor again if you followed along here. Make sure to connect the server directly to your router with an Ethernet cable — if you don’t have a spare port, you can pick up — and power it on. If all went correctly, you can connect via Chrome Remote Desktop to set up Plex properly, importing your media, creating libraries, and assigning all of the proper metadata.
The Plex-specific thing you need to do is enable remote access so you can access your library away from your home network. You can do all of this without spending any money on Plex, though I highly recommend a Plex Pass subscription. It’s $5 a month, but the real trick is to wait for a deal on a lifetime pass. You can usually score it for under $100, and it opens up hardware transcoding, HDR tone mapping, downloads, and features like the ability to skip intros and credits.
I’ve been using my Plex server for a few months, and I’ve rarely touched another streaming app. It’s quickly become the only way I watch movies, TV shows, and anime. It’s a lot of work to get your Plex server set up in this way, but once it’s done, the experience is seamless.
I don’t want to pretend like this solution is perfect. As mentioned, there are security concerns if someone can physically get access to your server, and using an external hard drive isn’t the most reliable way to store a large library. This is a good starting point, though, and you can easily invest some time in learning SSH and setting up a RAID array if you want better security and reliably down the road.


