
When we say “pop-ups,” we bet one of the first thoughts that comes to mind are those aggressive mini-windows that take up precious screen real estate when you’re trying to browse a site. That is definitely one kind of pop-up, but what if we told you that not all pop-ups are nuisances? Notifications from your favorite websites might be the kind of thing you don’t want to miss; and technically, these are pop-ups!
So is there a way to disable some pop-ups on a Mac, without affecting the instant windows you actually want to see? Yes there is! These settings are located right in macOS, and it doesn’t take long to learn how to use them.
Enable pop-ups on Safari
The default browser on your Mac makes managing pop-ups very simple. Here’s what to do:
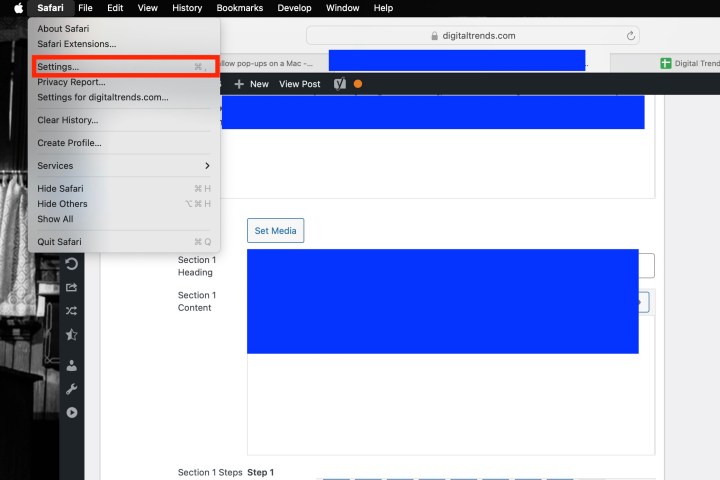
Step 1: With Safari active, click Safari located in the top-left corner, followed by Settings in the resulting drop-down menu.
Step 2: In a pop-up window, click the Websites tab at the top, followed by the Pop-up Windows entry on the left.
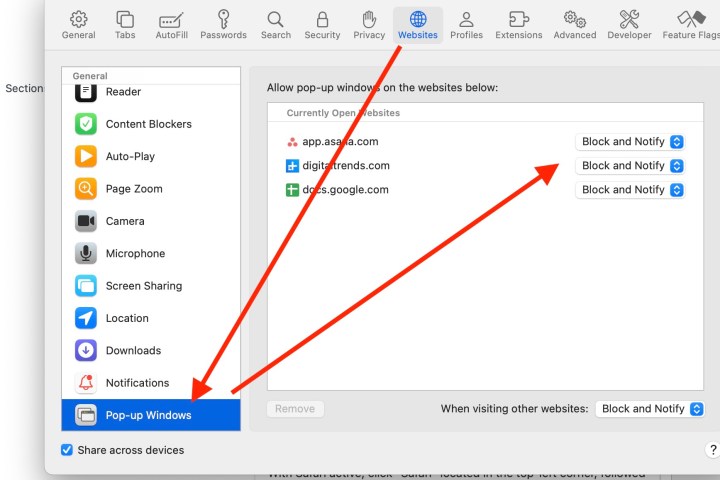
Step 3: To enable pop-ups on a specific website, click the drop-down menu next to the website’s name and click Allow. If you want to allow pop-ups on all websites, select Allow on the drop-down menu next to When Visiting Other Websites located at the bottom.
Step 4: Finally, when Safari actively blocks a pop-up, a little notification appears in the browser’s address bar to let you know it happened. If you need this pop-up to enable a feature, then you can quickly retrieve it. Just click on the notification, and Safari will give you an option to view the pop-up.
It’s not a great way to manage pop-ups in general, but it is useful if you occasionally view a pop-up but don’t want to change any of your settings permanently.

Enable pop-ups on Firefox
Firefox is also a very common browser choice for Mac users, even more so since its Quantum revamp. If you use Firefox, take a look at how you can enable pop-ups within Mozilla’s popular browser:
Step 1: While in a Firefox window, select Firefox in the top-left corner, followed by Settings in the resulting drop-down menu.
Step 2: In the new Settings tab, click Privacy & Security listed on the left, and scroll down to the Permissions section.
Step 3: Uncheck the box next to Block Pop-Up Windows to enable pop-ups for all websites.
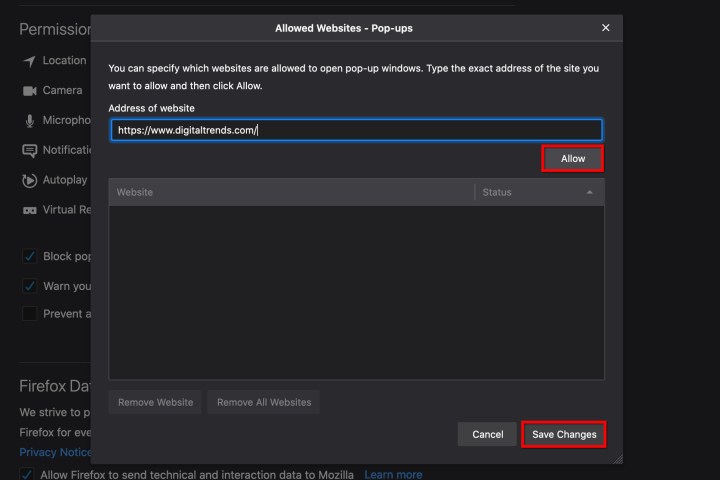
Step 4: If you don’t want to enable all pop-ups, use the Exceptions button instead. This opens a new window where you can manually enter the website’s address — use the copy/paste method — and click the Allow and Save Changes buttons. You can add as many websites as you want to your exceptions, and remove them as needed when you are done.
Enable pop-ups on Chrome
Chrome is a popular browser for Android and Mac owners alike. The steps illustrated below explains how Chrome manages pop-ups and how you can deal with them manually.
Step 1: With a Chrome browser window open, click Chrome listed in the top-left corner, followed by Settings on the resulting drop-down menu.
Step 2: A new Settings tab opens. To the right, you should see a list of options, with Privacy and Security among them. Click on it.
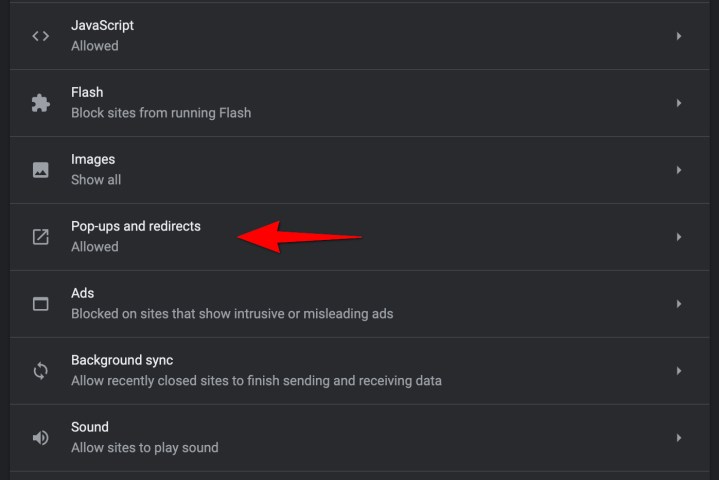
Step 3: Select Site Settings, scroll down, and click Pop-Ups and Redirects. You’ll see a new page with an option to toggle between Blocked (Recommended) and Allowed. Switch to Allowed to enable all pop-ups.
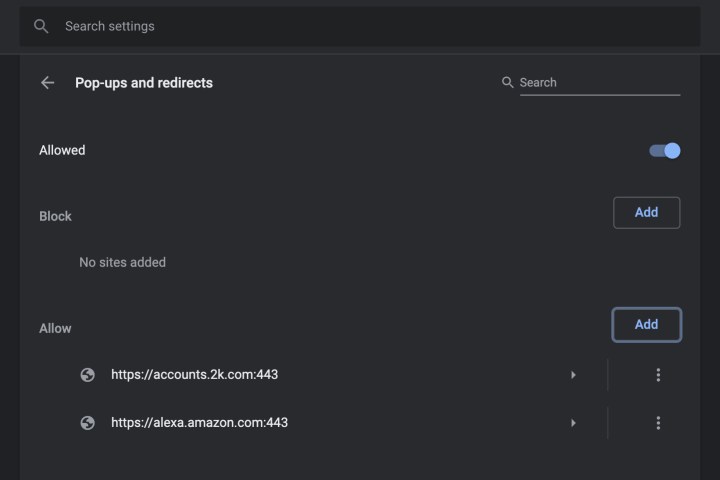
Step 4: Under Allow, you can manually add individual sites to the pop-up Allow list. This works well if you have another list of allowed sites that you can copy and paste into Chrome and save.
Step 5: You also have an option to automatically allow pop-ups from any site you visit in Chrome. When a page in Chrome blocks pop-ups, you will see a small icon in the address bar called Pop Up Blocked, which looks like a window with an X on it. You can click this icon to allow the pop-up or choose to allow pop-ups from that particular site.
Note: You can also access the pop-up settings by entering chrome://settings/content/popups in the address bar.
What about third-party apps?
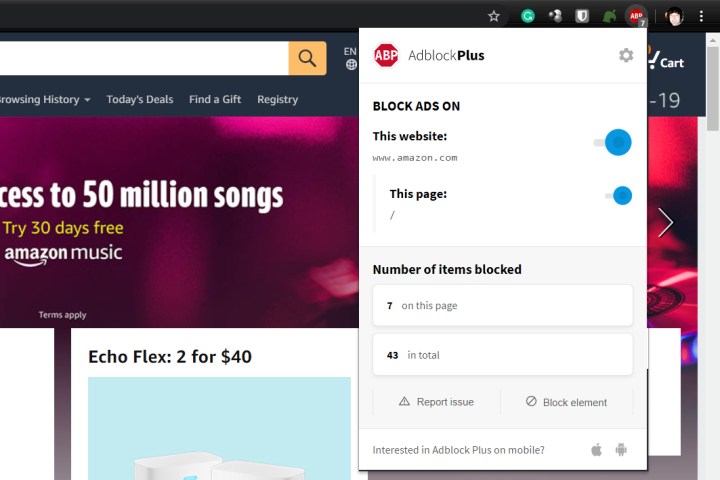
Third-party ad-blocking apps like Adblock Plus get rid of ads and pop-ups. As you can see in the image, external apps provide a visual indicator of the present number of ads they have blocked.
However, you may need to enable pop-up windows in these apps as well, as they may incorrectly identify and block innocent pop-ups. When you visit a site where you need pop-ups, click on the AdBlock icon and find a way to add the site to your whitelist, or disable the block for that specific site. You should keep this in mind when using these third-party apps as the majority of them possess this capability.
Can pop-ups harm my Mac?
We all see pop-ups on our computers. As outlined in this article, not all of these notifications are malicious, but some definitely are. For the most part, the pop-up itself isn’t dangerous, unless you click on it. If the pop-up is designed to load malware and other harmful viruses onto your PC, in most cases, a click is all it takes to begin the sabotage.
Luckily, pop-ups have been around for a minute, so users are getting very good at detecting the malarky. If you have a gut feeling that you’ve been receiving phony macOS notifications, we recommend visiting Apple’s numerous support pages on this topic.


