You would think that connecting a computer to a TV is rather straightforward: You just grab an HDMI cable and tether the two together, right? But what if a PC doesn’t have an HDMI port? This guide shows how to connect your computer to a TV on the three major PC platforms — Windows 10, MacOS, and Chrome OS — with several wired and wireless methods.
Windows 10
HDMI
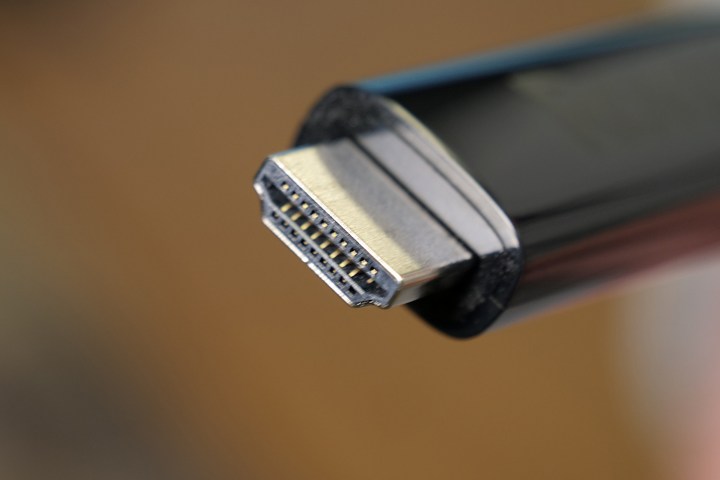
All modern desktop displays and TVs have HDMI ports. In most cases, there is more than one in a panel on the back and/or along the side. Most desktops and a good number of laptops also offer this connection option, making it one of the simplest ways to connect your computer to a TV — especially considering it handles both video and audio with just the one cable.
Two smaller variants of this interface still used today are Mini HDMI and Micro HDMI.
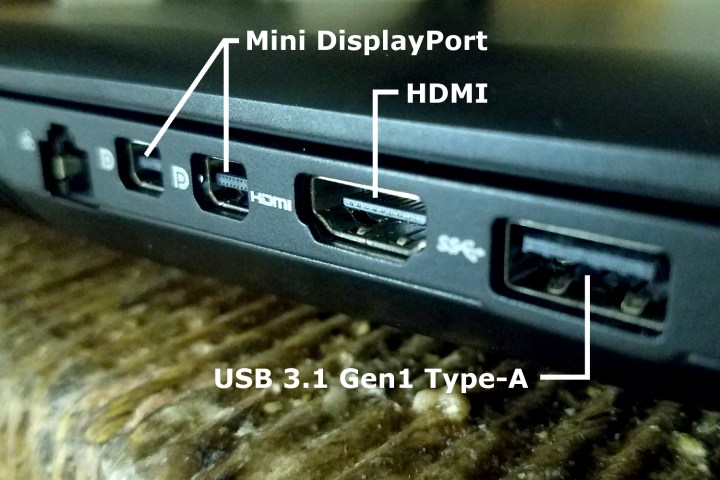
To tether the two devices, connect one end of a male-to-male HDMI cable to a port on the TV and the other end to a port on the PC. Windows 10 will then recognize the TV as an external display, which can be verified by right-clicking on the desktop and selecting Display Settings on the pop-up menu.

To view the Windows 10 desktop on a TV, just grab the remote and cycle through the connections until the PC’s desktop appears.
If the view looks wonky, do the following:
Step 1: Right-click on the desktop and select Display Settings on the pop-up menu.
Step 2: Select the TV in the diagram. The primary display should read as “one” and the TV as “two” — or something higher if more than two displays are connected.
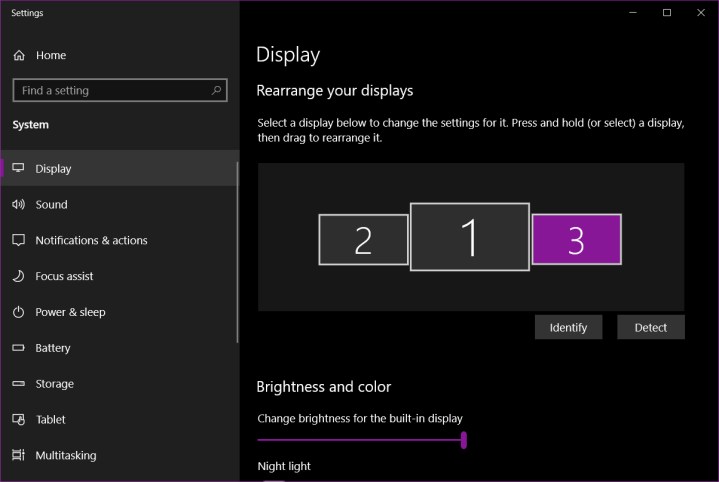
Here, the output display resolution, orientation, and scaling can be changed. If needed, change the refresh rate, too. Here’s how:
Step 1: While still on the Display panel with the TV selected, scroll down and click Advanced Display Settings.
Step 2: In the following window, click Display Adapter Properties for Display # — change the symbol to the TV’s designated number.

Step 3: Click the List All Modes button in a pop-up window.
Step 4: Select a refresh rate and click the OK button.
DisplayPort

Most desktop PCs with dedicated graphics cards come with at least one DisplayPort connector, though it’s less common on laptops. Some have the altered mini-DisplayPort adapter. Unfortunately, TVs typically don’t have DisplayPort connectors — they’re mostly reserved for desktop monitors.
In this case, a DisplayPort to HDMI male-to-male cable is required, or you’ll need an adapter with a DisplayPort male end and an HDMI port female end. In both cases, the PC connects to the TV just as it would with an HDMI connection.
Windows 10 should detect the TV as an external display and offer it as an extended or duplicated display, based on your preferences.
USB-C

Modern PCs without an HDMI or DisplayPort connector often have an alternative option in the form of USB-C. Keep in mind that not all USB-C ports support video output — it’s just an interface that doesn’t promise any other technology outside USB 3.2 connectivity. Check the PC’s specifications before assuming its USB-C port supports HDMI and DisplayPort output.

In this case, a male-to-male cable with USB-C at one end and HDMI on the other end is required. A USB-C adapter with a USB-C male end and an HDMI female end will also work.
As with a standard HDMI connection, Windows 10 should detect the TV as an external display.
USB-A
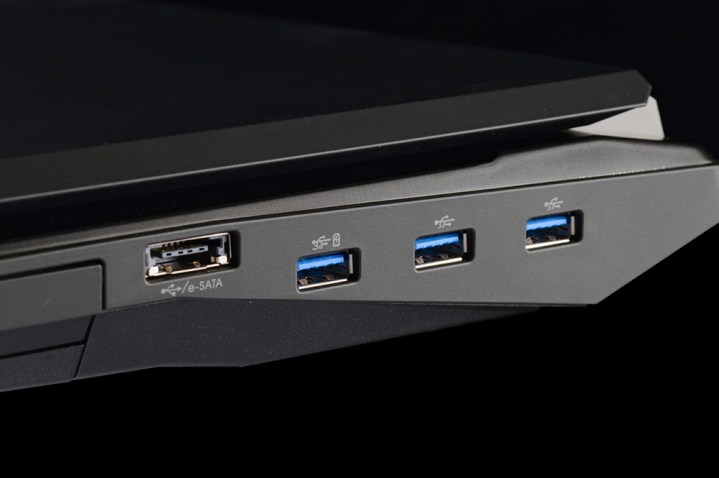
This port was really never meant to push video. Unlike DisplayPort and HDMI, it requires third-party DisplayLink drivers. This method works best on blue USB ports (USB 3.0, USB 3.1), shown above, due to its speed. However, DisplayLink’s system requirements also list older USB 2.0 non-blue connections, which are slower.
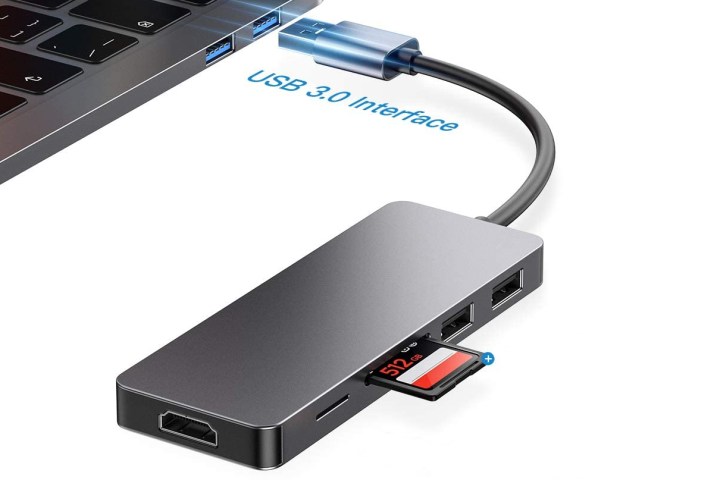
This method requires an adapter or dock with an HDMI port, like the one shown above by Mokai Start. Most automatically install DisplayLink drivers when they’re connected to a PC’s USB-A port. However, these drivers may be old, requiring users to download and install the latest directly from DisplayLink.
With the adapter or dock connected and the drivers installed, Windows 10 should discover the TV. Keep in mind that video output performance may vary because the PC depends on third-party software.
VGA and DVI

Short for Video Graphics Adapter, VGA first appeared in 1987 and only supports analog video signals. It’s far from versatile, but it is usable in some cases. Use a male-to-male cable with VGA on one end and HDMI on the other, or use an adapter with a VGA male end and an HDMI female end. Mini-VGA is a smaller variant.

Digital Visual Interface, or DVI, is the next step up and is also still in use in some niche cases. There are seven variants of this interface, including DVI-I Single Link, DVI-I Dual Link, DVI-A, DVI-D Single Link, DVI-D Dual Link, Mini-DVI, and Micro-DVI. This makes buying the right adapter difficult, so check your PC’s specifications to determine the correct cable or adapter before making a purchase.
Miracast/Other streaming apps
Make sure the TV is compatible, turned on, and set to receive the PC’s broadcast. For instance, on an LG Smart TV with webOS, owners first must load the Device Connector app and select the PC option, followed by Screen Share and Miracast. This can also work with apps like Plex, PlayOn by Roku, TiVo Desktop software, and other various options. The instructions will vary a little bit for the app, although on the PC side the steps should largely be the same.
This method absolutely will not work if either device is on a wired connection.
Step 1: Click the square Notification icon next to the system clock in the lower right corner of the Windows home screen. This launches the Action Center.
Step 2: Click Expand at the bottom if only four tiles are visible.
Step 3: Click the Project tile. Its position can vary, but it will be there.

Step 4: Select Connect to a Wireless Display listed on the roll-out menu that appears on the right.

Step 5: Select the compatible TV on the list.
Step 6: Follow the instructions on the TV, if any.
Step 7: To end the broadcast, click Disconnect located on a toolbar shown at the top of the PC’s primary screen.

Note that this toolbar has a gear icon. Click it to find three optimizations: Gaming, Working, and Watching Videos. For the former, it reduces latency for the optimal framerate. The Watching Videos mode increases latency to reduce buffering, while the Working mode resides between the two.
To change the broadcast mode, do the following:
Step 1: Right-click on the desktop and select Display Settings on the pop-up menu.
Step 2: The Settings app appears on the screen. Select the TV in the diagram.
Step 3: Scroll down to Multiple Displays and click the down arrow to expand the selection.

Step 4: Choose a mode: Extend the desktop, duplicate the desktop, display only on the TV, or disconnect.
The resolution, scaling, and so on can be changed like any other display.
MacOS
Thunderbolt 3/USB-C

All modern Macs ranging from the MacBook Air to the Mac Pro rely on USB-C to connect external devices, whether it’s a peripheral, an external drive, or a display. They’re all backed by Thunderbolt 3 promising up to 40Gbps to handle all this data at once.
This method requires an adapter or cable to physically connect a Mac to a TV. However, what users purchase depends on the actual USB-C port.
The little tree symbol printed next to the port means it does not support Thunderbolt 3, but it does handle DisplayPort video output. The lightning icon means Thunderbolt 3 is included. Unfortunately, these symbols don’t always appear on the chassis, so check the specifications.
Once the Mac is connected to a TV, MacOS should detect it as an external display. To change the output mode, do the following:
Step 1: Click the System Preferences icon on the Dock. Alternatively, click the Apple logo in the top left corner and select System Preferences from the drop-down menu.
Step 2: Select Displays in the System Preferences window.

Step 3: Click the Arrangements tab.
Step 4: To mirror the primary display, click the box next to Mirror Displays. Otherwise, MacOS defaults to extended mode.

Note: Drag the white menu bar icon in the primary display’s thumbnail over to the TV screen to make the latter your primary display.
Mini DisplayPort

This port is found on older Macs. As shown above, it’s a rounded, box-shaped interface (save for slight angles in the bottom left and right corners). Some merely provide DisplayPort output, while others also include older Thunderbolt and Thunderbolt 2 connectivity.
As with USB-C, the printed lightning icon indicates Thunderbolt technology. Those without Thunderbolt have a square icon with a small line on each side.
This method requires a Mini Display Port to HDMI male-to-male cable or an adapter with a Mini DisplayPort male end and an HDMI female end. Once connected to a TV, MacOS will detect it as an external display.
If in doubt, Apple provides a list of ports that are available on all Macs, past and present.
Apple TV
This is Apple’s approach to mirroring or extending MacOS to a TV over a wireless connection. This requires an Apple TV device already connected to a TV’s HDMI port and signed in to an Apple account. This is the only solution for those who don’t have a TV that natively supports AirPlay 2.
To get started, enable AirPlay on the Apple TV device. Here’s how:

Step 1: Select the gray and silver Gear Tile on the home screen. This opens the Settings app.
Step 2: Select AirPlay and HomeKit on the following screen.

Step 3: Select AirPlay to turn it on if it isn’t already. A prompt asks for a local location and a name to identify it on other Apple devices.
Step 4: Select Allow Access to configure limitations, like creating a password and disabling nearby off-network AirPlay access.

Now the Mac can connect.
Step 1: Make sure the Mac and TV are connected to the same wireless network.
Step 2: On the Mac, click the icon next to the Wi-Fi icon on the menu bar. It resembles a screen with an up arrow at the bottom, as shown below.
Step 3: Select the target Apple TV device on the drop-down menu.

Step 4: Click the AirPlay Icon again to switch between two modes: Mirror the primary display or use the TV as a desktop extension.

Step 5: To disconnect, click the AirPlay Logo again and select Stop AirPlay on the drop-down menu.
AirPlay 2 TVs
This is a different strategic method to wirelessly copying or connecting MacOS to a television. These TVs possess built-in AirPlay 2, omitting the requirement of purchasing Apple’s expensive set-top box. Currently, they are only manufactured by LG, Samsung, Sony, and Vizio.
This process is basically identical, except the toggle function on AirPlay 2 is different on each television. For example, on Samsung TVs, we advise taking this route: Settings > General > Apple AirPlay Settings. After you do this, the TV should show up on the Mac’s AirPlay menu.
Chrome OS
If you want to use HDMI, you can utilize a male-to-male cable or an adapter. We suggest using a cord with an HDMI male connector on one end or an adapter with an HDMI female port on one end for USB-C and all other connectors.
After you’ve made a secure connection to both, the Chrome OS desktop should appear on the TV screen.
Sometimes you might want your TV screen to reflect your desktop screen instead of stretching it. Below, we’ve outlined a few simple steps that allow you to change the settings:
Step 1: Click the System Clock located in the bottom right corner.
Step 2: Click the Gear Icon on the pop-up menu to open the Chrome OS settings.
Step 3: Select Device listed on the left.
Step 4: Select Displays listed on the right.
You’ll see all possible options listed beneath each display. Double-check to pick the proper tab before making any adjustments:

- Rearrange the displays by dragging their icons.
- Check the box next to Mirror Built-In Display to echo the desktop to the TV.
- Change the scale of on-screen items.
- Change the sharpness of text and images (resolution).
- Change the orientation.
- Adjust the desktop boundaries on the current screen.

Chromecast
If your budget doesn’t allow you to fork over a bunch of much cash, you may want to contemplate using Chromecast, which comes at a much more affordable price compared to an Apple TV.
You might not realize it, but you probably already have Chromecast on your computer, using your username and Google account. Chrome OS is compatible with Chromecast, so it’s best to pair your Chrome OS and Chromecast for PC-TV connections.
While you can’t extend your desktop to your TV screen with Chromecast, you can reflect it by following the steps listed here:
Step 1: Click the System Clock in the bottom right corner.
Step 2: Click the Cast button on the pop-up menu.

Step 3: Select the Chromecast device that appears on the following menu.
Step 4: Select the desktop thumbnail on the following pop-up window and click the Share button.

To stop casting, take these steps:
Step 1: Click the System Clock in the bottom right corner.
Step 2: Click Stop at the top of the pop-up menu.

