Cookies are a convenient way to experience the parts of the internet you frequently visit. One can think of these non-edible artifacts as digital breadcrumbs for info you may not want to remember every time. But when your computer is tasked with remembering too many of these trail-markers, it can really slow down your machine. Regardless of the browser you’re using, it’s a good idea to clear your cookies every once in a while.
We’ve put together this guide to teach you how to clear cookies on Chrome, Firefox, Safari, Edge, and a few other browsers. We’ll also teach you about some system clean-up tools you can install to automate the organization of your PC or Mac.
Google Chrome
Google Chrome lets you easily delete cookies, control browsing data, and specify what sort of files it should accept or block.
Step 1: Click the three-dot Customize and Control icon located in the top-right corner.
Step 2: Select Settings in the drop-down menu.
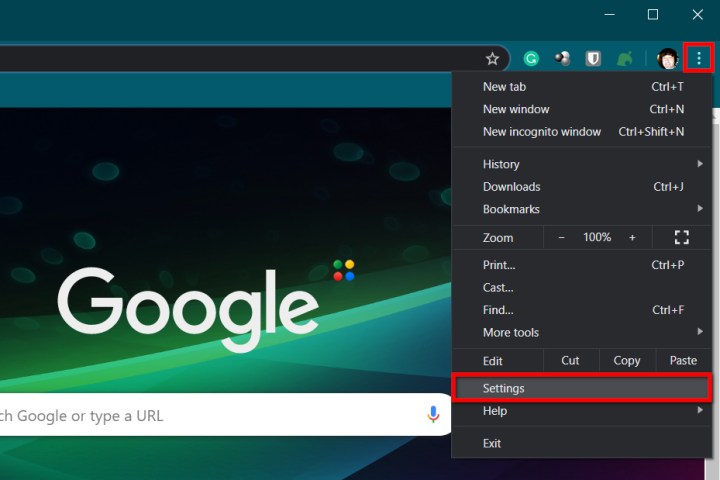
Step 3: A separate Settings tab opens in Chrome. Click Privacy and Security listed on the left to expand your options.
Step 4: Select Clear Browsing Data shown on the right.
You can also reach this setting by typing chrome://settings/clearBrowserData in the address bar.

Step 5: An in-browser pop-up appears with the Basic tab loaded by default. Here, you can delete your browsing history, cached images, and cookies, along with other site data. You can select a time range using the drop-down menu, then sign out from your Google Account to delete browsing data from the device you’re on.
You can also click the Advanced tab for additional features like clearing your download history, passwords, other sign-in data, autofill form data, site settings, and hosted app data.
Step 6: When ready, click the blue Clear Data button. If your Google account is synced to other devices, this step will clear cookies on those devices as well.
Step 7: To manage how cookies are saved and stored in the future, select the Site Settings option listed under Privacy and Security. Then, select Cookies and Site Data on the following page.
Note: You can also reach this setting by typing chrome://settings/content/cookies in the address bar.
Here, you’ll find options to disable all cookies, clear cookies when you close Chrome, and block third-party cookies. You can block and allow cookies from specific sites as well.
Chrome on Android or iOS
The steps are identical on iOS and Android devices, but the big difference you’ll see is the overall visual presentation. The screenshots provided below are from an iPad Pro:
Step 1: Tap the three-dot icon. It’s typically located in the top-right corner unless you’re viewing Chrome on a phone in portrait mode (bottom right).
Step 2: Tap the Settings option on the drop-down menu.
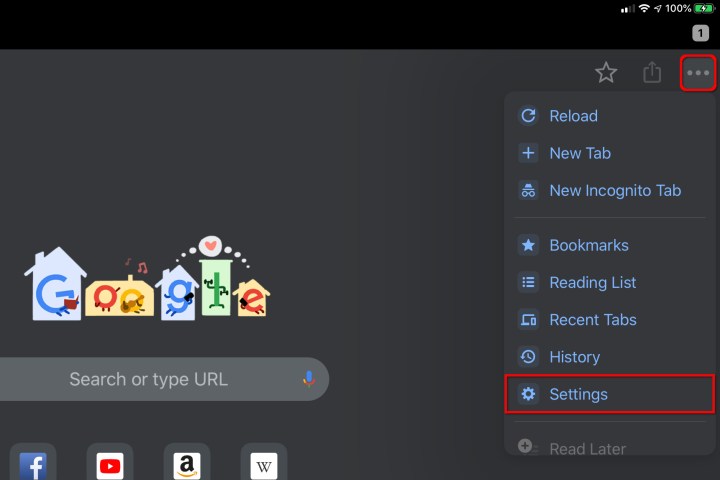
Step 3: Tap on Privacy on the following screen. Again, the presentation is visually different.
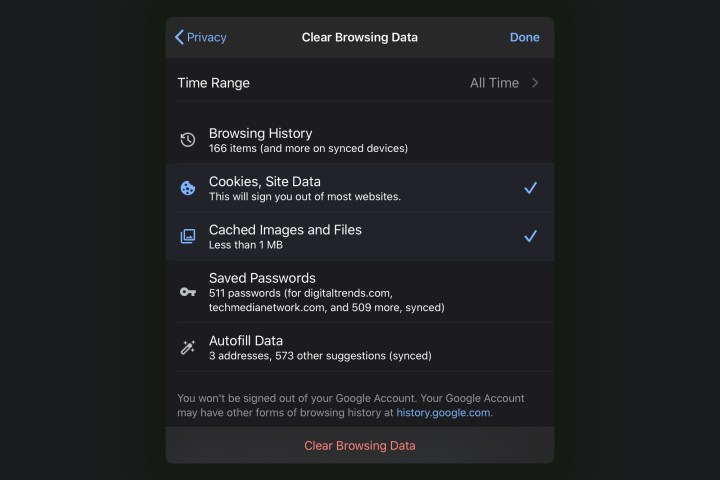
Step 4: Tap Clear Browsing Data. Then, tap Cookies and Site Data if it’s not already selected.
Step 5: Tap on Clear Browsing Data when ready.
There are also options for clearing your browser history and removing cached images and files.
Mozilla Firefox
The open-source browser has tons of add-ons and actually offers more options than Chrome when it comes to customizing these settings. Here’s how to clear out any cookies it’s storing:
Step 1: Click on the three-line Menu icon located in the top-right corner.
Step 2: Select Options on the drop-down menu.
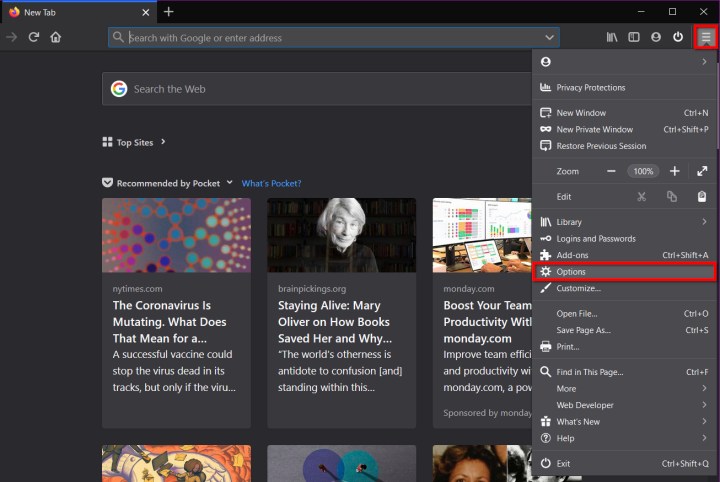
Step 3: The General category loads by default. Select Privacy and Security listed on the left.
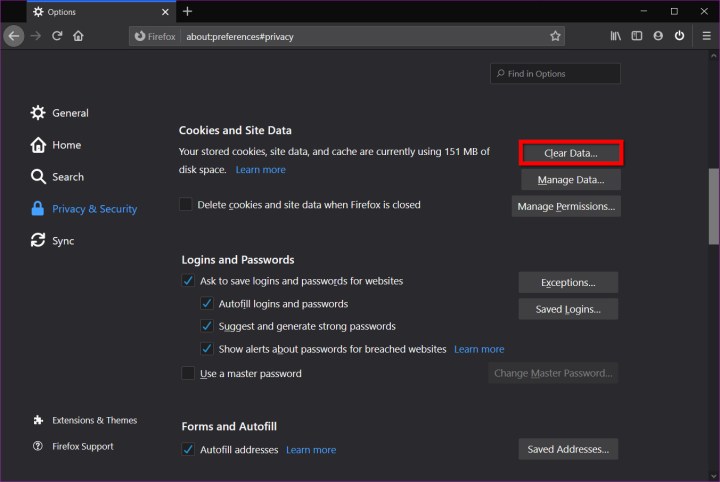
Step 4: Scroll down on the right to find Cookies and Site Data. Click the Clear Data button.
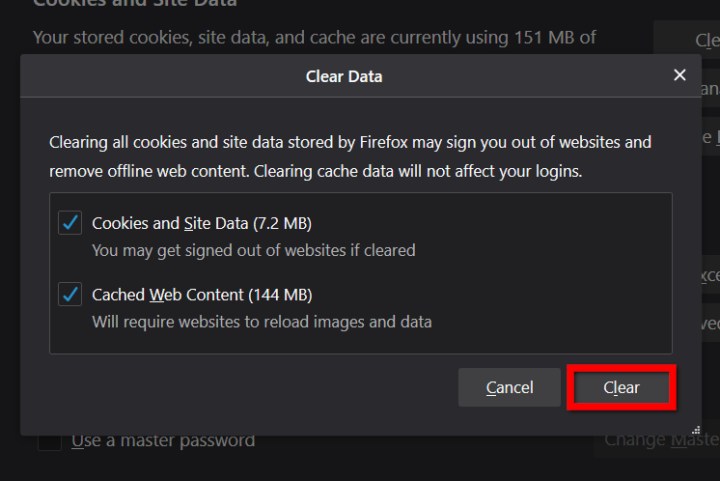
Step 5: A pop-up window appears. Make sure Cookies and Site Data is checked, and then click the Clear button.
Alternatively, you can click the Manage Data button rather than Clear Data. A pop-up window appears with a search field for locating a specific cookie and a list of all cookies stored on your device. You can click the Remove Selected button to delete a highlighted cookie or click the Remove All button to delete them all.
Finally, you can click the Manage Permissions button located under Cookies and Site Data to control whether individual cookies are blocked or allowed, respectively.
Firefox on iOS and TabletOS
Step 1: Tap the three-line Hamburger icon.
Step 2: Tap Settings on the pop-up (or drop-down) menu.
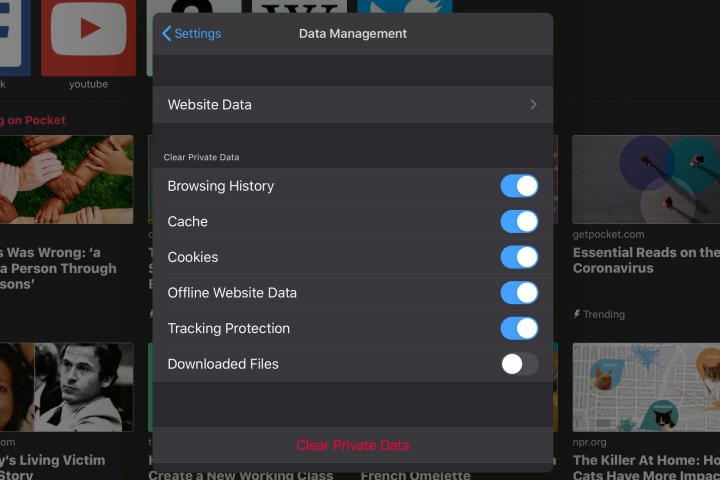
Step 3: On phones, scroll down to Privacy and tap Data Management. On tablets, tap Data Management listed under Privacy in a pop-up window.
Step 4: Under Clear Private Data, make sure Cookies is toggled on, and then tap the red Clear Private Data button.
Firefox on Android
Step 1: Tap the three-line Hamburger icon.
Step 2: Tap the Settings option on the pop-up (or drop-down) menu.
Step 3: Tap on Clear Private Data.
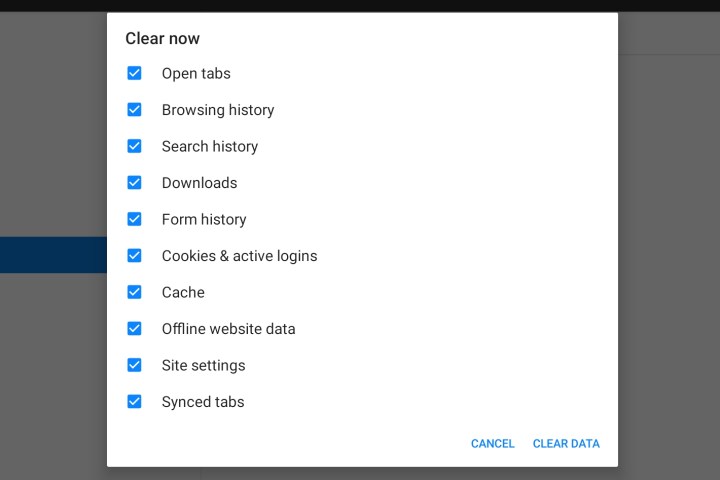
Step 4: A pop-up window appears. Make sure the Cookies and Active Logins option is checked and then tap Clear Data.
Safari
Unlike Chrome and Firefox, Safari only stores cookies from websites you visit. Nevertheless, Safari lets you easily change these settings. Since Apple discontinued the Windows version, our instructions focus on the macOS and mobile versions.
Step 1: With Safari open, click Safari listed next to the Apple icon on the menu bar.
Step 2: Select Clear History on the drop-down menu.
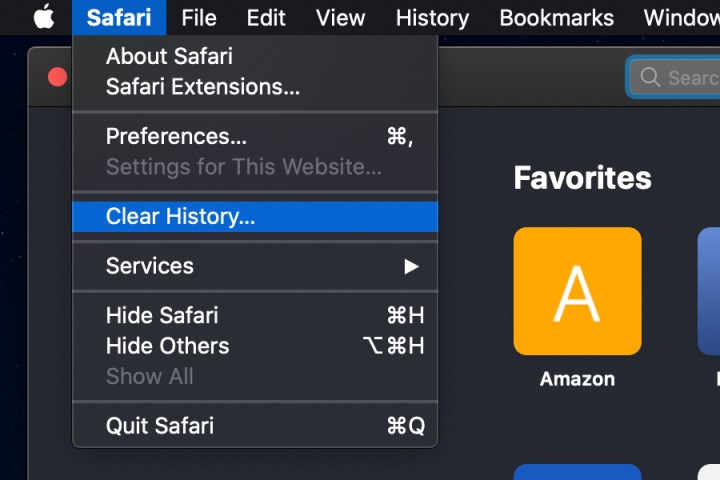
Step 3: A pop-up window appears with four options in a drop-down menu: The Last Hour, Today, Today and Yesterday, and All History. Select an option, and click the Clear History button.

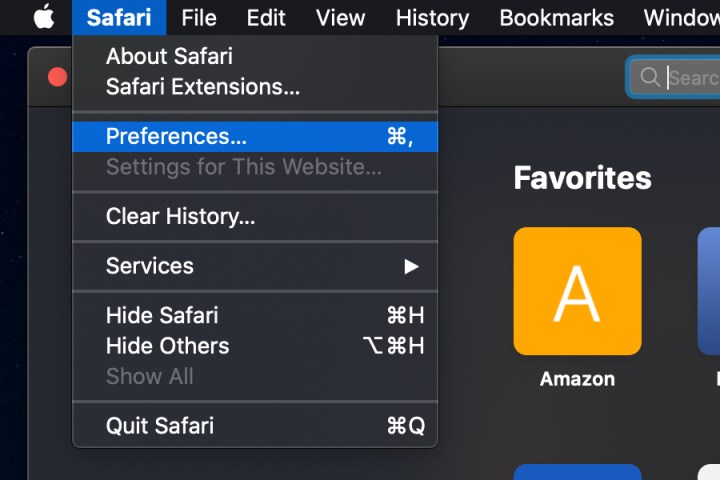
Step 4: If you prefer to have more control over what is deleted, with Safari open, click Safari listed next to the Apple icon on the menu bar. Then select Preferences on the drop-down menu. A pop-up window appears. Click the Privacy tab.
Here, you can use Block All Cookies to remove everything in one fell swoop. Alternatively, click the Manage Website Data button to see a list of each cookie stored in the browser, which you can then remove individually.
Safari’s options for filtering cookies are limited. You can, however, have Safari block cross-site tracking.
Safari on iOS and iPadOS
Step 1: Open Settings.
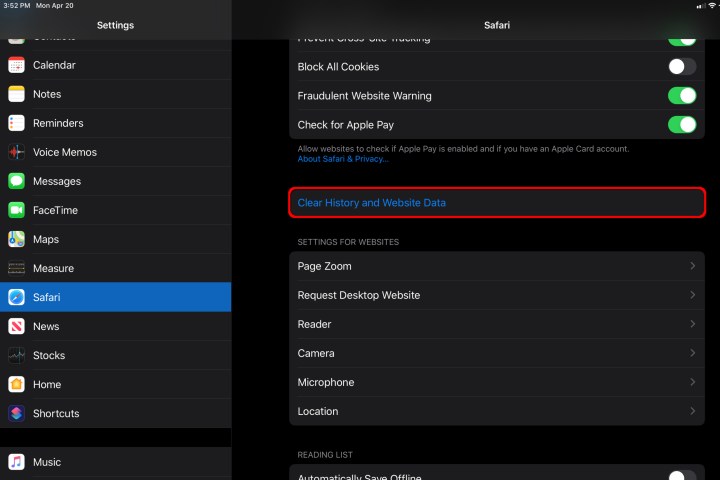
Step 2: On iPadOS, scroll down on the left-hand menu and tap Safari. Simply scroll down and tap Safari on iOS devices.
Step 3: To delete all cookies, tap Clear History and Website Data.
Step 4: To delete a specific cookie, start by opening Settings. For iPadOS, scroll down on the left-hand menu and tap Safari. Simply scroll down and tap Safari on iOS devices. Then, scroll down and tap Advanced.
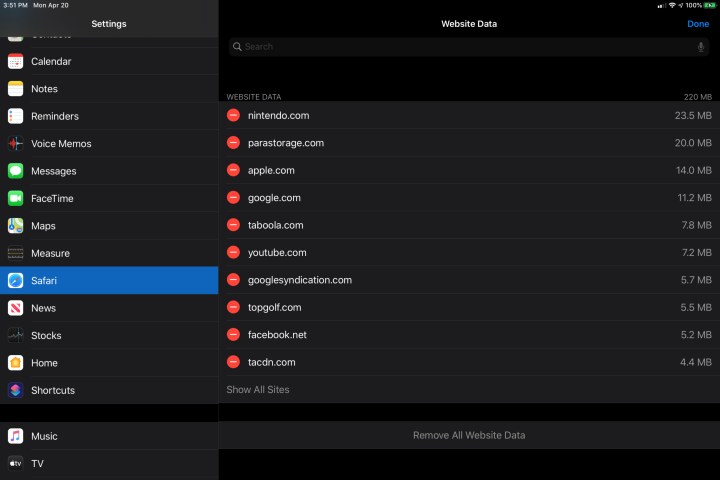
Step 5: Tap Website Data. A list of all websites appears on your screen. Tap the Edit button. Tap the red Minus button next to each site you want to remove and delete. Tap Done to complete.
Microsoft Edge (Non-Chromium)
Edge is Microsoft’s latest browser integrated into Windows 1q. Here’s how to alter its cookie settings and wipe out any existing ones:
Step 1: Click on the three-dot Settings icon in the top-right corner.
Step 2: Click the Settings option on the drop-down menu.
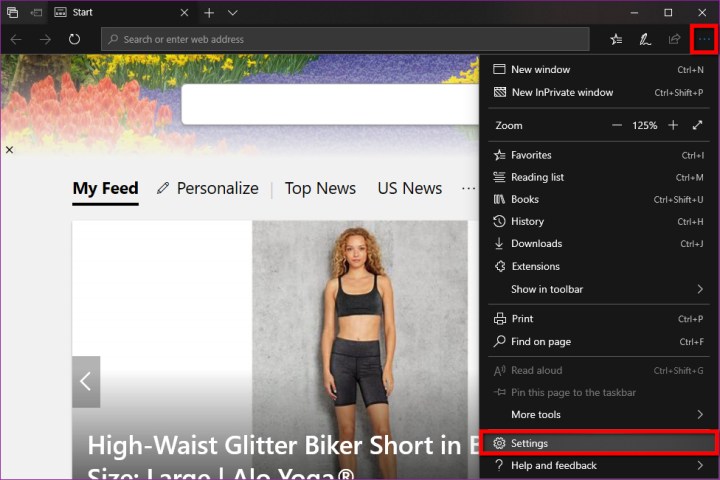
Step 3: The General category opens by default. Click Privacy & Security on the roll-out menu.
Step 4: Click the Choose What to Clear button.
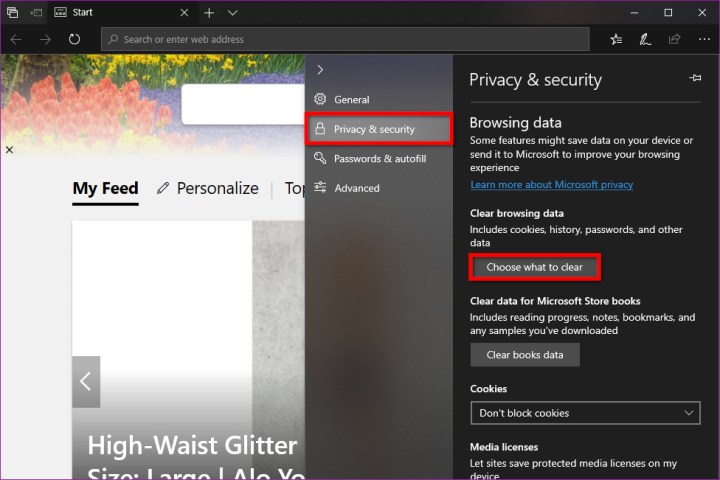
Step 5: Make sure Cookies and Saved Website Data is ticked and then click the Clear button.

Step 6: To manage how Edge handles cookies, scroll down the Privacy and Security panel to locate Cookies. The associated drop-down menu provides three options: Don’t Block Cookies (default), Block on Third-Party Cookies, and Block All Cookies.
Within the Choose What to Clear menu, you also have the option to clear cookies every time you leave the browser, using the toggle option under the Clear button.
Opera
Although the Opera browser is based on the same foundation used by Google Chrome, getting to the browser’s cookie options has a slightly different process:
Step 1: Click on the red Opera logo in the top-left corner.
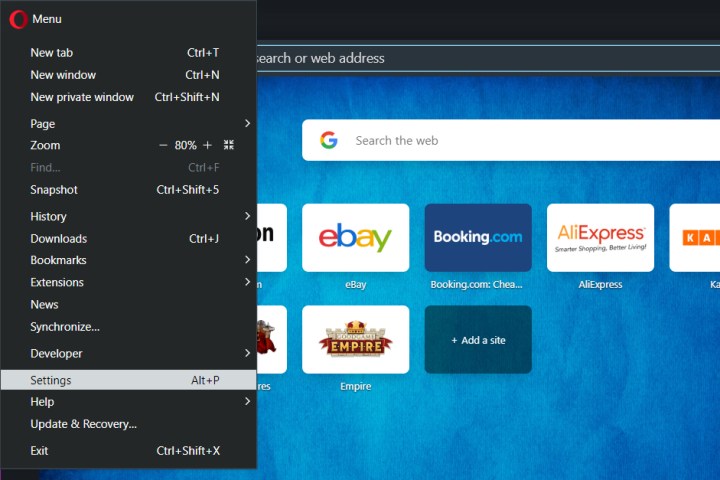
Step 2: Select Settings on the drop-down menu.
Step 3: A new tab opens. Click Advanced on the menu, followed by Privacy and Security.
Step 4: Select the Clear Browsing Data section.

Step 5: An in-browser pop-up appears with the Basic tab loaded by default. Here, you can delete your browsing history, cached images, and cookies, along with other site data. Select a time range using the drop-down menu.
You can also click the Advanced tab for additional features like clearing your download history, passwords, other sign-in data, autofill form data, site settings, and hosted app data.
Click the Clear Data button when complete.

Step 6: To manage how Opera handles cookies, do the following, click on the red Opera logo in the top-left corner. Select Settings on the drop-down menu. Then, click Advanced > Privacy and Security > Site Settings.

Step 7: Select the Cookies and Site Data section on the following page. Here, you can decide whether you want to block cookies, delete them at regular intervals, or allow them entirely.
Apps and plugins: CCleaner
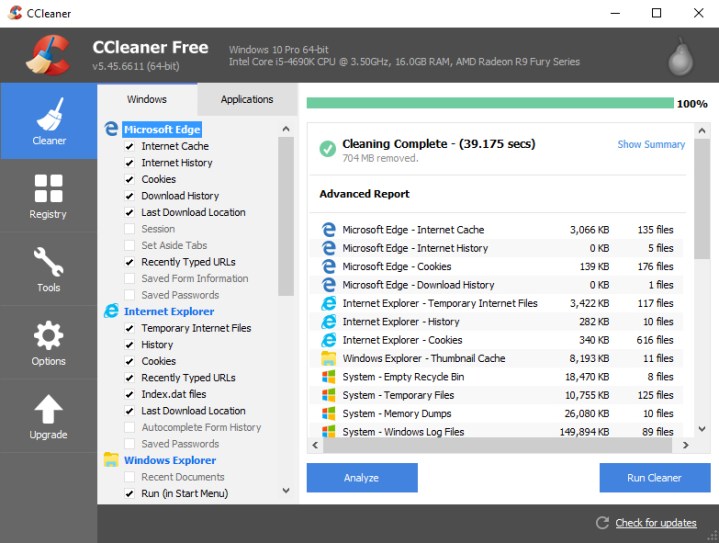
Free to download, CCleaner is a vital tool used to help your computer get rid of those extra files generated due to browsing the web and other applications. CCleaner doesn’t just clean cookies within one particular browser; it’s a web browser that can clean cookies across the board.
Users have other options if they’re looking for a deep clean. CCleaner offers a Pro version of its software for just $30 a year. This paid version is a great way to automate cleaning by setting times for your computer to conduct a deep cleaning. It also notifies you constantly of any cyber threats or privacy breaches as they are happening. These paid features are worth the investment because they add steadfast protection for your home or office, ensuring your privacy for all types of activity.
Apps and plugins: Cookie AutoDelete
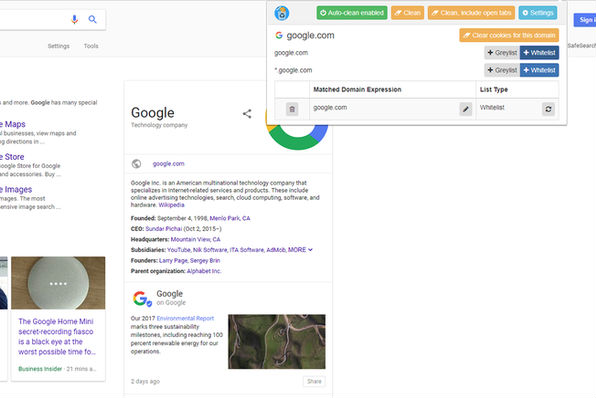
Cookie AutoDelete will eliminate cookies whenever you close out your browser, so you don’t have to worry about doing it yourself. You can also remove cookies from a domain and create white and gray lists that you may want to allow and share. The developer maintains a database so you can check each cookie for more information.
You can install Cookie AutoDelete on Google Chrome and Mozilla Firefox. Its compatibility with both browsers earns it our top pick for cookie management apps on the market.
Apps and plugins: Onyx
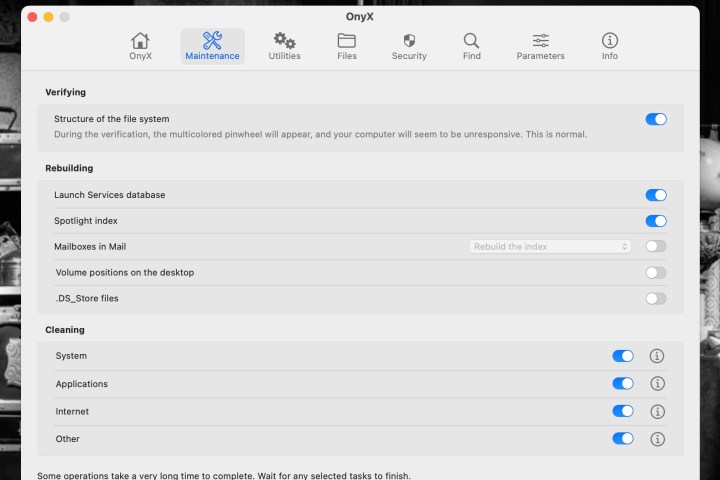
Onyx is a fantastic system clean-up tool made exclusively for macOS products. It’s free to download and doesn’t take long to get up and running. When you open the app, you’ll see tabs for Maintenance, Utilities, Files, Security, and a few other options. Clicking one of these categories will bring you to that respective tab’s settings dashboard. From here, you’ll be able to fine-tune exactly how Onyx goes about sweeping up digital debris.
Under Maintenance, we recommend clicking the Info icon next to Internet. This will take you to a sub-menu, where you’ll be able to toggle on the ability to clear cookies and other site data (which is toggled off by default).


