The recent influx of OLED and mini-LED displays on external monitors and laptops has finally made HDR (High Dynamic Range) more viable on PCs. Indeed, Windows 11 saw a big HDR push when it launched, and Microsoft has been improving it with updates and new settings to play with ever since.
Learning how to use HDR in Windows 11 is more than just turning it on — though that’s important too. There are a bunch of intriguing HDR settings to get your head around if you want to make the most of it.
Update Windows 11
Before you try to adjust any HDR settings in Windows 11, you should make sure you’re running the latest version of Windows 11. New HDR features have been added over the years — most recently, Microsoft added an SDR brightness slider to its HDR settings options.
You’ll only get access to that if you’re running the latest major Windows 11 update, so hit Windows update and make sure you have all the latest HDR features.
How to turn HDR on in Windows 11

OK, I know we said the settings were more important, but you may still need to enable HDR in Windows 11, too, especially if you’ve only recently upgraded to an HDR display.
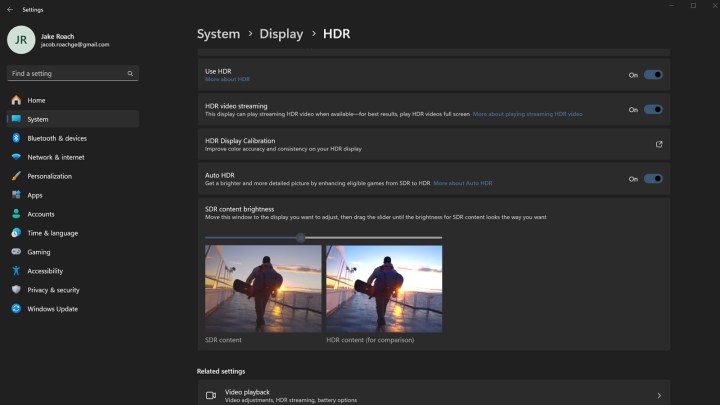
Navigate to Settings > Display > HDR (or just search for “HDR Settings” in the Windows search bar and select the appropriate result. Select the display that you want to enable HDR on from the drop-down menu, and toggle Use HDR to on. This is where you can go to turn it off again in the future if you don’t want to use it anymore.
Do you want to watch HDR content over streaming services? Make sure to toggle on HDR video streaming, too.
Do you want to play games using Auto-HDR? If so, toggle Auto HDR to On. The list of games that support HDR isn’t exhaustive, but there are several hundred, and many of them are mainstream, big titles that come highly recommended by millions of gamers. There’s no guarantee the auto-HDR implementation is perfect, but the results we’ve seen in some have been impressive.
How to use the HDR calibration app
The official Windows HDR Calibration tool is free through the Microsoft Store — with a link in the HDR Settings.
Click through to the calibration tool, or install it manually from the store yourself and run it. Once it’s open, select Get Started and follow the on-screen prompts to adjust your HDR settings. It will walk you through your HDR configuration, adjusting minimal luminance, maximum luminance, max full-frame luminance, and color saturation. When you’re done, review your settings and give the HDR profile a name so you can toggle it on and off as needed.
When you back out to the HDR settings page, make sure that next to Color profile, your newly calibrated HDR settings profile is selected from the drop-down. If it isn’t, do so. Use this menu in the future to make different HDR calibration profiles for different kinds of content or games.
Calibrating your HDR settings to their best can take a few tries, and it helps to know the specifications and capabilities of your display before starting, so be patient if it takes a couple of tries to get it just right. The results are worth it.
How to adjust SDR content brightness

One of the latest additions to Windows 11’s HDR capabilities was actually to do with SDR. It isn’t something that’s applicable to HDR content, but it lets you introduce some HDR-like brightness “pops” in your SDR content, where SDR brightness maximums would otherwise limit it.
You’ll have to play this feature with yourself, but launch some SDR content you want to watch and move the slider around until you find a point that feels right for you and what you’re watching. A recommended spot to start at is 60, a commonly enjoyed SDR brightness setting, but you may have different preferences.
Calibrate your display
The last step in tweaking how HDR works in Windows 11 is to adjust the settings on your display. Whether it’s a TV or monitor, adjusting its contrast, brightness, colors, HDR settings, and more can make a big difference to how your games and streaming content look and feel.
There are a handful of monitor settings you should always have set to your preferences; You can just adjust those by eye. However, if you want to really make your monitor or TV look perfect (or as close to it as possible), you’ll need to calibrate it. Fortunately, Windows has several built-in tools to help you there, and we have a guide on how to calibrate your monitor to make the most of its capabilities.


