How to password protect a Word document

how to make a resume in microsoft word macbook table
Digital Trends

Microsoft Word is suitable for creating all manner of documents. But it doesn't matter if you use Microsoft Word to create shopping lists or legal documents, you might want to protect the file from prying eyes.

Password protecting a Word file is a great way to add an extra layer of protection to your documents with sensitive data inside. It won't make it fullproof, but it will make it much harder for anyone to look at the contents of your files without finding out the password first.

Here's how to password protect a Word document.

Recommended Videos

Difficulty

Easy

Duration

5 minutes

How to password protect a Word document

Word has a built-in password protection system you can use to quickly and effectively protect your files.

Step 1: Open the Word document that you want to secure with a password. Then, select File, followed by Info then Protect Document.
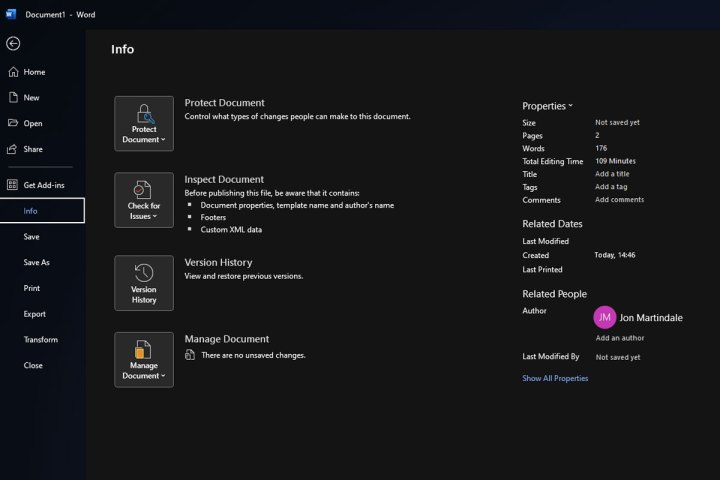
Password Protection activation in Word.
Digital Trends

Step 2: You can choose a few options to protect the file, from making it Read Only, so that it can no longer be edited, or you can control the changes that are allowed to be made to the document moving forward.

For our needs, though, you want to select Encrypt with Password.

Adding password to Word document.
Digital Trends

Step 3: Type in the password that you want the file to have. Take a serious note of the warning: If you lose the password you will almost certainly lose access to this file and it will be hard to recover. Take this moment to think of a memorable password, or better yet, note it down in your favorite password manager.

Step 4: When prompted, type the password in again. Make doubly sure you know what it is, then select OK.

Step 5: The file will now be password protected. Next time you try to open it, you'll be prompted to input the password. Type it in, select Enter or the OK button and you can use the file as normal.

How do I get Word?

If you don't have Word, you can use the online version for free, or you'll need to subscribe to Microsoft 365. It's only $5 a month and you get access to all the Office apps as part of that subscription, including Word.

Don't want to pay or want more more help? Check out our guide on how to get Word for free.

Learn more about how to use Word

Want to become even more of a Word wizard? Check out our guides on how to convert a PDF to Word, and our general beginner's guide to Word. It'll teach you everything you need to know to make the most of the world's most popular word processor.

Have enough of Word and want to break away from the Office apps? There are some great Office alternatives out there.

Konrad Krawczyk
Former Digital Trends Contributor
Konrad covers desktops, laptops, tablets, sports tech and subjects in between for Digital Trends. Prior to joining DT, he…
How to create a pivot table in Excel to slice and dice your data

Microsoft Excel is arguably the greatest spreadsheet application from Redmond, and there's a good reason so many number crunchers use it for all of their number crunching needs. While using Microsoft Excel is fine for simple spreadsheets to track expenses or build calendars, it comes into its own when you need to slice and dice and then present complex data. Here, we show you how to create a pivot table in Excel to take advantage of one of the application's most powerful tools.

Before we start, just what exactly are pivot tables good for? Simply put, pivot tables let you look at the same data in different ways and from different angles, to make it easier to perform in-depth analysis and to spot important trends. When you're evaluating sales results, for example, you may want to look at an individual person, a specific product, or a specific timeframe. With a pivot table, you can create one pool of information and then easily change your focus from one thing to another -- an analysis that would be tedious to perform manually.

Read more
How to set an ‘Out of Office’ message in Microsoft Teams
Person using Windows 11 laptop on their lap by the window.

Many people use Microsoft Teams regularly to communicate with colleagues both inside of the office and remotely. It is considered one of the most efficient ways to ensure you can stay in contact with the people on your team, but what if you need to let people know you’re not readily available? Microsoft Teams has a method for you to set up an "Out of Office" status for your profile to let staff members know when you’ll be gone for the afternoon, for several days on vacation, or for an extended period.
Where do I go to set up my ‘Out of Office’ status for Teams?
It is important to note that your Microsoft Teams and Outlook calendars are synced. This includes your out-of-office status and automatic replies. So, whatever you set up in Microsoft Teams will reflect in Outlook. Similarly, you can set up your out-of-office status in Outlook, and it will be reflected in Teams; however, the former has a more straightforward instruction.

The following steps will work whether you use Microsoft Teams online or on the desktop.

Read more
How to password-protect an Excel file on Windows and Mac
A person using a laptop while lounging on a couch.

If you use a computer, you probably have some Microsoft Excel documents on your Mac or PC that you wouldn’t want other people to find and read.

After all, Excel serves not only the average person, but also businesses, government institutions, and millions of other folks worldwide. Whatever you’re using Microsoft Excel for, the best way to keep that information safe is to learn how to password-protect an Excel file.

Read more