If you struggle with quick note-taking, recording your Skype call is an excellent alternative to jotting down notes with a pen and paper. Recording the call lets you play it back later, allowing you to pause and write down key points or just rewatch the most vital parts. You can quickly record and save personal and professional Skype calls for later viewing directly from your computer.
We’ll be assuming you’ve already installed the latest version of Skype for our guide or at least the last version of the classic desktop client. If not, head to the Skype website and download it before we get started. Please note that recording audio and video conversations without asking the other party for permission is legally questionable and differs based on where you live. Check the laws in your local area or ask for permission before recording.
See more
Skype’s built-in recording
Skype has its built-in recording function, and though others may be more full-featured, it comes pre-bundled with the application, making it the easiest to gain familiarity.
Note that Skype is available on smart displays and smart speakers like Amazon Echo/Alexa — and you can even get more free minutes for using Skype on these devices. However, these smart devices do not allow you to record your Skype conversations at this time. If you want to record the audio or video, you will need to have it on a computer.
Here’s how to use it:
Step 1: Start a call with your friend or colleague. It can be voice or video. You can simply choose someone from your contact list with the right syncing options. The option works whether you’re using personal Skype or Skype for Business.

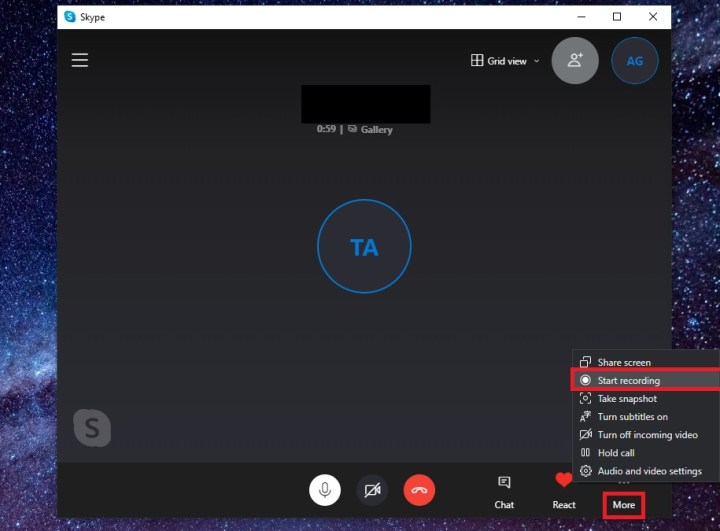
Step 2: Click the More icon in the bottom-right corner and select Start Recording. A message will appear at the top of the window, reminding you that the call is being recorded. Doing so also creates a banner notification that everyone in the call will see, letting each person know that they are being recorded. All Skype screens/audio streams will be captured, no matter how many people are on the call.

Step 3: When you’ve finished recording the call, either hang up or press the More icon again and select Stop Recording. The recording will then be finalized and processed.
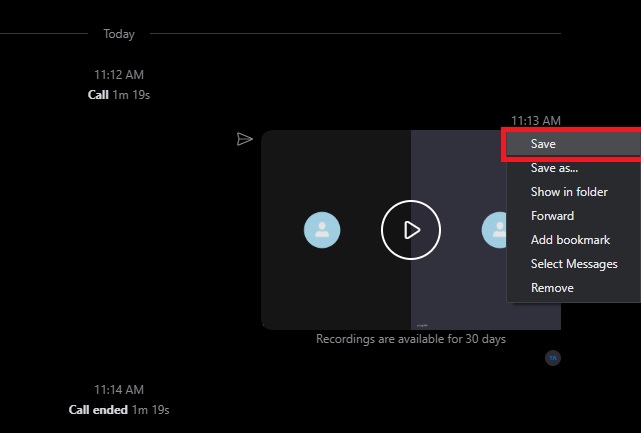
Step 4: Once the call has ended, you’ll be taken back to the chat screen for your conversation. Your recording should appear in the chat once it’s finished processing. Click on the recording to play it back. If you want to save it to your computer, the easiest way is to mouse over your recording in the chat until the More Options icon appears (three vertical dots). Click on that icon, and from the pop-up menu that appears, select Save. This will send a copy of your recording to your Downloads folder.

Note that Skype’s in-app recording function records all participants’ video and audio in the same file, only records Skype-to-Skype calls, and only saves files for 30 days. If you want separate recordings, you may be better off using one of the following alternatives.
Windows alternatives
MP3 Skype Recorder
Although it only records the audio portion of a call, MP3 Skype Recorder is the most lightweight and hands-off of the Skype recording solutions we recommend. It’s entirely free, with only the most niche features hidden behind the Pro version paywall.
Evaer
Another option is Evaer, which is a straightforward program that’ll get the job done in a pinch. With the free trial, you can record video conversations of up to five minutes in length. If you want to record longer videos than that, however, you’ll need to pay for the premium version (which starts at $20).
MacOS alternatives
ECamm Call Recorder ($40)
If you want to record Skype calls on a Mac without using Skype’s built-in methods, ECamm’s Skype Call Recorder is the obvious first choice. It’s not free, but there’s a seven-day trial if you want to try the software before shelling out $40.
Step 1: Head to the Skype Call Recorder homepage and download the trial version. You can buy the full version later if you want, but for now, let’s just get the software up and running.

Step 2: The trial comes in a ZIP file, which you merely need to double-click to open (or use one of these programs). You’ll find the installer inside. Run it, and you’ll go through the motions to install Call Recorder. Enter your password if prompted.
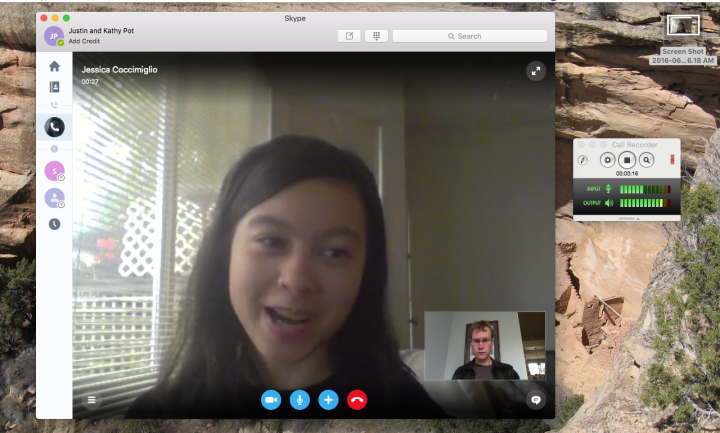
Step 3: Launch Skype as you usually would. Everything will look the same, except there will now be a new window that opens alongside the main Skype window. Simply click the red button in the new window to start recording your conversation.

You’ll see audio levels for both your microphone and the other people in the conversation, which lets you know if the recording is indeed working. If you want to fine-tune how everything works — i.e., the resolution, format, and recording type — a preference pane in Skype’s settings will allow you to do so.
Step 4: If you weren’t already aware, you automatically installed a tool called ECamm Movie Tools alongside Call Recorder. Launch the program — you can also open it via the magnifying glass in the ECamm window — and you can edit your recordings.

Step 5: From there, you can adjust the volume for either side of the conversation and decide whether to show one or both videos — you can also export to the file format of your choosing. There’s even a share button for uploading directly to YouTube or Vimeo or exporting to iMovie. As you can see in the image above, however, the trial version includes a prominent watermark.
That’s it! Do with the resulting file what you will. Remember that the video file will show what the screen showed during the call, so if one of you was experiencing some camera or sound lag, it will appear that way in the recording as well, even if you optimized the frame rate and resolution settings.
Use MacOS’s built-in screenshot toolbar
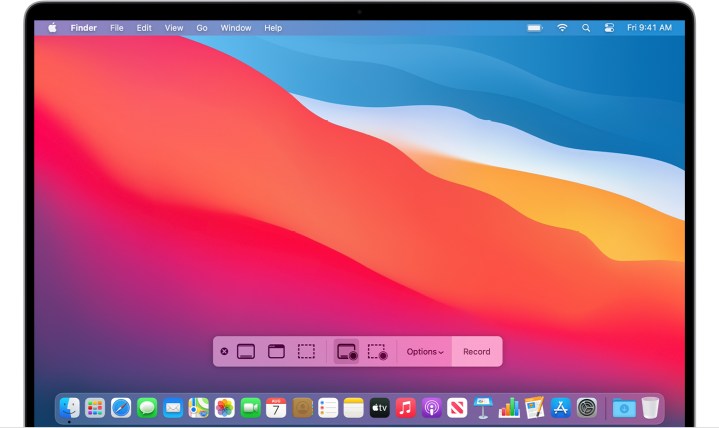
MacOS has a built-in screen recorder that allows you to select what portion of your screen you want to record. You can use this application and highlight the Skype call window to record your video call.

Just hit Shift + Command + 5, and a toolbar will appear at the bottom to record your screen. Select the icon that looks like a Square with Dotted Lines and highlight the portion of the screen you want to record. Then, click Record, and you will capture whatever is showing in that space. Your Mac will record the screen until you end it, and you’ll have an option to save the video file from there.


