How to remove a picture background in Canva

Pictures in Canva with one background removed.
Image used with permission by copyright holder

Most times, you want the subject of your photo to be the center of attention with no distracting background. You might have a photo bomber behind your subject or simply a background that you don’t need for your project.

With Canva Pro, you can remove the background of a picture. Then, use that important part that remains in your Canva project. We’ll show you just how to remove a background in Canva.

Recommended Videos

Difficulty

Easy

Duration

5 minutes

What You Need

  • Canva Pro account

Upload and add your picture to Canva

If you’ve already uploaded the picture you want to use, you can jump down to the next portion explaining how to remove the background in Canva.

But if you don’t have your image uploaded yet, you can add it easily.

Step 1: Open your project and select Uploads on the left side.

Step 2: Choose Upload Media or use the Three Dots to import an image from Google Drive, Dropbox, Facebook, or Instagram.

Upload media in Canva.
Image used with permission by copyright holder

Step 3: Select the image and click Open or follow the prompts per the location you choose.

Step 4: On the Images tab, pick the picture you want to insert or drag and drop it onto the canvas on the right.

Insert an image in Canva.
Image used with permission by copyright holder

Remove the picture background in Canva

With your image on your canvas, it’s super easy to remove the background.

Step 1: Select the picture and click Edit Image in the toolbar at the top.

Step 2: You’ll see the Edit Image options to the left. Pick Background Remover at the top.
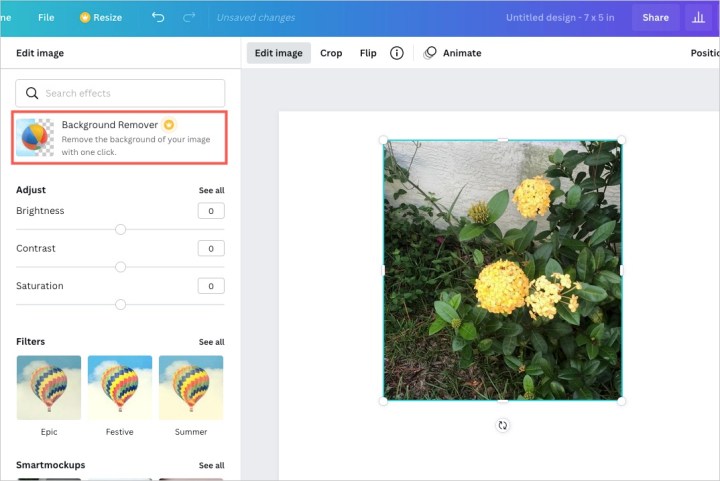
Background Remover tool in Canva.
Image used with permission by copyright holder

Step 3: After a few moments, you’ll see your picture transformed to one without a background.

You can then make an adjustment if there’s more of the background you want to eliminate.

Image background removed in Canva.
Image used with permission by copyright holder

Step 4: Select Erase to remove additional portions of the image. Then, adjust the slider to set the brush size you want to use. Use your cursor to click or swipe through the other parts of the picture you want to remove.

To see the background again but dimmed, check the box for Show Original Image.

Use Erase to remove more of an image background.
Image used with permission by copyright holder

Step 5: If you accidentally erase something you want back, click Restore. Then use your cursor to bring back those portions of the picture as they were originally.

Use Restore to bring back part of an image background.
Image used with permission by copyright holder

Step 6: When you finish, click Done at the top to save your edits. If you change your mind, click Cancel instead.

Then, click Apply in the sidebar.

Apply to save your changes using the Background Remover.
Image used with permission by copyright holder

As mentioned, the Background Remover tool is available with Canva Pro. You can check out the Canva website for subscription options.

Sandy Writtenhouse
Sandy has been writing about technology since 2012. Her work has appeared on How-To Geek, Lifewire, MakeUseOf, iDownloadBlog…
Canva’s new AI tools might replace your video editor
Canva's Magic Edit feature adding flowers to an image.

Canva -- the online design platform used to create logos, presentations, infographics, and more -- announced a new suite of AI tools that can do everything from generate new images to automatically edit videos for you.

The toolset touches nearly every part of Canva's design suite. It starts with Magic Design, which will automatically design a graphic for you based on an uploaded image and selected style. Users are free to edit the design after the fact, and they can automatically translate it with Canva's new AI-powered translate feature that supports more than 100 languages.

Read more
How to remove the background from an image
remove the background from an image

Cutting out the background from an image can be time-consuming and fiddly, especially if a lot is going on within it. Fortunately, there are several tools to make the job quick and easy — and some of them don’t even require a download.

Read more
How to edit pictures using Photos on a Mac
Photos editor open on a MacBook.

Photo-editing applications can be intimidating, especially if you don’t use them often. But with the tools available in the MacOS Photos app, making adjustments and corrections to improve photos is much easier than you might realize.

With options to correct red-eye and remove marks, you can fix minor blemishes, as well as crop, straighten, or rotate a photo. If you’d like to go further, you can adjust the white balance, light, and color to enhance your picture. And best of all, many of these tools have an Auto feature that makes the improvements for you.

Read more