Whether you’re looking to sell your Mac or reset it due to an intractable software problem, restoring your Mac to factory settings is a good way to spruce it up, clear off your personal information, and fix any lingering problems.
Doing so will erase any content you’ve stored on it, so it’s vital you follow our guide and back up your Mac before getting started. That can save you a bunch of headaches down the line.
The method you use to restore your Mac to factory settings depends on the version of macOS you are running and whether it has an Apple silicon chip or an Intel one. Our first section below will cover Macs running the latest version of macOS on an Apple silicon chip. After that, we’ll turn to older Macs that use Intel chips. If you’re not sure about these details, select the Apple logo in the top-left corner of your screen, then choose About This Mac. That will list the chip and macOS version for you.

Erase and reset your Apple silicon Mac
Erasing your Mac’s files and settings is a vital part of restoring it to factory settings. Fortunately, this is a lot easier than it used to be, and Apple has put some dedicated settings in place to make this process as simple as it can be.
Step 1: Open the System Settings app from your Mac’s Dock, or by selecting the Apple logo in the top-left corner of your screen and choosing System Settings.
Step 2: In the System Settings app, pick General > Transfer or Reset. Now select the Erase All Content and Settings button.
Step 3: This opens Apple’s Erase Assistant app. You might need to enter your Mac account’s password to go any further. Do that and choose Unlock.
Step 4: Erase Assistant will show you what data will be removed when you erase your Mac. This will include any user accounts, fingerprints used in Touch ID, your Apple ID settings, and tools like Find My, Activation Lock and Location Sharing. Any Bluetooth accessories you’ve paired to your device will also be unpaired.
Step 5: Once you’ve reviewed this information, select Continue. You might be asked to enter your Apple ID password so that you can be signed out of your account. This signs you out of other apps and services like Apple TV, Apple Music, Find My, the App Store, and more, so there’s no need to do those separately.
Step 6: You’ll now be asked if you want to back up your Mac to Time Machine. This is highly recommended so that you can restore your Mac if you change your mind or if something goes wrong. Make sure you have an external hard drive connected to your Mac so that you can back up your files.
Step 7: Once everything has finished, your Mac will warn you that continuing will erase everything on your Mac. If you’re all set, select the red Erase All Content & Settings button.

Step 8: Your Mac will now restart and start restoring itself to factory settings. You might be asked to pair a Bluetooth accessory that you were using again (if it doesn’t connect within 30 seconds, try turning it off, then on again). Your Mac may also ask you to connect to a Wi-Fi network. You can skip the Bluetooth pairing step if you want to sell your Mac after it has been reset.
Step 9: When that has finished, you should see a screen saying Activate Mac at the top. Underneath is a confirmation that your Mac has been activated. Select Restart.
Step 10: Once your Mac has restarted, you’ll be presented with an assistant that will take you through the process of setting up your Mac from scratch (such as choosing settings for location and analytics). If you plan to sell your Mac, you should skip this process by pressing and holding the power button until your Mac turns off. Otherwise, continue through with the assistant until the end.

How to erase and reset an older Mac
On some Macs, you might not see the Erase All Content & Settings option in System Settings. That’s because this feature requires macOS Monterey or later, as well as either a Mac with an Apple silicon chip or with a T2 Security Chip. Apple has a list of Macs that come with the T2 chip on its website.
If you are running an older version of macOS or use a Mac that doesn’t have a T2 Security Chip, you’ll need to follow the instructions below.
Step 1: First, follow our guide to backing up your Mac to an external hard drive.
Step 2: You’ll now need to sign out of any Apple services that you’re using on your Mac. In iTunes, go to the menu bar and select Account > Authorizations > Deauthorize This Computer. For your iCloud account, open System Settings or System Preferences and go to Apple ID > Sign Out (in older versions of macOS, Apple ID might instead say iCloud). Finally, open Messages and, in the menu bar, select Messages > Settings (or Preferences). Select iMessage, then Sign Out.
Step 3: Optionally, you can unpair any Bluetooth devices by going to System Settings (or System Preferences) and choosing Bluetooth in the left-hand sidebar. Move the mouse pointer over the device you want to disconnect, then select the Disconnect or X button next to its name. Note that you’ll need to plug in a USB mouse or keyboard if your Mac doesn’t have built-in control methods (such as if you’re using a Mac mini).
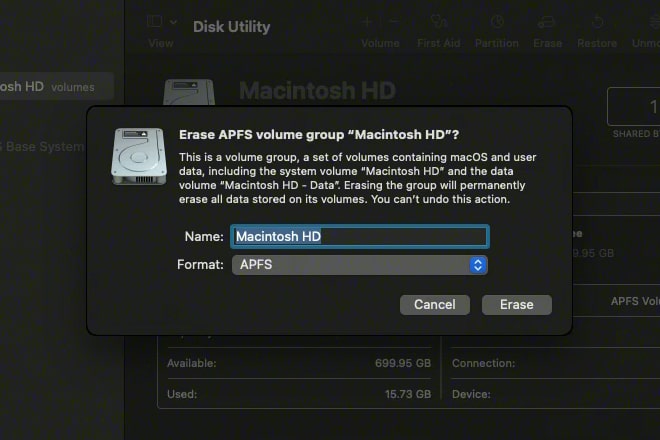
Step 4: It’s now time to erase your Mac. Shut it down, then turn it on and immediately press Command+R. This opens the macOS Recovery app. From here, select Disk Utility > Continue. Choose Macintosh HD (or whatever you’ve named your main drive) in the sidebar and pick Erase. Leave the Name and Format options as they are and select Erase. You might need to enter your Apple ID password. When you’re done, close Disk Utility to return to the macOS Recovery app.

Step 5: Now that your Mac has been erased, you’ll need to reinstall macOS. In the macOS Recovery main menu, select Reinstall macOS > Continue. You might be asked to enter your password and whether you want to install macOS on the Macintosh HD or Macintosh HD. If so, select Macintosh HD. Your Mac might restart a few times during the reinstallation process -- just let it carry on until it’s finished and don’t shut down your Mac or close its lid. When the process has finished, a setup assistant will open. If you want to sell your Mac, close the assistant and shut down your Mac.
Step 6: If your Mac uses an Intel processor, the final step is to reset its NVRAM, which restores various settings to their factory defaults (Apple silicon Mac owners scan skip this step). Shut down your Mac, then turn it on and immediately hold the following key combination for about 20 seconds: Option+Command+P+R. During this time, your Mac might appear to restart once or twice (you might hear the startup chime or see the Apple logo, for example). Once you let go, your Mac should load to the login screen. Its NVRAM has been reset.

What about your AppleCare plan?
Resetting your Mac to factory settings is a must if you intend to sell it. We’ve already covered most of the important tasks, and whether you have an Apple silicon Mac or one with an Intel chip, the previous steps ensure you’re signed out of your accounts and that your data is safely removed.
However, if you have an AppleCare plan, you’ll need to work out what you want to do with it. If you’re not planning on getting another Mac, you can cancel it entirely. Alternatively, you can transfer it to your new Mac if you prefer.
In either case, you’ll need to contact Apple support. Make sure you have your AppleCare agreement number, proof of coverage, your Mac’s serial number and the original receipt on hand. Apple’s support team will then be able to sort out your coverage for you.
Restoring your Mac to factory settings involves a few steps, but it needn’t be overly complicated, especially if you can use Apple’s Erase All Content and Settings feature. But the small amount of effort it requires is easily worth it considering how it can protect your private data and potentially fix persistent problems your Mac is suffering from. Once you’re finished, your Mac will be fresh and ready for whatever comes next.


