How to set wake and sleep settings on Mac

how to set wake and sleep settings on mac macbook coffee cup table
Engin_Akyurt/Pixabay

If you start and end your workday at the same times every day, you can put your Mac on a schedule. This allows you to wake your Mac in the morning and put it to sleep in the afternoon every day, on weekdays, or on weekends.

Instead of a wake and sleep schedule, you can have your Mac shut down or even restart at the same time every day if you prefer.

Let’s walk through how to set up your wake and sleep settings on Mac.

Recommended Videos

Difficulty

Easy

Duration

5 minutes

What You Need

  • Mac computer

About setting a schedule for your Mac

Here are a few things to keep in mind before setting a schedule for your Mac to wake, sleep, start up, shut down, or restart.

  • To start up or wake your Mac, it must be plugged into the power adapter.
  • To shut down your Mac, you must be logged in and your computer must be awake.
  • If you have applications open with unsaved documents, this may stop your Mac from shutting down on schedule.
  • You do not have to use both the start-up or wake and shut-down or sleep settings on Mac. For instance, you may only want to wake your computer each morning, not sleep or shut down on the schedule.

Start up or wake your Mac on a schedule

To set up a schedule for your Mac to either start up or wake, follow these simple steps.

Step 1: Open System preferences using the icon in your Dock or the Apple icon in the menu bar.

Step 2: Select Battery.
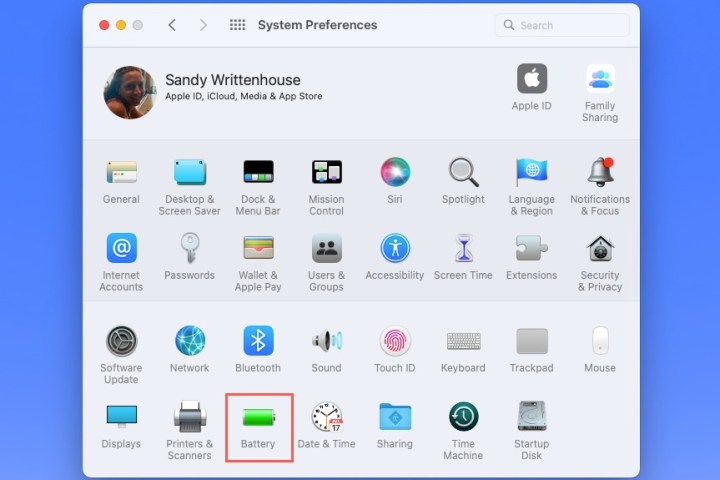
Battery in the MacOS System Preferences.
Image used with permission by copyright holder

Step 3: When the battery preferences open, pick Schedule on the left.

Step 4: On the right, mark the top option for Start up or wake.

Step 5: Use the first drop-down box to pick the days. You can use Every day, Weekdays, Weekends, or a particular day of the week.
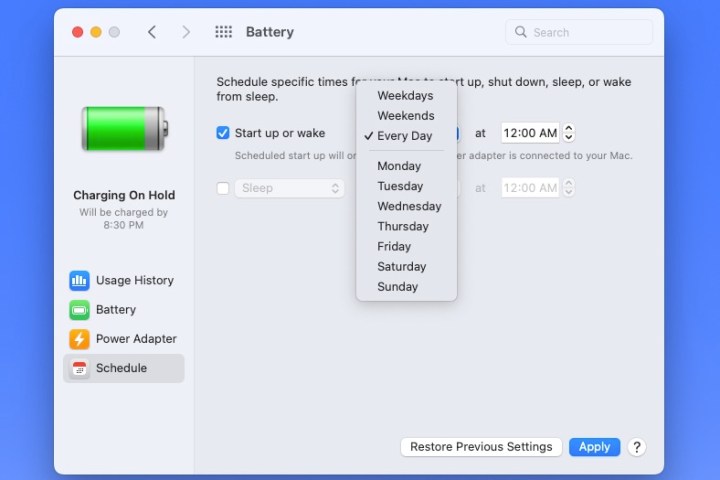
Day selection for the MacOS Wake or Start Up setting.
Image used with permission by copyright holder

Step 6: Use the second drop-down box to pick the time. You can enter the hours and minutes in the box or use the Arrows to move up and down one hour or one minute at a time.
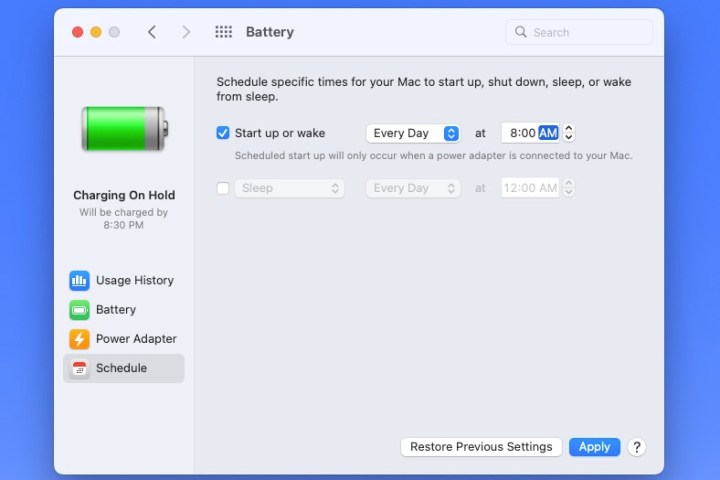
MacOS Wake or Start Up setting.
Image used with permission by copyright holder

Step 7: When you finish, select Apply.

Sleep, restart, or shut down your Mac on a schedule

If you’d like to make your Mac sleep, shut down, or restart regularly, this is just as easy to set up.

Step 1: Open System preferences > Battery as described above.

Step 2: Pick Schedule on the left.

Step 3: On the right, mark the second option for Sleep.

In the Sleep drop-down box, you can choose Restart or Shut down if you prefer.
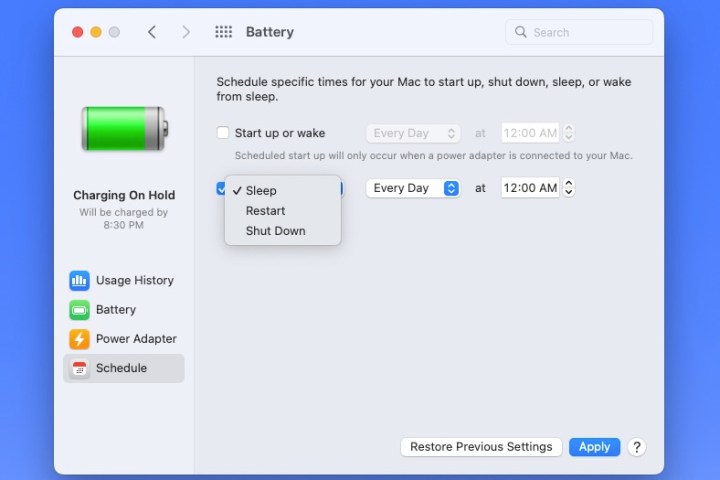
Sleep, Restart, or Shut Down in the MacOS Battery settings.
Image used with permission by copyright holder

Step 4: Use the drop-down box to the right to choose the days or a certain day of the week.
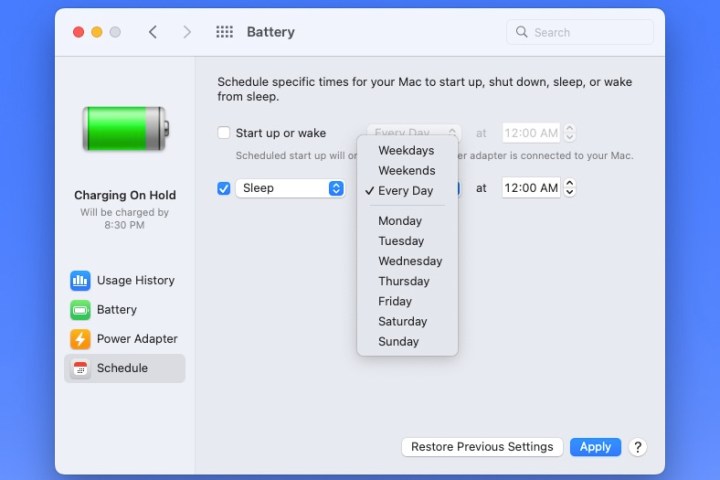
Day selection for the MacOS Sleep setting.
Image used with permission by copyright holder

Step 5: Use the drop-down box on the far right to choose the time of day.
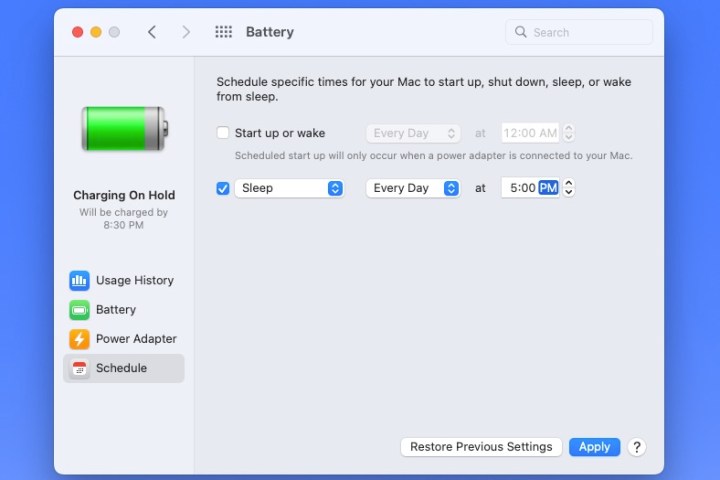
MacOS Sleep setting.
Image used with permission by copyright holder

Step 6: Select Apply when you finish.

If you change your mind about your schedule, you can edit it anytime in System preferences > Battery > Schedule. You can also go back to your last schedule using the Restore previous settings button.

Once you set up a schedule, you can have your Mac awake and ready to work each morning when you are or go to sleep or shut down when you finish each day.

For more help with MacOS, look at how to stop your Mac from freezing or how to use the motor accessibility features.

Sandy Writtenhouse
Sandy has been writing about technology since 2012. Her work has appeared on How-To Geek, Lifewire, MakeUseOf, iDownloadBlog…
You can finally try out Apple Intelligence on your Mac. Here’s how
macOS Sequoia being introduced by Apple's Craig Federighi at the Worldwide Developers Conference (WWDC) 2024.

The second developer beta of macOS Sequoia is open for business and it includes Apple Intelligence features. It looks like anyone can try it out as long as you're not in China. That includes people in the EU -- even though the AI features might not launch there right away. The features available for testing include Writing Tools, Siri, Safari and Mail summaries, Smart Replies, Memory Movies, transcription features, Reduce Interruptions Focus Mode, and a few more. If you want to have a look yourself, here's everything you need to do to download the beta and activate Apple Intelligence.

Before you start, make sure you've backed up your Mac with Time Machine so you can restore the previous version if anything goes wrong. You can also use a secondary device if you have another Apple silicon Mac lying around because beta versions can go wrong and you have to download them at your own risk.

Read more
How to share an external hard drive between Mac and Windows
The WD Easystore 14TB External USB 3.0 hard drive on a desk next to a monitor and near a plant.

While using a Windows PC over a MacOS system (or vice versa) was once fairly limited in terms of crossover, such towering walls no longer exist. Still though, if you’ve ever wanted to use the same external hard drive with both Windows and MacOS, you know how big of a burden this process can be.

Incidentally, the term "external hard drive" generally refers to portable storage devices. They're as fast as the best SSDs, but you can connect them to your computer using a USB cable.

Read more
How to free up RAM on Mac and PC
A person works on a computer in a home office.

One of the main reasons your PC might go from snappy to sluggish after using it for a while, is that you've run out of memory. If you don't have enough RAM for what you're doing, or you have a lot of background applications running, then hitting your memory limit can really slow your PC down and make it feel like you need to replace the whole thing.

If you know what RAM is, you'll know that's probably not true. In fact, if you just take some steps to free up some memory, you might be able to make it last that bit longer.

Read more