How to share files with other people on a Mac

apple macbook air m1 review
Mark Coppock/Digital Trends

Apple has implemented an easy-to-use file-sharing system for its Mac systems, providing a straightforward way for Mac owners to share files, data, and folders with other individuals. Choosing what specific files and folders that can be accessed by users other than yourself is predominantly controlled by Mac’s Shared and Public folders.

Let’s take a look at how to share files with other people on a Mac.

Recommended Videos

Difficulty

Easy

Duration

5 minutes

What You Need

  • Mac desktop or MacBook

Sharing files with the Shared folder

Putting files into the Shared folder on your Mac will allow any other user account on your system to view its contents.

Step 1: Open Finder. In the search bar, enter users and find and open the Users folder. Here, the Shared folder will show up. Open it.
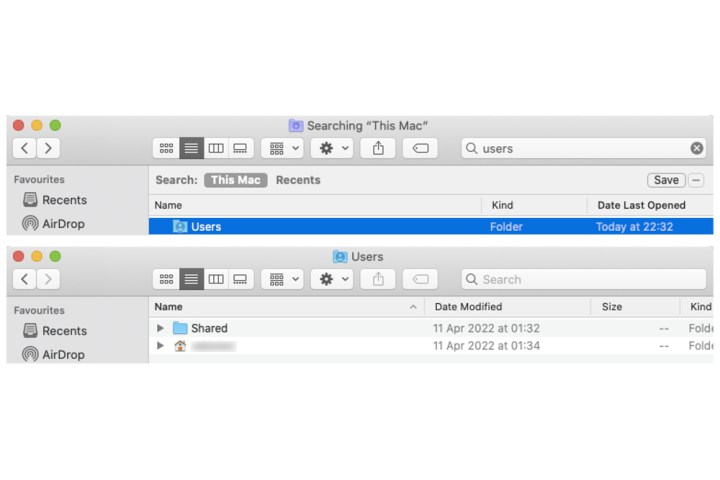
The Shared folder on a Mac.
Image used with permission by copyright holder

Step 2: Open a new Finder window. Drag and drop or copy and paste the files and folders you want to be shared with other users into Shared.

When another user on your Mac logs in to their account, they'll be able to view the files you placed within the Shared folder.

Inputting files into the Shared folder on a Mac.
Image used with permission by copyright holder

Sharing files with the Public folder

Another way to share files and folders with other people on a Mac is through the system’s Public folder.

Step 1: Open Finder, search for public, and open that folder.

Step 2: Copy and paste or drag and drop whatever you wish to be shared into the Public folder.

The Public folder on a Mac.
Image used with permission by copyright holder

Customizing permissions for Shared and Public folders

Now that we’ve explained how to share files and folders with other users on a Mac, let’s take a look at how to customize specific permissions for both the Shared and Public folders.

Step 1: Open System Preferences and then select Sharing.

An arrow points to the Sharing settings icon for Mac located within System Preferences.
Image used with permission by copyright holder

Step 2: Select the Public folder, which should already be displayed within the Shared folders section. The default settings assign read and write control (can edit and delete) to the admin account, while other users are set to Read Only.

However, by selecting a user’s Read Only field, the permission for that person can be changed to Read & Write as well.

The Sharing settings window for Mac.
Image used with permission by copyright holder

Step 3: In the Shared folders section, select the + button and add the Shared folder. Follow step 2 and make any necessary adjustments you wish to apply in terms of who exactly has Read & Write permissions.

The Shared folder permissions settings for Mac.
Image used with permission by copyright holder

Step 4: If you want to share files and folders with other users on your network who are using another system as opposed to your own Mac, select the Options button, select the Share files and folders using SMB box, and select Done. The SMB address can now be used to share files on your Mac to another system.

Similarly, within that same window, you can also enable Windows file sharing as well for Windows-based systems.
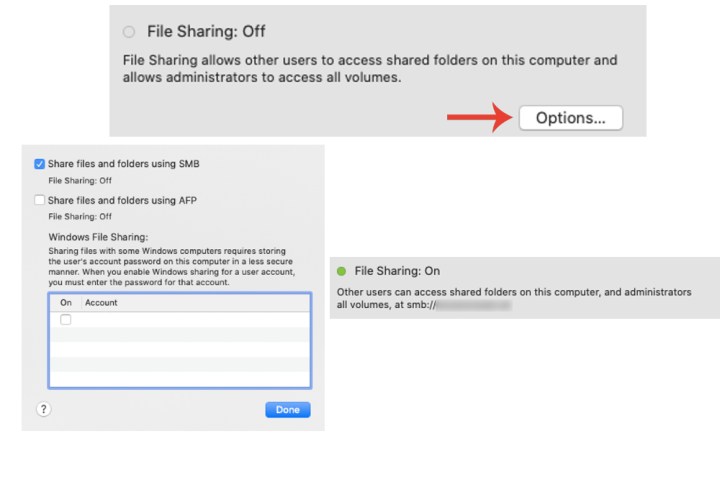
The file-sharing options for Mac.
Image used with permission by copyright holder

Another way to share files with a Mac is via AirDrop — head over to our guide explaining how to use this feature.

Zak Islam
Former Digital Trends Contributor
Zak Islam was a freelance writer at Digital Trends covering the latest news in the technology world, particularly the…
The performance downgrade made to the M4 Pro that no one is talking about
Someone using a MacBook Pro M4.

I've spent this whole week testing the new M4 chip, specifically the M4 Pro in both the Mac mini and 16-inch MacBook Pro. They are fantastic, impressive chips, but in my testing, I noticed something pretty surprising about the way they run that I haven't seen others talk much about. I'm talking about the pretty significant change Apple made in this generation to power modes.

First off, Apple has extended the different power modes to the "Pro" level chips for the first time, having kept it as an exclusive for Max in the past. The three power modes, found in System Settings, are the following: Low Power, Automatic, and High Power. The interesting thing, however, is that in my testing, the Low Power drops performance far more this time around.

Read more
Apple faces challenges with bringing OLED to the MacBook Air
The MacBook Air on a white table.

A report from Korean outlet The Elec suggests the OLED MacBook Air that Apple was allegedly planning to release in 2027 could face significant delays. While progress for the OLED MacBook Pro seems to be going smoothly, the price increase caused by the new display technology is a much bigger problem for the budget MacBook Air models.

One of the biggest selling points of the MacBook Air is its lower price, making it great for first-time Mac buyers, students, and anyone else who doesn't expressly need the power of a Pro. While price increases are a natural part of the tech industry, the slightly disappointing sales of the 2024 OLED iPad Pro suggest that a new display simply isn't enough of an incentive for consumers to justify a higher price tag.

Read more
The MacBook Air may have officially met its match
HP OmniBook Ultra Flip 14 front view showing display and keyboard.

The MacBook Air has dominated the $1,000 price point for the past few years, and the most recent M3 upgrade (and subsequent bump to 16GB of RAM in the base model), has made it even better.

But there's an unexpected challenger for the crown of best laptops. The HP OmniBook Ultra Flip 14. Don't get turned off by the name. It's powered by Intel's new Core Ultra Series 2 chips, which brings a surprising amount of battery life into play. The OmniBook Ultra Flip 14 may not outright defeat the MacBook Air, but it gets incredibly close.
Specs and configurations

Read more