Since Microsoft has owned Skype for nearly a decade now, it’s no surprise that the video chat app has wound up as an integrated part of Windows 10. If you buy Windows 10 today, Skype is included. The problem is that Skype is often set as a startup app (either manually or automatically) that will keep opening and appearing every time you log into Windows.
That gets frustrating if you don’t use Skype and like to keep Windows running efficiently. While Skype may be inextricably tied to your Microsoft account, you can keep it from showing up every time you log on. Here’s exactly what to do.
Step 1: Head to app settings

In the Windows 10 home screen, head to the search bar in your taskbar and type “Settings.” When the results pop up, choose the Settings app to get started.

Now choose Apps from the Settings screen. This will take you to the Apps & features menu, where you can change a number of app settings.
Step 2: Switch off Skype’s startup mode

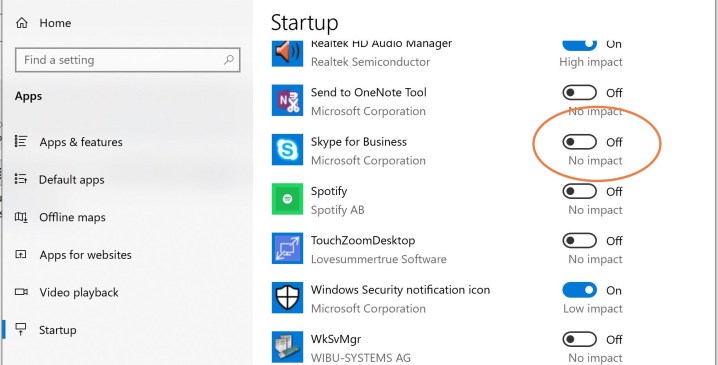
Look to the left side menu and choose the Startup section. This shows all the apps that have native startup options. Look for the apps Skype or Skype for Business, and make sure they are toggled Off.

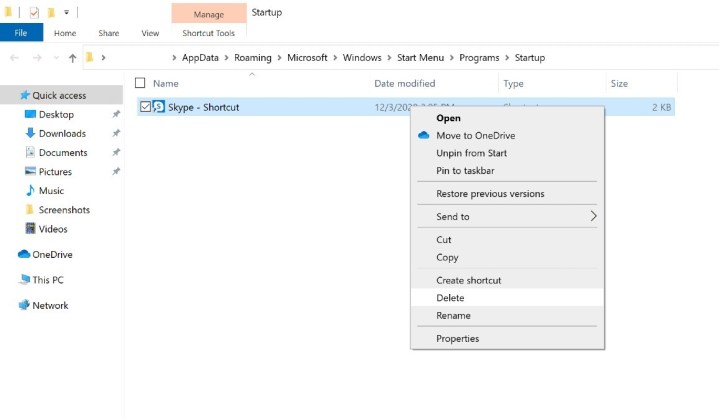
If you don’t see your Skype app here but it’s still starting up on login, it could have been enabled manually; there’s a fix for that, too. Hold down the Windows key and the R key to open your dialog box, and type shell:startup to open up the Startup folder. If you see the Skype app shortcut in this startup folder, select it and right-click to Delete it, and this should solve the problem.
Step 3: Head over to privacy settings

There’s one more step you should take to make sure that Skype won’t bother you again, and it’s just as easy as the first. Hit the back arrow on the top left of the window to return to the main Settings menu. If you already closed the window, just search for Settings again in the search bar like before. Now choose the Privacy section, where you can make decisions about what apps are allowed to run in the background.
Step 4: Turn off Skype’s background app mode

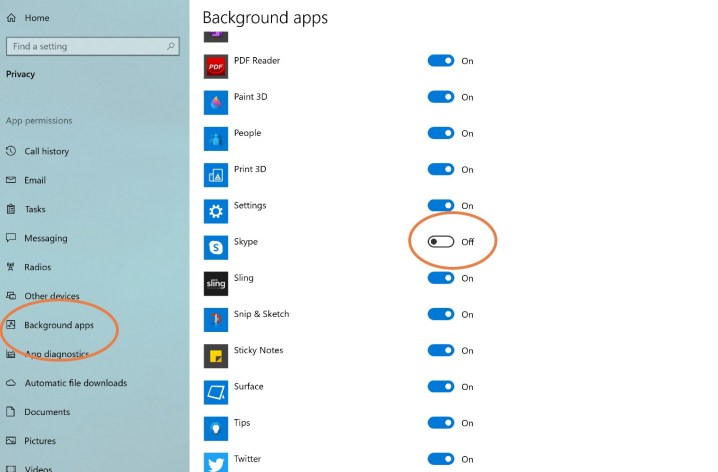
Background apps are allowed to carry out tasks in Windows even if you haven’t opened the app and can’t see them doing it. It’s a good idea to stop Skype from doing this, too. Scroll down the left side menu of the Privacy section until you find Background apps, and select it.
Now scroll down until you see Skype. Make sure that it is toggled to Off.
With the Settings changes made, it’s time to reboot! Head to the main Windows menu, choose the Power section, and select Restart. When you log back onto Windows 10, Skype should no longer automatically appear.
Stopping Skype startup on Macs
Since Skype isn’t integrated into MacOS, automatic startup isn’t really an issue. However, some users may have switched Skype to an app that loads upon login. If that happened in the past but now you want to remove Skype from automatic startup, it’s very easy. Find Skype on your MacOS dock and right-click it. Head to the Options section on the menu that opens, and you will see that the option to Open at Login is checked. Select this to uncheck it, which should solve your problem.


