If you’re ever in need of a temporary solution to gain access to the internet on your Mac and MacBook systems, one of the most effective ways to do so is using an iPhone as an internet hot spot.
Here is how to use an iPhone as a Mac internet hot spot, so you can get back online quickly and easily.
Setting up a personal hot spot on an iPhone
Step 1: Enable the Bluetooth setting on your iPhone. This is the most common way users connect their Mac to an iPhone for internet hot spot purposes. Your phone’s cellular data also needs to be turned on so be sure that option is enabled as well.
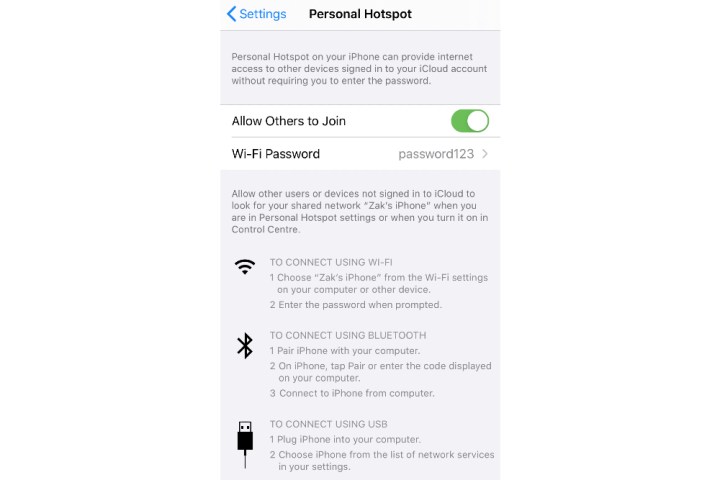
Step 2: The second step towards setting up a personal hot spot on your iPhone is going to Settings, and then clicking Personal Hot spot. If you don’t see it, you can locate it within the Cellular/Mobile Data options.

Step 3: The next step is setting up a suitable Wi-Fi password, which will be used to connect your Mac to the iPhone itself. You don’t necessarily have to use the same password that’s used for your Wi-Fi router, but choose one that’s secure enough that others can’t guess easily.
Step 4: After the aforementioned steps are completed, from here, you’ll be required to turn on the Allow Others to Join button to make your iPhone discoverable to your preferred Mac system.
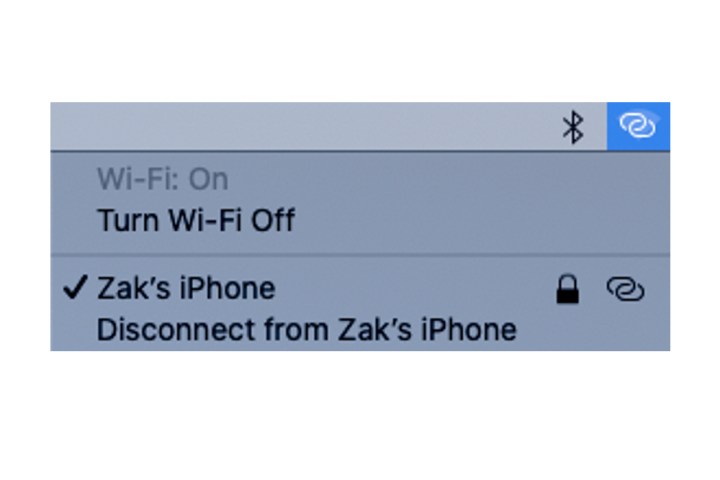
Step 5: Now, click the Wi-Fi icon on your Mac, which is located on the top right corner panel of the screen, immediately next to the Bluetooth icon. From here, you will see the name that you initially decided to label your iPhone as (this can be changed to your liking by navigating to General >> About >> Name). Once you click that, you’ll be asked to input the Wi-Fi password you chose from Step 2, after which you can use the internet via your iPhone’s data.
Once your Mac has been successfully connected to your iPhone’s personal hot spot, a corresponding icon representing the hot spot will be temporarily replace the Wi-Fi icon.

Using an iPhone as a Mac internet hot spot with a USB cable
In addition to connecting your Mac to an iPhone’s internet hot spot via Bluetooth, you can also do so with a USB cable. You’ll need a Mac system that comes equipped with both a USB port and at least firmware OS X 10.9 or later.
Step 1: The first step is connecting your charging cable for your iPhone model to the Mac system. As there’s variations between iPhone charging cables (USB-C and Lightning), there’s some things to consider: if your Mac is outfitted with a USB-C port and your iPhone comes with a Lightning to USB Cable, you’ll need to connect the USB end of the cable to a USB-C to USB Adapter. Alternatively, you can utilize a USB-C to Lightning cable. Both these components (the adaptor and USB-C to Lightning cable) are sold separately.

Step 2: Once the necessary cables are connected from the iPhone to the Mac, a Trust this Computer? alert may appear. Click Trust and then go to your system’s Network preferences and select iPhone.
Use Instant Hot spot
Similar to how you are able to connect an iPhone’s internet hot spot to a Mac through Bluetooth connectivity, you can connect to your personal hot spot without the need to input a password via Apple’s Instant Hot spot feature.
Step 1: To use Instant Hot spot, both the Mac and iPhone have to be signed in to your iCloud account with the same Apple ID. Furthermore, the Bluetooth and Wi-Fi options have to be turned on both devices.
Step 2: Once step 1 is completed, click the Wi-Fi icon on your Mac and select your iPhone from the dropdown list. Now go to your iPhone’s Settings option, click Wi-Fi, and choose the iPhone’s name you set up as your personal hot spot. You won’t be asked to input a password as long as both your iPhone and Mac have been configured as explained in step 1.
While the majority of phone carriers provide a data plan that allows for internet hot spot use, some companies may charge an additional fee on top of your regular phone and data package price when the option is used. With this in mind, you should check for any extra costs associated with an internet hot spot with your carrier, especially if you’re planning to use a considerable amount of data.


