Fan Control is a great tool for doing exactly what its name suggests, giving you complete control over your system's fans, including your CPU and GPU fans, plus any water cooling pumps that you may have connected to fan headers. It's far easier than controlling your PC fans through voltage limiters and BIOS tweaks.
Fan Control is an all-in-one solution to system cooling management, and though it's a little complicated and assumes a certain level of expertise, it's still relatively easy to learn with a little help. That's where we come in: Here's how to use Fan Control to manage all of your system's fans.
Note: This particular software is available on Github and is developed by an independent developer. We used it for a couple of weeks on a desktop PC running Windows 10 and didn’t face any concerning issues. Having said that, we do not take responsibility for any potential damage that it may cause to your system. Please download and use this software at your own risk.
How to use Fan Control
Fan Control is available for free from its Github page and the official website. According to the developers, the drivers and the backend portion of the tool have not been created from scratch. Instead, they have managed to repurpose a bunch of existing hardware libraries and have simply added a user interface on top. Thus, any hardware compatibility issue completely depends on LibreHardwareMonitor and NvAPIWrapper.
Step 1: Download Fan Control from the official website, or its Github repository. Unzip the package and store all the files in a folder. To run the tool, open the FanControl.exe file.
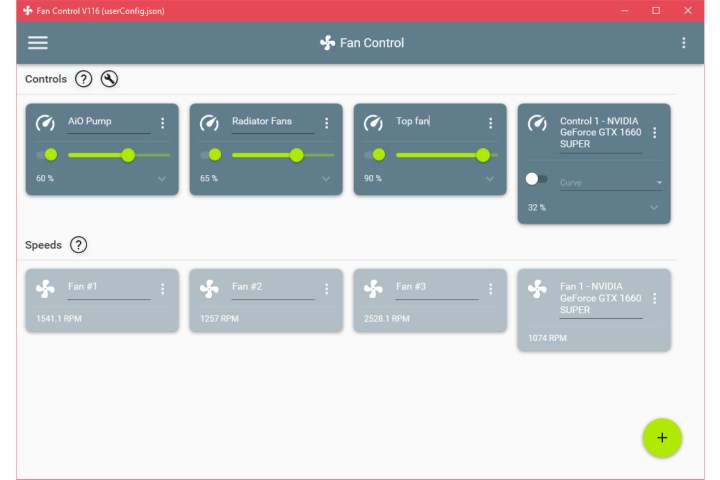
Step 2: The main home screen of the software is divided into two sections: Controls and Speeds. Each card under the Controls section corresponds to a card in the Speeds section. For instance, the first card, Fan Control #1, should be the control for Fan #1.
If you have connected the CPU cooler or a liquid cooler pump to the CPU fan header, it should be Fan #1 by default. The rest should be all additional case fans along with a dedicated card for the graphics card/GPU fans.

Step 3: Test each fan to ensure that it is performing the correct action by sensing the change in fan noise and airflow. This can be done by controlling the fan speeds manually. Select the Three-dot menu on each fan control card, enable the Manual control option, and then select the toggle to enable the slider. Use the slider to increase or decrease the fan or pump speed. You should see that change in speed reflected in the sensor card, and — ideally — hear the difference from the fan so that you know the controls are working.

Step 4: Once you have checked all the fans, rename them for ease of identification. Click on the title of each card and assign names accordingly. You might also see some additional cards under the Controls section, which are basically the headers on your motherboard that are not in use. You can hide these by selecting the option from the Three-dot menu on the top-right corner of each card.

Step 5: Remember, running your PC fans at their maximum speed might sound like a good option to increase cooling potential, but there are some drawbacks. Increasing the speed of your fans is going to make them noisy, and it affects the overall life cycle of the fans. Additionally, if you have any intake fans, you also bring in more dust, which means more cleaning.
Step 6: Apart from manually controlling your fan speeds, you can also create your own fan curves. Fan curves are graphs that show how fast your fan spins when your PC hits a certain temperature, making it easier to customize your cooling based on temperature and noise levels.
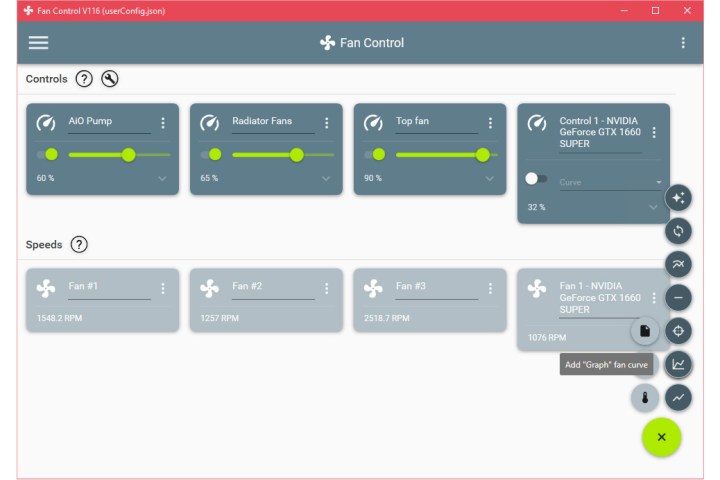
To add a fan curve select the Plus button on the bottom right to reveal a bunch of fan curves and temperature sensor options. The Graph fan curve option is the easiest as you can simply assign what percentage of the total fan speed a particular fan should run at a certain temperature.

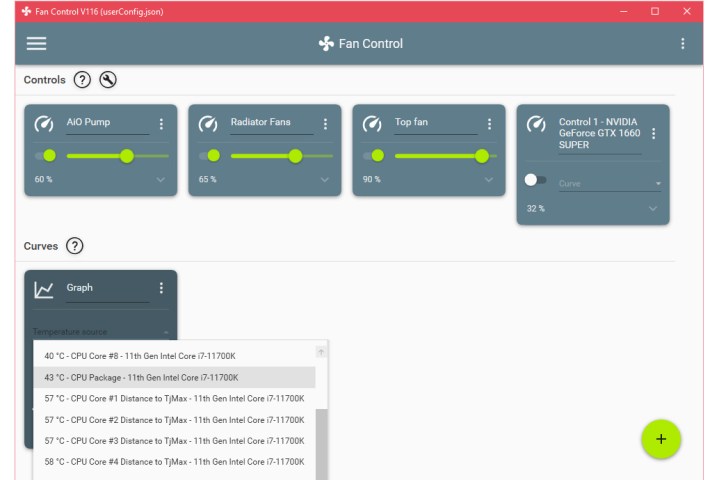
Step 7: Once you select the Graph fan, a card should appear under the new Curves section. To configure the curve, you first need to select the source. Select the Temperature source option to reveal a menu with a variety of sensors that are embedded into your motherboard and other connected parts.
Considering that the CPU and GPU are typically the hottest components in your PC, it is best to optimize airflow and create fan curves based on either of the two. Learn more about monitoring your CPU temperatures here.

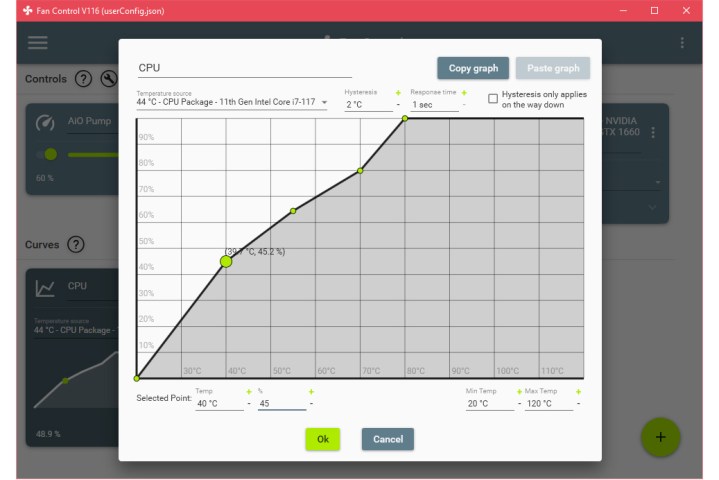
Step 8: To create a CPU fan curve simply, select CPU package denoted under the Temperature source drop-down menu. The graph can be configured by selecting the Edit button. A new pop-up window should appear where you can tinker around by adding points on the graph or just entering the parameters at the bottom. Assign a particular percentage of the fan speed corresponding to the temperature.
Once you are satisfied with your fan curve, select OK to save it. Similarly, you can create a GPU fan curve by selecting your GPU as the temperature source.

Step 9: After creating the fan curves, you can now assign them depending on the fans in your system. Disable manual control, and the option to select a curve should appear. Assign the correct fan curve for all your fans. The fan(s) on the CPU cooler or radiator and the watercooling pump should be assigned to the CPU fan curve so they behave according to the changes in CPU temperatures.
If you have additional fans that pull in fresh air or exhaust hot air away from the GPU, it is best to assign them to the GPU fan curve. By doing so, the fan(s) can automatically ramp up when the GPU is under heavy load, especially while gaming.
Step 10: The final step is to save all the configurations you made. Open the Three-dot menu on the top right of the software and select Save configuration. The software will create a configuration file with all your settings that can be easily imported or exported. This is an important step if you don’t wish to lose your settings.
How to customize Fan Control
Fan Control is a powerful tool functionally, but it also offers a lot of style customization options to help make the tool your own.
Step 1: Select the Three-line menu icon in the top-left to access the Fan Control settings.
Step 2: You can change the layout of the fan controls into columns by ticking the Columns mode box. You can also adjust what cards are shown and which ones are hidden, and whether Fan Control starts up with Windows, or not.
Step 3: Select the Appearance button to adjust Fan Control's coloc scheme. By default it will synchronize with your Windows theme, but you can select the primary and secondary colors for the Fan Control window using the sliders, or by putting in the HTML color code.
Now that you've got your fans all set up, why not try your hand at custom liquid cooling? It's not as difficult as you might think.
Frequently asked questions
What does Fan Control do?
Fan Control is a software that allows you to control your Windows PC's fans. You can use it to do things like adjust your fans' speed or construct a fan curve.
How do I lower my CPU temperature?
There are lots of ways to lower your PC's CPU temperature. You can do things like remove dust from your PC, undervolting the graphics card, or even just removing the PC's side panel. And if you need more ideas for ways to lower the CPU temperature, or more details on how to implement such solutions, check out our guide on how to lower CPU temperatures.
Another option could be removing your PC's current CPU cooler and replacing it with a new one. To learn how to do that, you should take a look at our guide on how to install a CPU cooler.
What is the best CPU cooler?
The answer to this question can vary based on your needs and budget. But we can narrow down your options for you with our handy guide on the subject. Take a gander at our list of the best CPU coolers.


