With computers having so many functions that we rely on for business and relaxation, it can be challenging to keep track of your work and easily navigate between programs, documents, and applications. Whether your work regularly involves handling several application windows and multiple virtual desktops at once or you want to go back and forth between select programs on your Windows 10 PC, Task View and Aero Snap are essential tools.
Aero Snap is an easy way to arrange any open windows on your desktop with your keyboard, mouse, or the Snap Assist function and has been around in various forms since Windows Vista. Task View is a quick way to create virtual desktops to simplify and organize your applications and then quickly select the one you want to work with and configure multitasking functions and review document and program activity from the last 30 days.
Windows Aero Snap and how to use it
Aero Snap (shortened to “Snap” in later Windows documentation) allows you to drag windows to the sides or corners of your screen, and they will change size automatically. Most Snap functions are available using either the mouse, touchscreen, or keyboard, with some being restricted to just one.
The settings can be toggled to let users decide whether using Snap shows which other windows can be snapped, if adjacent windows will be automatically resized, and whether Snap will make windows adjust to fill available space. To adjust your Snap options, open Settings, select System, and click on Multitasking.
Click on the title bar of the window you want to snap and move the window to the edge of your screen. You will see an outline that indicates where the window will snap to. Dragging the window to either side of your screen will snap it to the left or right portion of the monitor.
How to Snap with the keyboard
Click on the window you want to snap. Once selected, selecting the Windows Logo Key + Left Arrow will snap that window to the left of your screen. Likewise, using Windows Logo Key + Right Arrow will snap the selected window to the right.
Snaps can also be moved into corners after being snapped by choosing the window and pressing the Windows Logo Key + Up Arrow or the Windows Logo Key + Down Arrow to shift it to your desired corner. After the window has been snapped to a corner, it will take up a quarter of the screen, which is the smallest area possible for snaps. The Windows Logo Key + Arrow Keys can then be used to move the window wherever it is needed.
How to Snap with Snap Assist
If you’ve snapped a window but still have a large amount of space available on your screen, the Snap Assistant will appear. If you have multiple windows open, they will be displayed as thumbnails in the available area.
In the remaining space on your screen, select the thumbnail of the window you want to open. Side-by-side windows can be adjusted at the same time by clicking the dividing line and dragging the mouse. Releasing the mouse will resize the second window to match the first and fill any remaining screen space.
- If you have two windows displayed side by side, you can resize both windows simultaneously by selecting and dragging the dividing line.
- Resize the window on one side to the size you want it to be, and then release the mouse button. The other window will resize itself to fit alongside the first one, so you won’t have any empty screen space.
Windows Task View and how to use it
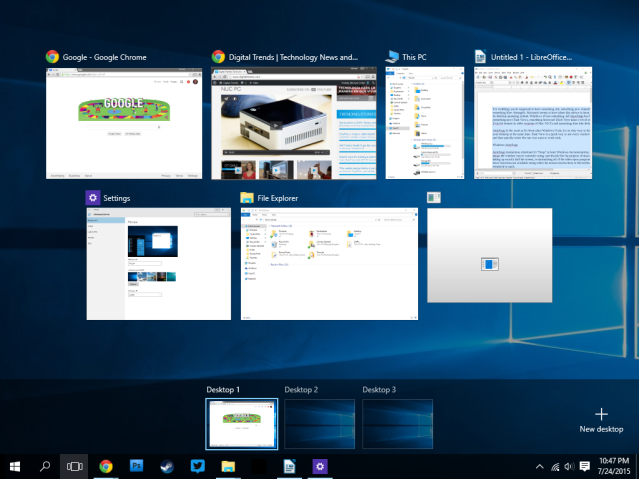
By default, Windows 10 has the Task View button enabled on the taskbar to the search button’s right. (If you don’t see it, right-click the taskbar, then click Show Task View Button.) You can also activate Task View by pressing Win + Tab on your keyboard. This keyboard shortcut will work whether or not the Task View button is currently visible.
When Task View launches, it will show you all the windows on your desktop, whether they’re minimized or maximized. If you’re using multiple monitors, the windows on each monitor will appear grouped on each screen. Click on any window to bring it to the front and make it active.
How to use virtual desktops
Task View is also where you access Windows 10’s virtual desktop feature. Any windows opened on this desktop won’t be visible on the first one.
Multiple desktops are a great way to separate tasks — you can use one for work items and one for personal stuff and separate individual applications for ease of use. You can create dozens of virtual desktops, but you probably won’t need more than two or three, and they become difficult to manage if you have too many.
To close a virtual desktop, click the X button above it in Task View. You can also create a new virtual desktop with the keyboard shortcut Win + Ctrl + D or close the current one with Win + Ctrl + F4. To switch between virtual desktops (in the same order as on the Task View bar), press Win + Ctrl + Left or Right.
To move an open window from one virtual desktop to another, open Task View with the button or Win + Tab command, then click and drag one of the small window icons to another desktop in the row at the bottom of the screen.
Task View Timeline and how it works
Introduced with the April 2018 Windows 10 update, Timeline allows you to scroll through any live tasks, such as documents or program activity, and also records Windows 10 sessions that you’ve logged into for the last 30 days. Recorded events from the Timeline’s history can be quickly selected and opened, allowing you to continue earlier tasks with ease.
It is worth noting that unless you choose otherwise, Timeline will also send Microsoft information about your device’s activity history. To adjust the settings of this new feature, go to Settings > Privacy > Activity History.
AeroSnap + Task View for smooth multitasking
When checking out the AeroSnap feature above, you may have noticed that the Task View automatically appears when you snap a window to the right or left side of the screen. This automatic Task View only lasts until you make another click, then disappears. If you click any of the window icons in Task View immediately after snapping another window, it will automatically fill the space on the opposite side of the screen. It’s a great way to quickly compare the contents of two windows at the same time.


