Each time you open a browser and type in a web address, there’s a hidden hand sending all the information to your PC to render the page as it should. Those middle-men of your newly loaded webpage are the internet’s DNS servers.
But what is a DNS server exactly? To help explain, we’ll walk you through the process of retrieving a web page and cover the many types of DNS servers residing between you and your favorite sites and services. We’ll also show you how to change DNS settings to get the fastest, safest web browsing experience possible.
What is DNS?
DNS is short for Domain Name System. Created in 1983 at the University of Wisconsin, it’s an expanding global directory for the Internet that replaces numeric addresses with alphabetic addresses. Rather than “dial” a string of numbers in a browser to contact Google, just type its name instead. Alphabetic addresses are simply easier to remember, even more so given there are more than 1.7 billion websites on the Internet today.
Google.com is easier to remember and type than 172.217.15.110, for example.
But why do websites even have numeric addresses? Because computing devices communicate in binary form: Ones and zeroes. They all also have a binary identifier when connected to a network so data knows where to go. These identifiers are rather long, containing 32 numbers, hence the 32-bit reference.
However, the numeric addresses we see are “condensed” versions divided into four “octets.” In binary form, each octet contains eight numbers, though we only see three in the condensed version ranging from 0 to 255. For example, the binary address 11000000.10101000.01111011.10000100 condenses down to 192.168.123.132.
These addresses are divided by decimals for a reason. Each one contains two components: Network and Host. How the four octets are divided up between these two components depends on the IP address class.
For instance, your home network may fall under Class C: The first three octets identify the network and the fourth octet identifies your device. Google’s address would fall under Class B: 172.217 identifies the network and 15.110 identifies the server. Meanwhile, Digital Trend’s IP address falls under Class A. The 18 number identifies the network while 235.70.209 identifies the server.
What is a DNS server?
It’s a program or computer that handles a DNS query.
There are four types of DNS servers, each with one specific function: The DNS resolver (or recursor), the Root nameserver, the Top Level Domain (TLD) nameserver, and the Authoritative nameserver. The whole process is handled in mere milliseconds so all you see is a web page instantly loading in your browser once you type an address.
How does a DNS query work?
The best way to understand how each DNS server type works is to follow the DNS query trail. Again, there are a lot of steps to get a webpage loaded in your browser, but unless you’re having connectivity issues, you’ll only see near-instantaneous page loads.
Step 1: The Web client
You open a web browser and type http://www.google.com. The query leaves your browser and is received by the DNS client built into the operating system.
Step 2: The DNS client
The built-in DNS client checks its local cache to see if it has the associated numeric address already on file. If it does, it provides the address to the web client. If not, it sends a query to an external DNS resolver server residing on the Internet. It’s typically maintained by your Internet Service Provider (ISP).
Step 3: The DNS resolver
This server resides between you and all other DNS servers required to get Google’s numeric address. This server essentially takes control of the DNS query, temporarily becoming the DNS client.
Step 4: The Root nameserver
There are 13 of these servers maintained by the Internet Corporation for Assigned Names and Numbers (ICANN). Overall, this network keeps track of all the servers that maintain a directory of each domain, like .com, .net, .org, and so on. In our example, this network responds to the query by directing the DNS resolver to the address of a server handling the .com domains.
Step 5: The Top Level Domain (TLD) nameserver
Again, each TLD nameserver maintains a directory of a specific domain. They’re managed by the Internet Assigned Numbers Authority (IANA), which is part of ICANN. When the .com TLD nameserver receives the DNS resolver’s request, it responds with the address of an Authoritative nameserver that keeps Google’s actual numeric address.
Step 6: The Authoritative nameserver
This is the final stop for the DNS query. This nameserver receives the DNS resolver’s query and pulls up the DNS A Record to retrieve Google’s numerical address. However, if a domain or a subdomain has an alias — like Google.com — the DNS resolver will receive that information first, prompting it to send another request for the numerical address listed in the DNS A Record.
Step 7: The DNS resolver
With Google’s numerical location in hand, the DNS resolver delivers the information to your PC’s DNS client. The resolver is done for now until it receives another DNS query.
Step 8: The DNS client
Now knowing the numerical address, the DNS client hands the address over to the web client. It will also store the numeric address in its cache for later use.
Step 9: The Web client
Using the numeric address, the web browser sends an HTTP request to the server located at that Internet address, which in turn responds with the webpage you see in your browser.
A note about DNS resolvers
You may see suggestions about switching DNS servers. These suggestions are typically referring to DNS resolvers. Your device’s DNS client and your router defaults to DNS resolvers maintained by your ISP unless you manually change the address information. You can do so on a device-by-device basis or dig into the router and change the DNS settings so it applies to all connected devices.
Here are a few reasons why changing your DNS settings is ideal:
ISP tracking
Your internet service provider can see which websites you browse each time you query one of its DNS resolvers. Changing DNS server information can reduce their overall tracking, though they can still see your activity based on the IP addresses you access. The only real way to dodge ISP snooping is to use a virtual private network. Still, switching DNS resolvers helps.
Third-party servers can unblock content
If you want to view region-blocked content, some third-party DNS servers can trick content providers into viewing your connection as local.
Third-party DNS servers may be faster
You’re likely physically closer to an ISP’s DNS server which should translate to better performance than a third-party DNS query. But that’s not always the case. Indeed, your ISP’s servers may experience ongoing issues or are slow in general. There may even be a third-party DNS server closer to your physical location, providing better speed and reliability.
Third-party DNS servers may be safer
One way to easily block unsavory content online is to use a third-party DNS server that offers parental controls, like OpenDNS. Simply change the DNS settings in your router, create and sign in to your free account, and establish filters that ignore DNS queries related to content you don’t wish your device’s or home’s connection to have access to. You can also use filters to block malicious websites that are intent on stealing your data.
How to change DNS settings on a router
Unfortunately, this isn’t a one-guide-fits-all scenario. Backend interfaces aren’t identical across all router models. Even more, some routers have broader and deeper feature sets than others. However, one universal setting across them all is altering DNS settings.
In our example shown below, we access a Linksys router using a browser (here’s how to access yours). We can change the DNS settings by clicking Connectivity on the left-hand menu followed by the Local Network tab in a pop-up window. As shown below, we enter Google’s Primary DNS address in the Static DNS 1 field and Google’s Secondary DNS address in the Static DNS 2 field.
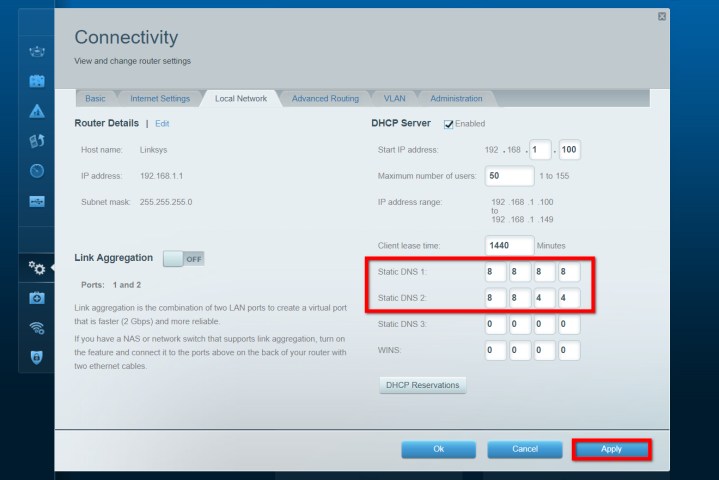
With those numbers inserted, we can click the Apply button to complete the change.
Now, when any connected device on the local network sends a query via its DNS client, the query is immediately directed to Google’s DNS resolvers rather than the ISP.
How to change DNS settings on Windows 10
Step 1: Right-click on your internet icon located next to the system clock (Wi-Fi or Ethernet) and select Open Network & Internet settings on the pop-up menu.

Step 2: The Status category in the Settings app appears on your screen. Scroll down and click Network and Sharing Center.
Step 3: The Control Panel appears on your screen. If you’re on a wired connection, click the Ethernet link followed by the Properties button displayed on a pop-up window. If you’re connected via Wi-Fi, click the Wi-Fi link instead followed by the Properties button.

Step 4: Select Internet Protocol Version 4 (TCP/IPv4) on the list and click the Properties button.
Step 5: In the pop-up window, change the current DNS setting to Use the following DNS server addresses.
Step 6: Enter the primary DNS server address in the first “preferred” field and the secondary DNS server in the second “alternate” field.
Step 7: Click the OK button to complete.

How to change DNS settings on MacOS
Step 1: Click the Apple logo located in the top left corner.
Step 2: Select System Preferences in the drop-down menu.

Step 3: Select Network in the System Preferences window.
Step 4: The Network window appears with your current Internet connection already selected. Click the Advanced button located in the bottom right corner.

Step 5: Click the DNS tab in the following window.
Step 6: Click the “plus” symbol next to IPv4 or IPv6 addresses.
Step 7: Enter the primary and secondary IP addresses of the third-party server. In this case, Google uses 8.8.8.8 for the primary and 8.8.4.4 for the secondary.
Optional: Here you will also see a section for Search Domains. This autocompletes hostnames when you type a single word in Safari and other network-based services. For instance, if the list contains apple.com and you simply type “store” in the address field, the browser loads the webpage associated with store.apple.com.
That said, generally leave this section blank unless you reside on a specific domain and need quick access to a networked PC using a single word.

Step 8: To finish, click the OK button.
How to change DNS settings on a Chromebook
Step 1: Click the system clock located in the bottom right corner followed by the “gear” icon on the pop-up menu.

Step 2: The Chrome settings appear on your screen. Select your Internet connection listed under Network. Unfortunately, this action only expands the list of available connections.
Step 3: Click your network connection again.
Step 4: Click the expand the Network setting.
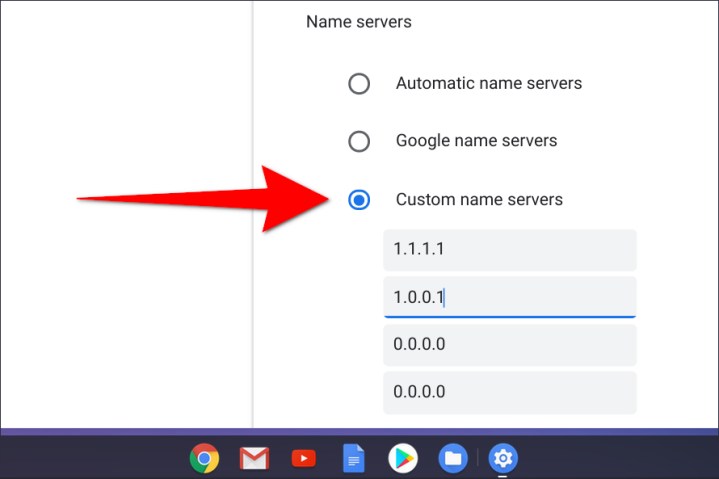
Step 5: To use Google’s DNS servers, change the setting to Google name servers — you don’t need to enter primary and secondary addresses.

To use a different DNS server, change the setting to Custom name servers, and enter the primary and secondary addresses. For instance, if you want to use OpenDNS Home, enter 208.67.222.222 and 208.67.220.220
Free and paid DNS servers
If you want to use a third-party DNS query service, there are plenty of free and paid alternatives. Here is a quick list below to get you started:
| Service | Primary DNS |
Secondary DNS |
Additional Paid Services |
| AdGuard DNS | 176.103.130.130 | 176.103.130.131 | No |
| Alternate DNS | 198.101.242.72 | 23.253.163.53 | No |
| CleanBrowsing DNS | 185.228.168.9 | 185.228.169.9 | Yes |
| Cloudflare DNS | 1.1.1.1 | 1.0.0.1 | Yes |
| Comodo Secure DNS | 8.26.56.26 | 8.20.247.20 | Yes |
| DNS.Watch | 84.200.69.80 | 84.200.70.40 | No |
| Google Public DNS | 8.8.8.8 | 8.8.4.4 | No |
| OpenDNS Home | 208.67.222.222 | 208.67.220.220 | Yes |
| Quad9 DNS | 9.9.9.9 | 149.112.112.112 | No |
| Verisign DNS | 64.6.64.6 | 64.6.65.6 | No |
IPv4 vs. IPv6
Everything provided in this guide is based on Internet Protocol version 4, or IPv4. However, you’ll also see references to version 6, or IPv6. This is a newer version of the protocol designed by the Internet Engineering Task Force (IETF) to replace version 4. Why? Because of the older protocol’s age and limitations.
IPv4 can only handle 32 numbers. That limitation led to the American Registry for Internet Numbers (ARIN) to completely run out of available addresses in 2015.
The successor, iPv6, fixes the problem by introducing addresses with 128 numbers, or 128 bits, that can support 340 trillion trillion trillion combinations (340,282,366,920,938,463,463,374,607,431,768,211,456). Developed in 1998, the protocol finally entered deployment in 2006, but the process has been slow.
According to Google’s statistics, IPv6 adoption in North America currently resides at 41.71% despite deployment beginning 14 years ago. Germany resides at 49.1%, France at 42.29%, Australia at 22.68%, and so on.
The bottom line here is that IPv4 and IPv6 will work side by side until the newer protocol fully replaces the older. That all said, you may find DNS numbers provided by IPv6 as well, though you can’t enter them in IPv4 fields. Instead, you’ll need to enter them in completely separate fields.
For example, here’s the Windows 10 method:
Step 1: Right-click on your internet connection icon located next to the system clock (Wi-Fi or Ethernet) and select Open Network & Internet settings on the pop-up menu.
Step 2: The Status category in the Settings app appears on your screen. Scroll down and click Network and Sharing Center.
Step 3: The Control Panel appears on your screen. If you’re on a wired connection, click the Ethernet link followed by the Properties button displayed on a pop-up window. If you’re connected via Wi-Fi, click the Wi-Fi link instead followed by the Properties button.
Step 4: Select Internet Protocol Version 6 (TCP/IPv6) on the list and click the Properties button.
Step 5: In the pop-up window, change the current DNS setting to Use the following DNS server addresses.
Step 6: Enter the primary DNS server address in the first “preferred” field. For Google’s Public DNS, this would be 2001:4860:4860::8888.
Step 7: Enter the secondary DNS server in the second “alternate” field. For Google’s Public DNS, this would be 2001:4860:4860::8844.

Step 8: Click the OK button to complete.
If you thought IPv4 numeric addresses were hard to remember, be glad DNS swaps out those long IPv6 numeric addresses for google.com and netflix.com!
Are you even using IPv6?
Windows 10, MacOS 10.15 Catalina, and Chrome OS support IPv6. However, load the Test My IPv6 online test and you’ll see that you’re probably still surfing the web on IPv4. This is why (1) you should consider switching to third-party DNS servers and (2) add the IPv6 DNS server addresses to your operating system or router. You may not even be receiving an IPv6 flow from your ISP.
Note that while modern routers support IPv6, they may not provide means to manually enter DNS server addresses based on IPv6.