Nvidia just released a new upscaling feature — erm, kind of. It’s called Nvidia Image Scaling, and although it might be the first time you’re hearing about it, Nvidia has had the feature around for a while. We’re here to break down what Nvidia Image Scaling is, how to use it, and how it compares to similar technologies.
Image Scaling has been a part of Nvidia Control Panel for over two years. It’s now available in GeForce Experience, as part of the Nvidia in-game overlay, and — perhaps most exciting — as an open-source tool for developers to add into their games.
What is Nvidia Image Scaling?
Nvidia Image Scaling isn’t new, but this might be the first time you’re hearing about it. The company released it as part of the Nvidia Control Panel in 2019, but it had been buried in a list of admittedly mundane settings. Now, however, Image Scaling is part of GeForce Experience and is available for developers as a software development kit (SDK).
Although Image Scaling and Nvidia’s Deep Learning Super Sampling (DLSS) achieve the same goal, you shouldn’t confuse them. Image Scaling is based on a new upscaling algorithm, which uses directional scaling in four directions and includes an adaptive sharpening filter. Both the upscaling and sharpening happen at the same time in the post-process rendering chain.
This is basically the same as AMD’s FidelityFX Super Resolution (FSR) — you may have even heard about AMD using the same upscaling tech Nvidia had been using for a while. The two upscaling features are basically the same. The major difference is that FSR places the upscaling and sharpening as two separate steps, while Nvidia Image Scaling does both in the same pass.
There are two versions of Image Scaling, but they achieve the same goal. The first version comes at the driver level through GeForce Experience. It supports five render resolutions, from 85% resolution to 50% resolution, and it includes a slider for the sharpening filter. This works across all games as long as you have a Nvidia GPU that uses GeForce Experience.
The other version is the SDK, which is open source and available for developers on GitHub. The SDK is functionally identical; it offers the same settings and produces the same results. The only difference is that developers can add Image Scaling directly to their games, so you’ll be able to access the setting alongside other graphics options. Because this version comes at the game level, it supports just about any GPU — AMD options included.
How to use Nvidia Image Scaling
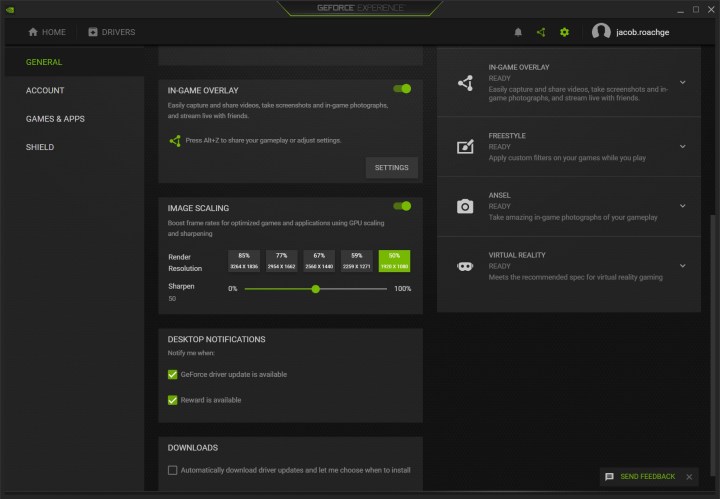
Nvidia Image Scaling is now part of GeForce Experience, so the first thing you need to do is update your GPU drivers. Download the latest version from Nvidia’s website and follow the instructions in the installer. The important thing is to install the driver and GeForce Experience together.
After that, choose Custom instead of Express for the installation method. On the next page, check the box for Perform a Clean Install, and wait while the driver installs. After it’s done, restart your computer, and you should be set.
You have two options to turn on Nvidia Image Scaling. The first is through GeForce Experience, which only works with optimized games. Here’s how to enable it:
- Open GeForce Experience and click on the cog icon (Settings menu).
- Navigate to the General tab and find the Image Scaling option.
- Turn the toggle switch on and select your desired input resolution and sharpness.
- Click Home and find the game you want to optimize.
- Hover your mouse over the game and click Details, and select Optimize.
- (Optional) Navigate to Home again, select the three dots in the upper right corner, and select Optimize All Games and Apps to quickly optimize all of your games.
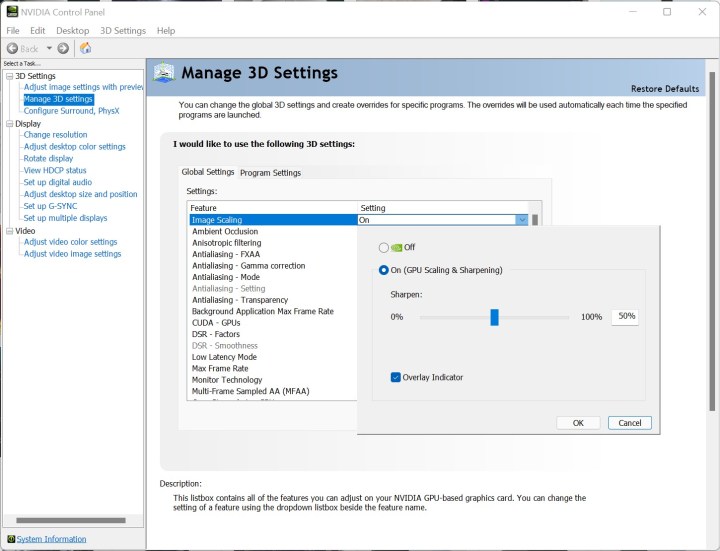
Through GeForce Experience, Image Scaling only works in supported games — games that can be optimized by GeForce Experience. You can still use Image Scaling in unsupported games, but you need to enable it through the Nvidia Control Panel instead. Here’s how to do it:
- Open up the Nvidia Control Panel.
- Select Manage 3D Settings and choose the Global Settings tab.
- Turn the Image Scaling option to On and set the sharpening percentage.
- Check the Overlay Indicator box.
- In game, set your resolution to the desired input resolution, not the output resolution.
The overlay indicator is important because it will let you know if Image Scaling is working. Unlike DLSS and FSR, you don’t set the desired output resolution — you set the input resolution. If you want maximum performance at 4K, for example, you would set the input resolution at 1,920 x 1,080.
You’ll see a small text box in the upper left corner of your screen. If the text is green, then the tool is upscaling and sharpening your image. If it’s blue, it’s sharpening but not upscaling. If you have a compatible GPU, you can stack DLSS and just the sharpening filter if you want, in which case you would set the resolution to whatever final resolution you’re looking for.
Nvidia Image Scaling vs. DLSS vs. FSR
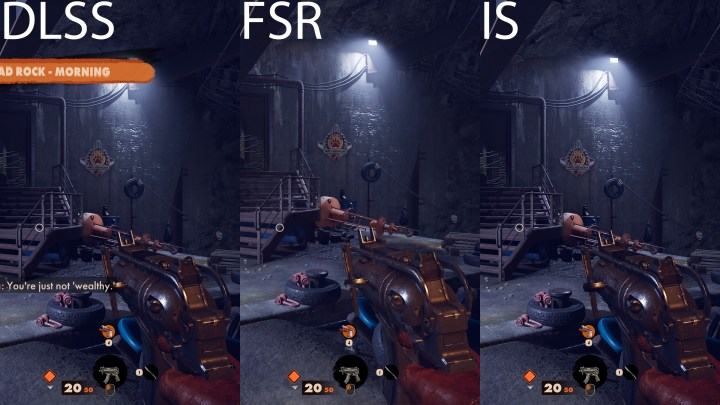
Nvidia DLSS and Image Scaling, as well as AMD FSR, achieve the same goal. They’re focused on upscaling your games to improve performance with as small of a drop in image quality as possible. There are some clear differences in image quality, though. We took a few 4K screenshots in games that support FSR and DLSS to see how big that difference is.
First is Deathloop, which shows some clear differences between the three technologies. We set the graphics quality to the highest possible mode and used the most aggressive performance mode for each upscaling tool. You can see our results below. DLSS clearly offers the best image quality, while FSR and Image Scaling are behind in their own ways.
FSR is messier overall. It has more jagged edges on the rails and buoy, and there’s some resolution lost in the fine details (look at the sign on the wall next to the stairs). Image Scaling looks better overall, but that’s only because it’s a still image. It seems the default sharpening filter is more aggressive with Image Scaling, so those jagged edges are more noticeable while playing.

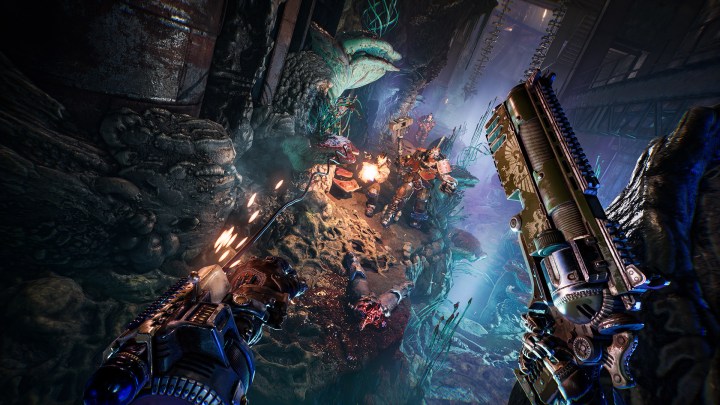
Necromunda: Hired Gun told the same story. We cropped in 100% for this comparison to showcase the differences more clearly. For Deathloop, we just cropped horizontal resolution, not vertical resolution).
Comparing the three modes, DLSS seems to balance the two. It maintains more detail than FSR, but it’s not as aggressive with the sharpening as Image Scaling is. You can turn down the sharpening amount through GeForce Experience, and if you do, Image Scaling looks almost identical to FSR.
We already came to this conclusion in our FidelityFX Super Resolution review — DLSS looks the best, but FSR offers a decent alternative to GPUs that don’t have access to DLSS. Image Scaling is no different than FSR. For performance and image quality, the only benefit it offers is control over the sharpening amount.
The biggest difference is that Image Scaling happens at the driver level, so you can use it in any game as long as you have an Nvidia GPU. It produces decent results overall, though you should tweak the sharpening filter to get the best image.

