Animal Crossing Museum Day Guide: All stamp locations and rewards

Capping off the events announced in mid-April, Blathers has turned his museum into a funhouse of sorts. To celebrate International Museum Day, everyone’s favorite wide-eyed curator is running a stamp rally, and it wouldn’t be Animal Crossing without a few prizes being up for grabs.

Recommended Videos

Like the May Day event, there isn’t a whole lot to this one, but the rewards are certainly better than that tiny Mother’s Day mug from a few weeks back. Not that the value of the reward was really the point there.

What is the Museum Day stamp rally and how long is it available for?

Animal Crossing museum day details
Image used with permission by copyright holder

A stamp rally is a small activity designed to encourage a proper tour of a venue, exhibit, or event, with a prize usually dished out for those who collect all the stamps on each corresponding card.

In the case of Animal Crossing, Blathers has dropped three stations around three of the exhibits, and it’s up to you to wander around and add each stamp to the cards he gives you upon arrival, while hopefully admiring the displays you’ve helped build up over time.

As for availability, the Museum Day stamp rally follows in the footsteps of every other Animal Crossing: New Horizons event to come before. It’s available until the end of May and can be completed in around 5-10 minutes, so there’s no need to rush.

Do I need the art gallery for museum day?

With Jolly Redd showing up a few weeks prior to Museum Day and convincing Blathers to add a fourth exhibit onto the museum for the dubious fox’s genuine art, you’d think unlocking the art gallery would be a requirement for the full museum day experience. It’s not.

The Animal Crossing Museum Day stamp rally only includes the first three museum exhibits: fish, fossil, and bug. So don’t worry if you haven’t build up (or even unlocked) the art gallery yet. Maybe next year, Michelangelo.

All Museum Day stamp locations

Blathers has set up three Stamp Rally stations in each of the three default exhibits throughout the museum, and it’s up to you to find them. Track them down, stamp the corresponding card, and take each completed set to him for a themed reward. They’re not hard to find. After all, the museum is fairly small.

You won’t have to go filling in holes and chopping down trees in a labyrinth-like the May Day Maze, so don’t worry about missing out. But if you have some trouble tracking every last Stamp Rally station down, we’ve got the full location list down below.

Fish Exhibit

Animal Crossing museum day fish stamp locations
Image used with permission by copyright holder
  • The Pond: This is to the bottom right of the first room of the Fish Exhibit.
  • Headwaters: In the top-right area of the first room
  • Icy Sea: In the top-right area of the room to the north of the first, in view of the Butterfly fish

Fossil Exhibit

Animal Crossing museum day fossil stamp locations
Image used with permission by copyright holder
  • Aquatic Reptiles: Straight-facing as you enter the second room (after the long corridor entranceway)
  • Pterosaurs: Right by the Aquatic Reptiles stamp station. You can’t miss it.
  • Cenozoic: On the bottom section of the silhouette exhibit in the room to the right of previous

Bug Exhibit

Animal Crossing museum day bug stamp locations
Image used with permission by copyright holder
  • Sun-Peek Path: Go up and to the left as you enter the first room. It’s right before a staircase
  • Coconut Corner: Keep going up the stairs and slightly north. You’ll come across the coconut trees and their station
  • Giant Tree: Continue north and walk across the boardwalk to the west. You’ll reach a giant tree. The station is tucked away in the upper-right corner

Animal Crossing Museum Day rewards

Animal Crossing museum day rewards
Image used with permission by copyright holder

So what do you get for running this quick little activity for Blathers? Some wall plaques! Your feathered friend will reward your little excursion with a themed plaque (fish, fossil, and bug) for each of the three complete stamp rally cards you hand back to him. You’ll have to hand in each individually, so just keep pestering him until he delivers his dues.

And that’s it, really. Like the last few Animal Crossing New Horizons events, there’s not a whole lot to it. Still, the plagues will go well next to your wall-mounted PhD and stacks of important papers. Raymond will be pleased.

Josh Brown
Former Digital Trends Contributor
Josh Brown is a UK-based freelancer with devoted interests in video games, tech, film, and anime/manga. Just don't talk to…
All Flarlic locations in Pikmin 4
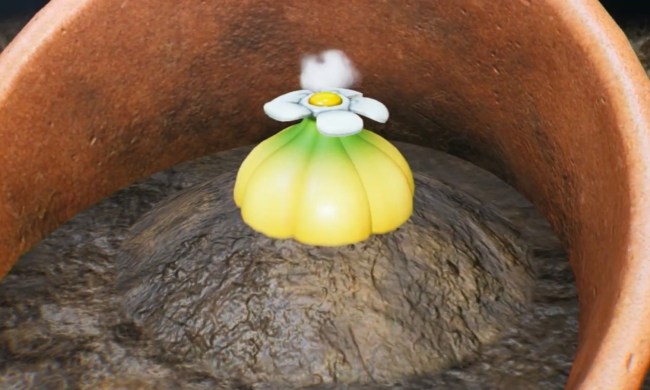
A Flarlic growing in a broken pot.

The Pikmin series has always highlighted the idea of commanding huge numbers of tiny creatures at once. With Pikmin 4 utilizing the power of the Switch, more Pikmin than ever can appear on screen, but that doesn't mean you can just grind out an entire army right off the bat. The game will limit you on how many total Pikmin you can control, forcing you to manage your forces between the different types. While this limitation will feel constricting at first, by collecting special plants called Flarlic, you can increase that number by 10. There are 12 total Flarlics to collect, with each stage having one on the surface and one in a cave to find, but you only need eight of them to reach the max Pikmin limit. Here's where to find all the Flarlic in Pikmin 4 so you can travel with a full army.
Sun-Speckled Terrace
The Flarlic you can find on the surface is way up north beyond the electric fence that you need Yellow Pikmin to pass. You'll need at least five Yellow Pikmin to toss up on the potted plant next to the fence in order to reach the Flarlic on the elevated mound.

The second is in the Last-Frost Cavern. Go to the top-left corner of the large northwest room and pluck it out of a sunken plant pot hidden behind some pots you need to smash.
Blossoming Arcadia
Our surface Flarlic is up north on the south side of the water and requires Blue Pikmin to bring back, or Ice Pikmin to freeze the water below it. It is tucked inside a wooden structure you need to toss some Pikmin up to collect.

Read more
All Zelda: Tears of the Kingdom Amiibo rewards
Link glides with a Majora's Mask-themed glider in Tears of the Kingdom.

While Amiibo are so cool that you may just want to display them, they still do serve functions in just about every Nintendo Switch game. Scanning them usually unlocks some type of reward in-game, which is true in both The Legend of Zelda: Breath of the Wild and the new The Legend of Zelda: Tears of the Kingdom. There are dozens of Amiibo out there already, and even a couple of brand new ones made specifically for Link's latest adventures, so scanning them all in is close to impossible. Thankfully, not all of them have unique rewards, but there are a handful that you might want to consider scooping up for some special unlocks. Here are all the Tears of the Kingdom Amiibo rewards and how to activate them.
How to activate Amiibo

To access any Amiibo reward in Tears of the Kingdom, you need to first enable them by pausing the game and going to the System Menu. From here, simply change the amiibo disabled tab to Use amiibo.

Read more
Animal Crossing: New Horizons bug guide for November 2022
Catching a bug in Animal Crossing: New Horizons.

Animal Crossing: New Horizons is a game for completionists, giving you tons of things to collect that can take up a lot of your time. In particular, bug catching can eat up lots of your time, especially since so many of them only appear during certain times of the year. Each month, different bugs come and go, even though the overall list might not change much from October to November, for example.

In this guide, we'll go through the new Animal Crossing: New Horizons November 2022 bug list, including tips on when they appear, where to find them, how much they're worth, and more.

Read more