A lot of buzz has been growing around the internet concerning how Cyberpunk 2077 runs on the Xbox One and PS4 generation consoles. The developers clearly targeted high performing PCs when designing the game, and even those players are having some issues running the game well. The Series X does help out a bit, but considering the game isn’t yet optimized for next-generation consoles, the experience isn’t as good there as one would hope either. Still, if you were looking forward to playing Cyberpunk 2077 on your base Xbox One, the experience is likely disappointing. Obviously, consoles are not as customizable as PCs, but there are still a few settings you can tweak to squeeze out the best possible performance while we wait for the developers to come out with some patches. Here are the settings that will give you the best performance boost.
See More
What can be improved
The settings you have control over in Cyberpunk 2077 on your Xbox One are few. That’s nothing new for console gamers who are traditionally used to a game automatically running as best it can for the hardware. What isn’t traditional is a game coming out that looks and performs as poorly as this one at launch. Bugs are the biggest concern for a lot of people, and rightfully so. However, that is not something that can be addressed on the user side. There’s no setting you can tweak that will make NPCs stop T-posing through objects. We’ll all just have to wait for the patches in this regard.
Visuals and performance, on the other hand, can be improved ever so slightly on your base console. Don’t expect to get visuals you’re seeing from the high-end PC builds out there, but you can at least make it as crisp and smooth as possible.
What settings to change

To get started making Cyberpunk 2077 perform that extra bit better, load up the game’s main menu. From here enter Settings and tab over to the Graphics tab using your bumpers. Here we are given five different options to play with: Film Grain, Chromatic Aberration, Depth of Field, Lens Flare, and Motion Blur.
Right off the bat, turn Film Grain off. Film grain is a graphical filter that is applied over the game to give it a specific style. Turning it off will make the game look more crisp.
Next, you want to have Chromatic Aberration set to on. This is more of a stylistic choice than one that impacts performance, so if you dislike the effect you can certainly turn it off. What it does is create those rainbow-looking lighting effects on light sources. Since Night City is full of bright neon signs, and the cyberpunk genre is somewhat known for this visual style, we think it lends to the visuals rather than take anything away.
Depth of Field is your next option on the list and should also be turned off. This is another filter that automatically makes things a certain distance away from your character, or your character’s focus, appear blurry or out of focus. Considering the game isn’t exactly all that sharp to start with, blurring the background just makes things look even worse.
Very similar to film grain, we have Lens Flare. If you’ve seen a J.J Abrams movie then you probably know what this setting does, but if not it makes light kind of streak and scatter in your vision, particularly when viewed at an angle. This one is very subjective. Like chromatic aberration, some love how it makes the game feel when walking around the environments, especially at night. Aside from fitting the aesthetic, it can also do a little bit to help cover up some lackluster textures. But, if you’re sick of this trick and find it distracting, feel free to flip it off.
Turn Motion Blur to off. This one is non-negotiable. As the name suggests, motion blur makes the game look blurry when things are in motion. Basically, that means all the time, but even when you are just moving your character’s head. The effect can look okay when handled right, but the Xbox One version just isn’t up to it. Even people who don’t normally feel nauseous playing games can get a little sick when motion blur is too aggressive, and that’s absolutely the case in Cyberpunk 2077.
HDR

This setting will only apply to you if you are playing on the Xbox One S and have a TV that can also display HDR. If you’re still rocking the OG Xbox One then you don’t need to worry about this step.
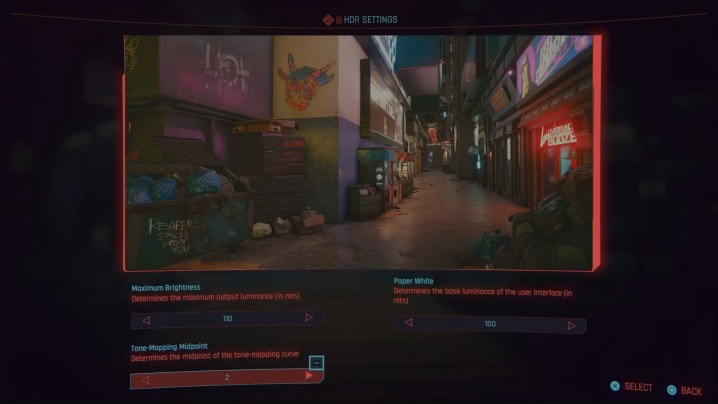
The HDR settings are actually a bit hidden in the menus compared to all the other settings. Start off just like before from the main menu and enter Settings. Now, from any screen here, press in your left analog stick to bring up the HDR settings menu. Now here you will be able to play with the Maximum Brightness, Paper White, and Tone-Mapping Midpoint settings. This is a difficult area to give any “best” or universally “better” settings you should select since it will heavily depend on your specific TV and gaming environment. That being said, and without getting too technical on these terms, we do suggest upping the brightness to around 1,000 to start and see how that looks. Paper White generally can go up a good amount as well and maybe a few in Tone-Mapping Midpoint as well.
Obviously, these changes are purely visual and won’t squeeze out any additional frames, impact load times, or anything like that. Still, the impact properly set HDR settings can have on a game like this is very striking. Take your time messing around and watching how the demo image changes to find the look you enjoy most.


