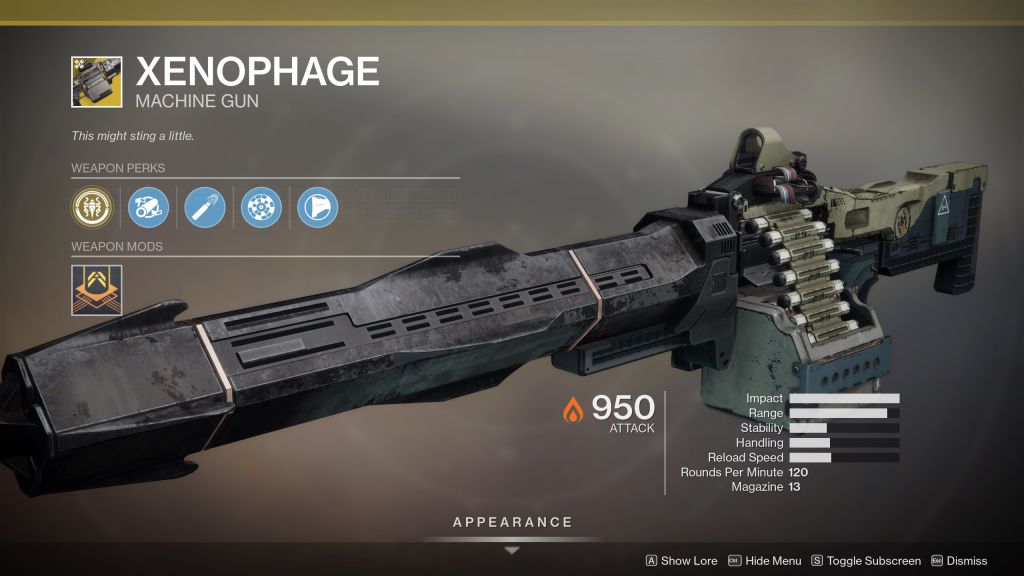
The latest Halloween-themed update to the game brings another new weapon to the fold: Xenophage.
This exotic machine gun requires you to complete one of Destiny’s most complicated quests yet, so here’s everything you need to know to add Xenophage to your arsenal.
Step 1: Obtaining the quest
To get the quest, you’ll need to head to the Moon and make for the Eris’ Morn’s location overlooking the Black Pyramid. There are two ways to get there. The easiest is by going through Eris’ portal, which appears after you complete one of her memory quests. If you haven’t knocked out this week’s yet, finish that up and head in.
If you don’t feel like opening the portal, there’s fortunately a back way in. Load into Sorrow’s Harbor and head all the way to the building on the northern edge. When you get in, jump up to the raised section and look for a door on your left. You’ll want to follow the linear path until you get to a darkened area that triggers your flashlight. Stop as soon as you reach this spot and turn around. You’ll see a hole in the wall that you can jump up to. Follow that path to reach the location.

Once you get here, take note of the four statues on the sides of the room. You’ll need to light all four up at the same time by interacting with them. There are several ways to complete this puzzle, but if you’re looking for a quick answer, do them in this order. Top Left, Bottom Left, Top Right, Bottom Right. Right and left are based on how you’re facing them when you enter the room.
Light up all the statues and a chest will appear. Open the chest and the exotic quest line will be added to your log.
Step 2: Light the lecterns
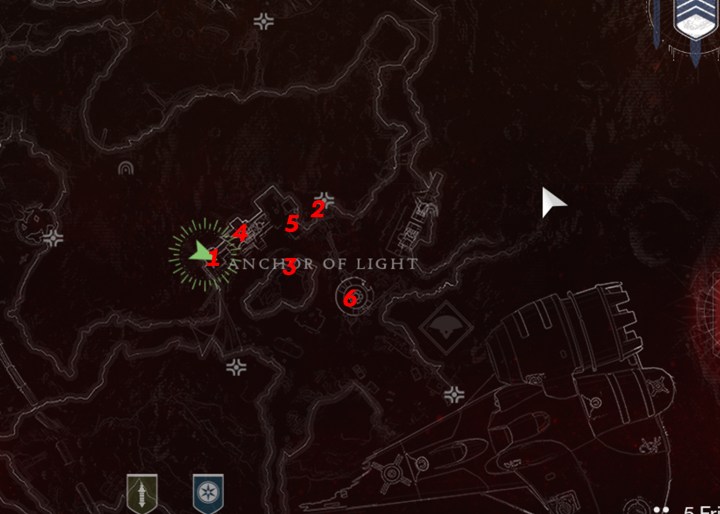
For your first step, head to Anchor of Light. Once you get to the area from the spawn point, hang a left and head to the Fallen-infested area. Here, you’ll need to pick up a ball of light and use it to illuminate 6 lecterns in a specific order. You only have 60 seconds to light each lectern.
To make this easy, here’s a map of the 6 locations.

- Enter the small building next to the larger central building and interact with the light to pick it up. The first lectern is right next to it in the room.
- Exit the building and head west to the second spot on the map. You’ll find the lectern on a raised platform, where some Fallen are hanging out.
- Head back to the main Fallen area and look across from the central building. You’ll see a smaller building across the way. Head in there to light to third lectern.
- Jump to the third floor of the big building and look at the left side of the central pillar. Jump up the pillar and you’ll find a lectern on one of the beams.
- Head to the small building that’s just west of the main building. Jump on top of it and you’ll find the 5th lectern.
- Finally, head to the big, round building right in the center of Anchor of Light. Jump on top of it and you’ll find the last lectern right in the middle of the roof.
Once all 6 lecterns have been lit, a marker will appear back in the area you were just in. Head there and interact with the object there to get the next step.
Step 3: Lost sectors
For this next step, you’ll need to complete all four of the Moon’s lost sectors. Each time you complete one, a puzzle will appear at the end. These are matching puzzles where you need to shoot runes on a 3 x 3 grid to make them match the rune at the top.

You can trial and error this if you love puzzles, but shoot the runes in this order if you want a quick solution.
- K1 Logistics: Top Left, Bottom Left, Center, Middle Right
- K1 Communion: Bottom Left, Bottom Right, Top Middle, Top Middle
- K1 Revelation: Middle Left, Middle, Middle, Middle Left, Top Middle, Bottom Middle, Middle, Middle, Middle Right
- K1 Crew: Top Right, Middle Left, Middle, Bottom Middle, Bottom Right, Bottom Right. Bottom Middle Bottom Middle
Each time you complete one successfully, a chest will appear. Open that to get a fragment. Once you collect all four, it’s time to explore the Pit of Heresy
Step 4: The Pit of Heresy
If you haven’t already, make sure to unlock the Moon’s new dungeon by speaking to Eris Morn and completing her short quest that requires you to play the new Altar of Sorrows public event. Once you get the dungeon, you’ll need to load in and follow three very specific steps to complete the quest.
To start, you’ll need to get to a room that’s filled with doors. You’ll notice a rune hanging above each door. Look for the one with no rune and head inside. Interact with the rune inside to move to the next quest step.
Next, you’ll need to get to the ogre encounter. Once you drop into the room, head towards the chasm on your left and look for a plate with runes on it. Stand on that to activate a series of platforms. Jump across the platforms and pick up the ball of light on the last one. Now, jump back across and head back to where you started. Go right this time until you find a sealed door. Interact with the two lecterns and the door will open.
Head into the door and get ready to fight a secret boss. Throughout this encounter, members of your fireteam will be assigned with a different “dread.” The goal here is for the buffed player to pick up a ball of light in the middle of the room and dunk it in a location that corresponds with their dread type.
To make this easy, here’s what everything corresponds to, with Top and Bottom referring to which level the spot is on and the direction referring to the corner of the room its in.
- Neutral Dread: Top, Front Right
- Abyssal Dread: Top, Back Left
- Thunderous Dread: Bottom, Front Left
- Fiery Dread: Bottom, Back Right
If you dunk correctly, you’ll get a Vengeance buff, which allows you to damage the boss for 25 seconds. The catch here is that you can only inflict damage with the element that corresponds to your buff. They line up as follows.
- Neutral Dread: Kinetic
- Abyssal Dread: Void
- Thunderous Dread: Arc
- Fiery Dread: Solar
To be most efficient here, use a different element for your heavy and special weapons and set your subclass to the other element.
Repeat this process until the boss is dead and you’ll get a Hive bug. Take that to Eris Morn and you’ll get Xenophage for your troubles. This exotic machine gun fires “high-powered explosive ammunition,” which is quite an enticing perk.


