Opening up your first Switch box can be equal parts exciting and confusing. This console may be small and designed for easy travel, but there are quite a few steps you’ll need to take to get everything up and running. The catch is, you can use the Nintendo Switch in one of two ways: mobile or in its docking station connected to a TV. Here’s how to set up the Nintendo Switch, whether you’re trying to squeeze in some game time on the commute to work or hosting a game night in your living room with some friends.
How to set up the Nintendo Switch for the first time
The first time you set up your Nintendo Switch, you’ll want to start without using the docking station. That’s because you’ll need to run through a few introductory prompts before you can actually use it. This is also great for people who prefer using their Switch as a mobile gaming device.

Start by picking up the AC adapter and plugging it into a nearby outlet. Connect the USB end to the port located on the bottom of the LCD screen. Turn on the console using the power button on top to confirm that it’s charging, then slide the right and left Joy-Cons into place on the sides of the screen. If you wish to use a Pro Controller, you have to wait until the initial set up is finished.
When attaching your Joy-Cons, there should be no resistance. If there is, it’s possible that your Switch is upside down or your Joy-Cons are backward. Never slam or force them into place because they may become stuck and could potentially cause irreversible damage to the console. If you’re having any problems, refer to the video by Nintendo below.
Once the Switch is on and the controllers are connected, you can start running through the prompts that appear on the screen. You’ll go through some questions that include selecting your language, region, and agreeing to an EULA. Select the internet network you want to connect to and allow the console to update. Picking your Time Zone will follow, along with a tutorial for connecting the console to a TV, but that can be skipped.
You will then be asked to create or connect your Nintendo profile, configure parental controls (also skippable), and then we’re happy to say that your Nintendo Switch setup will officially complete!
If you plan on using your console primarily as a mobile gaming device, this method of connecting directly to an AC Adapter is perfect for you. But, if you plan on doing some comfy home console gaming, then continue reading to learn how to set up the Nintendo Switch for the TV.
How to Set Up the Nintendo Switch for TV
Perfect for those days where you’re lounging around at home and itching to see one of your favorite Nintendo games on the big screen, the Switch’s home console capability is a godsend for those of us who like to enjoy the best of both worlds. Converting your Switch from mobile to home is simple and takes only a few additional steps.

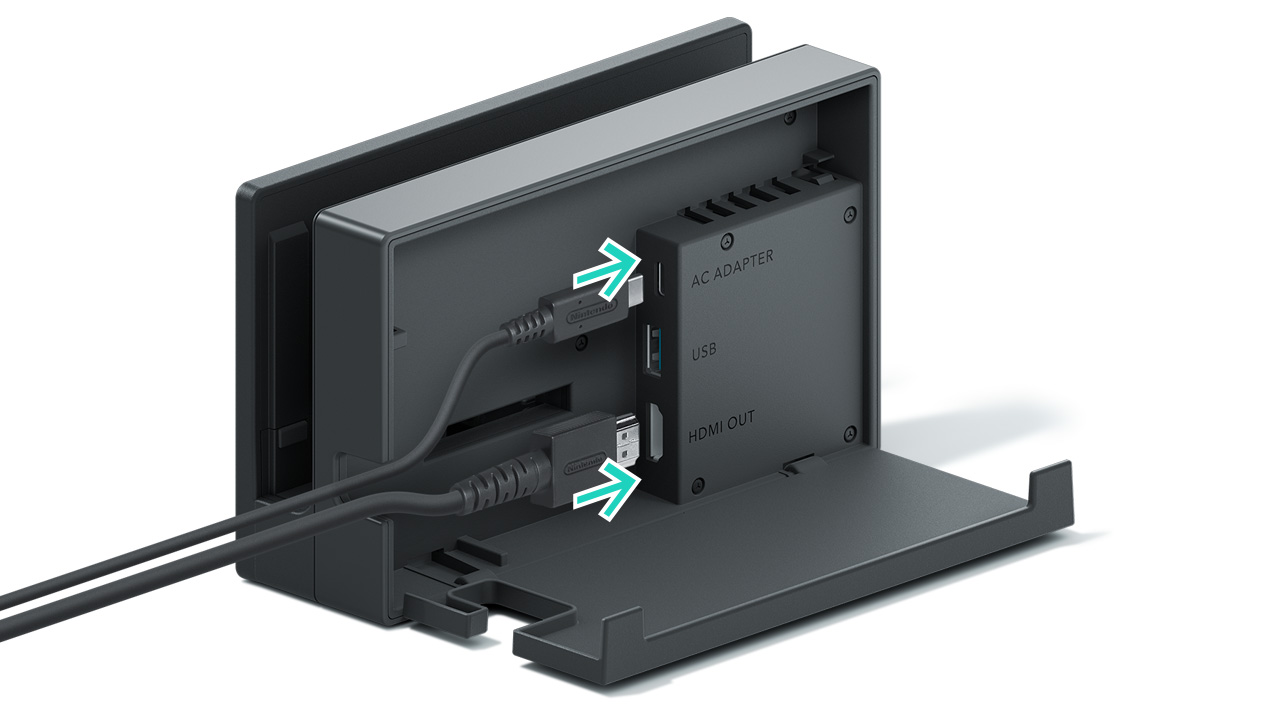
You’ll want to begin by plugging the AC Adapter into an outlet near the TV. Set the docking station on a flat surface nearby and open the back compartment to connect the USB to a port labeled AC ADAPTER.
Next, take the HDMI cable and plug one end into an HDMI port on your TV. Plug the other end into the port labeled HDMI OUT in your docking station. Close the back compartment, making sure that the wires thread through the small opening, or else the back won’t close properly.
Before sliding your Nintendo Switch into the docking station, make sure the console is turned on. If it needs to be charged, simply leave it in the docking station for a bit before trying to power it on again.
Turn on your television and select the appropriate HDMI input. The screen of your Nintendo Switch should now be displayed on the TV. If it is, you’ve successfully set up your Nintendo Switch to the TV.

