
How to record gameplay on Steam using Game Recording

how to steam game recording gameplay
Valve

Between YouTube, Twitch, Discord, and social media, gamers are sharing their clips and videos more than ever. No matter what console you're on, there's an easy way to create a video of your gameplay to share with the world. For once, PC gamers were somewhat behind the times in this regard. If you were playing a Steam game, the only way to reliably record and edit any footage was to use a third-party software, and even those lagged behind in some features most would hope to have.

Steam has rolled out a solution — or rather rolled out the beta for one. Steam Game Recording will let you easily record, edit, and share your best moments with ease.

Difficulty

Easy

Duration

10 minutes

What You Need

  • Enter the Steam Beta Update

A dota 2 clip in Steam.
Valve

What Steam Game Recording can do

Steam Game Recording has four main features: record, replay, clip, and share.

Unlike third-party recording software that need to be running prior to anything happening in a game you want to capture, Background Recording will constantly be recording what you do within the time and space parameters you set. If you don't have that much space to spare, you can also simply toggle recording on and off.

If you are currently recording, you will see the new Steam Timeline where you can create markers you want to revisit later, and some games will even generate some automatically.

Replay allows you to instantly rewind a bit to watch whatever just occurred in your game. This could be useful if you missed a bit of key information in a cutscene, or want to see how that enemy got the upper hand on you.

Clip is a simple editing tool you can use to slice out the key part of the video you want to save.

Finally, Share is exactly what it sounds like. You can share your created clips or videos wherever you wish. You can simply save your clip on your PC, save an MP4, and send MP4s between devices.

How to use Steam Game Recording

If you want to start recording and sharing clips all within Steam, you can get started in just a few steps.

Step 1: Join the Steam Beta Update.

To do this, open Steam and head into Settings >Interface > Beta Participation and select either Steam Beta Update or Steam Families Beta.

Joining the beta in Steam.
Valve

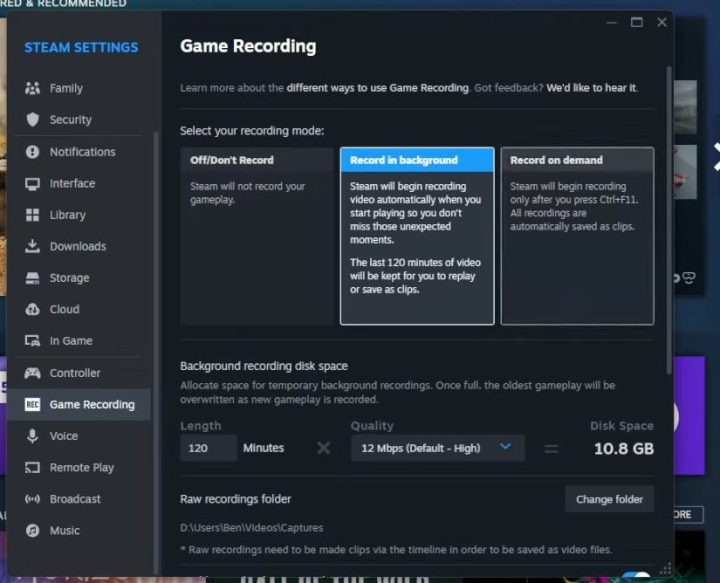
Step 2: Once you've updated to the beta build, go back into Settings and you will now see Game Recording.

Get your weekly teardown of the tech behind PC gaming
Check your inbox!

Step 3: Here you can pick between Background or On Demand. Background recording will constantly record a set duration of your gameplay so you can decide later if anything is worth saving, while On Demand will only record when you have it turned on. The default hotkey for On Demand is CTRL + 11 but you can set it to whatever you like.

The background recording option in Steam.
Valve

Step 4: Play any Steam game and find a moment you want to save.

Step 5: When you have the clip you want to save, open the Steam Overlay by pressing Shift+Tab.

Some CS 2 footatge in Steam.
Valve

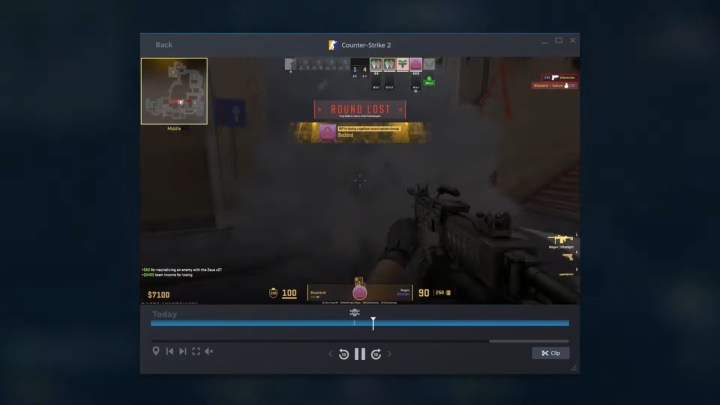
Step 6: Select the section of the timeline you want to save and press the Clip button.

Step 7: To share or save this clip, hit Save/Share and choose whichever option is appropriate for you.

Jesse Lennox
Jesse Lennox loves writing, games, and complaining about not having time to write and play games. He knows the names of more…
How to turn on the FPS counter on Steam
A modded gaming PC built into a monitor from a YouTube video.

Part of the appeal of gaming on a PC is getting those sweet, sweet extra frames. There are a lot of ways to gauge your rig's overall performance, but if your main goal is to just keep up with how your FPS is averaging over the course of a play session, you may want to turn on Steam's basic FPS counter. This will let you keep an eye on your FPS in one of the corners of your screen (you get to choose which one!). If that sounds like something you'd like to achieve, look no further — here's how to turn on Steam's FPS counter.

Read more
How to upgrade your gourd in Black Myth: Wukong
A monkey man faces off against a fiery boss in Black Myth: Wukong.

Black Myth: Wukong isn't a true Soulslike in the traditional sense, but it does share a few core elements players will recognize. Chief among them is the healing system. To recover health, The Destined One needs to take a drink from his limited gourd. Once you've downed the entire thing, the only way to refill it is to rest at a checkpoint. This makes rationing your drinks critically important, especially during boss fights. However, there is a way to upgrade your gourd to not only grant additional sips, but also apply new buffs. You can't do it yourself, so here's where and how to upgrade your gourd.

Read more
How to upgrade health in Black Myth: Wukong
Black Myth: Wukong protagonist drinking from his Gourd.

In an action RPG with as many bosses as Black Myth: Wukong, health is your most valuable resource. While you do have ways to upgrade and improve your healing gourd, there will always be a limit to how much health you can recover between Shrines. Your best defense is to not get hit, obviously, but that's not exactly useful advice. The next best tip is to get more health, but it isn't immediately clear if or how you can even do that. In reality, there are several ways, but it takes a little time to find them.
How to upgrade health in Black Myth: Wukong

There are three main ways to upgrade your total health in Black Myth: Wukong. The first is the easiest, but also provides the smallest improvements. It entails leveling up the Robust Construction stat in the skill tree. You can level this stat up multiple times to get incremental buffs to your total HP.

Read more