If you own PlayStation 4 and have a PlayStation Vita, PlayStation TV, Windows PC, Mac, or mobile device lying around the house, you have access to one of the coolest features currently available on the PS4. The aptly titled tool does exactly what it sounds like and allows you to play your PS4 games remotely using a Vita, PS TV, computer, or select mobile device.
The process is straightforward, but it does require some setup and configuration. Thankfully, we’ve put together this simple guide for those looking to take advantage of Remote Play, along with some basic tips to ensure the best possible experience.
Compatible devices
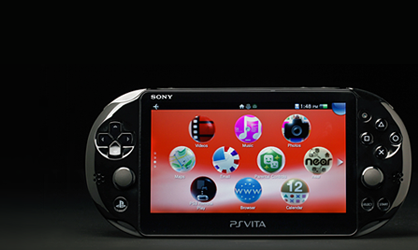
If you want the Nintendo Switch game feel when streaming games using PS4 Remote Play, the PlayStation Vita is your best bet. However, not all games are compatible with the device, plus Sony discontinued the handheld in 2019, although there are plenty to purchase through Amazon. The PlayStation TV set-top box is also a good way to stream the best PS4 games in another part of the house.
Here’s the official list provided by Sony:
Sony-made
PlayStation Vita
PlayStation TV
Controller support:
Android 5 and newer: On-screen only
Android 10 and newer: On-screen and DualShock 4 Bluetooth
iOS/iPadOS
Controller support:
iOS 12.1 or newer: On-screen only
iOS 13 or newer: On-screen only and DualShock 4 Bluetooth
PC
Controller support:
Windows 10: DualShock 4 Bluethooth and wired
MacOS 10.12 or newer: DualShock 4 wired
MacOS 10.15 or newer: DualShock 4 Bluetooth and wired
Remote Play really does remote
For years, Sony’s PS4 Remote Play service was superior to Microsoft’s Xbox solution in that gamers could stream their PlayStation 4 console from anywhere across the nation, not just within the house. They could use the PlayStation Vita handheld, the PS TV set-top box, the mobile apps, or the desktop software for Windows and MacOS.
Xbox One owners weren’t quite so lucky. Before the recent arrival of Xbox Remote Play, they could only stream to a Windows PC using the Xbox app. Moreover, streaming was locked to the local network. On the plus side, this in-house lockdown guaranteed great performance.
However, having a remote service introduces latency. At first glance, PS4 owners appear to simply stream their console across the local network. But even if the console is connected via an Ethernet cable, there are performance issues, making Microsoft’s local service a bit more stable.
Sony won’t reveal how its PS4 Remote Play service actually works, but the latency indicates that the stream first goes to Sony’s cloud servers before arriving to the locally connected Vita, PS TV, or PC. Why? So the “client” devices can access the stream on any network. This assumption is backed by the Vita and PS TV’s ability to directly connect with the PS4 and bypass the internet connection altogether.
That said, here are a few general tips to get the best out of PS4 Remote Play:
- Use Ethernet connections.
- For wireless devices, use the 5GHz band.
- Park all devices close to the router for the best wireless performance.

How to set up PS4 Remote Play (console)
Step 1: On the PS4, open Settings and select Remote Play Connection Settings. The box beside Enable Remote Play must be checked.
Step 2: Back out and select Account Management on the list.
Step 3: Select Activate as Your Primary PS4.
Step 4: Select Activate on the following screen. This tells Sony’s servers that your PS4 will now serve as the host for streaming games to any device logged in using the same Sony Entertainment Network account.
Step 5: Back out to the main Settings panel and select Power Save Settings.
Step 6: Select Set Features Available in Rest Mode.
Step 7: Check (enable) two settings: Stay Connected to the Internet and Enable Turning On PS4 for Network. These settings allow the remote client device to turn the PS4 on while it’s in Rest Mode.
With the PS4 now registered to the PlayStation Network as your streaming server, you can move on to the “client” devices. Note that the PS4 must be connected to the internet and logged in to the PlayStation Network to pair client devices and stream games.
How to use Remote Play (PS TV and Vita)
A good rule of thumb is to have the PlayStation 4 wired to the network to reduce latency. You can do the same with the PS TV unit, but the Vita doesn’t have that option.
However, the handheld has a “direct connect” mode for a better connection versus using the local network. The PS TV unit also provides this feature if you can’t physically connect it to the local network. To enable this connection, do the following on the PS4:
Step 1: Open Settings and select Remote Play Connection Settings.
Step 2: On the following screen, check (enable) Connect Directly with PS Vita/PS TV.
If these two devices move out of range, or you take them to another house or hotel, they will default to the local wireless connection.
How to set up the PS4 Link app
Step 1: Turn on the Vita or PS TV unit and update it to the latest firmware, if necessary.
Step 2: Be sure all devices are connected to the PlayStation Network with the same Sony Entertainment Network account.
Step 3: On the Vita or PS TV, select the PS4 Link button followed by Start.
Step 4: Select Remote Play on the following screen.
The system will now search for any PS4 present on the network. If successful, the PS4 Home screen should appear on the Vita or PS TV. After the initial pairing, the PS4 will wake from sleep whenever the PS4 Link app requests a session.
Troubleshooting
If the Vita or PS TV cannot locate the PS4, do the following:
Step 1: On the PS4, open Settings and select Remote Play Connection Settings.
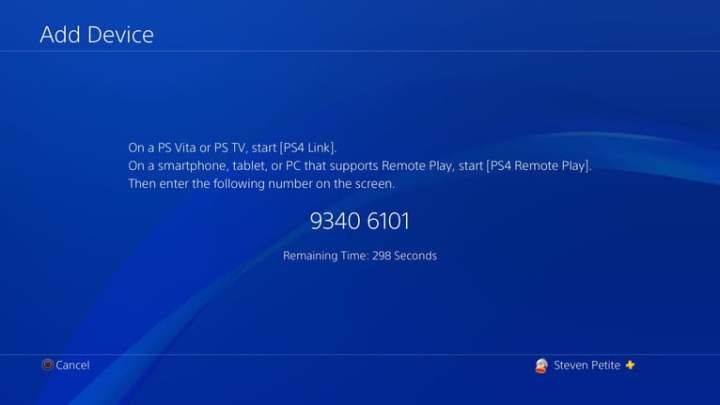
Step 2: Select Add Device.
The screen will provide a one-time code for 300 seconds. Use that code in the PS4 Link app to manually pair the PS4 with the Vita or PS TV unit.
Once the process completes, the consoles will now be synced and you can play the PS4 remotely.
A few notes
The Vita’s front screen and rear touch panel usually take the place of the R2 and L2 triggers, and the R3 and L3 toggles on the analog sticks, but this can differ between games. Some games, such as Destiny 2 and Fallout 4, feature Remote Play-specific control schemes for the Vita. Be sure to double-check the controls, which are usually located in the options menu for most games.
For the PS TV, use a DualShock 4 rather than the included DualShock 3. The latter isn’t compatible as a PlayStation 4 controller.
How to use Remote Play (Windows/MacOS)
As shown on the above chart, Windows 10 and MacOS 10.15 support DualShock 4 controllers over Bluetooth. If the Mac or PC doesn’t have Bluetooth, then gamers will need to fall back on a wired USB connection. MacOS 10.12 only supports wired DualShock 4 controllers.
With both Windows and MacOS, gamers are restricted from using third-party controllers. PS4 Remote Play only supports Sony’s DualShock 4. Gamers also cannot stream to a Mac or Windows PC while using a controller connected to the console — the controller must be connected to the PC.
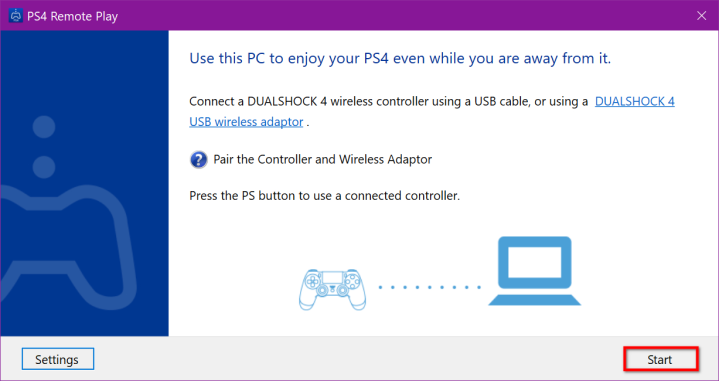
Step 1: Download and install the Remote Play desktop program.
Step 2: Connect a DualShock 4 controller.
Step 3: Launch PS4 Remote Play and wait for it to update if needed.
Step 4: Click the Start button.
Step 5: Sign in to the PlayStation Network using the same Sony Entertainment Network account used on the PS4. After the initial pairing occurs, the console will automatically wake when PS4 Remote Play requests a session.
Troubleshooting
The PS4 Home screen will appear on the Windows 10 PC or Mac. If not, try the following steps to resolve the issue:
Step 1: Ensure the Windows 10 PC or Mac is connected to the same local network as the PS4 console.
Step 2: On the PS4, open Settings and select Remote Play Connection Settings.
Step 3: Select Add Device. The screen will provide a one-time code for 300 seconds.
Step 4: On the Windows 10 PC or Mac, click the Manually Register button in PS4 Remote Play. If a Settings button appears instead, click that followed by the Change button under Change PS4 to Connect To.
Step 5: Enter the one-time code when prompted to do so.
How to use Remote Play (Android/iOS/iPadOS)
As seen in the above example, there is added support for DualShock 4 controllers on Bluetooth devices with both Android 10 and iOS 13 models. Particular devices without Bluetooth technology or those designed with dated operating systems are restricted to only touch control access.
Step 1: Open the Google Play Store or the Apple App Store and download the PS4 Remote Play app.
Step 2: If you know your device is compatible with Remote Play, go ahead and connect it to your DualShock 4 controller.
Step 3: Open the app and click Start.
Step 4: Sign in to the PlayStation Network with the same Sony Entertainment Network username and password you use when you log into your PS4.
Step 5: Select OK if it asks you to allow the app to locate and connect to devices found on your network. At this point, you should see the PS4 Home screen pop up on your device.
Troubleshooting
If you don't see the home screen, follow these steps to get there:
Step 1: Make sure you’ve connected your device to the same local network as your PS4.
Step 2: Navigate to the PS4 and click Settings. From here, click Remote Play Connection Settings.
Step 3: Select Add Device. Once you do this, you’ll receive a one-time code that will last for only 300 seconds. Don’t wait too long before entering it.
Step 4: On your device, tap the Gear icon. This is where you will be able to access and adjust all your fancy, new PS4 Remote Play app settings.
Step 5: Choose Change PS4 to Connect To once you’ve arrived at the next screen.
Step 6: Click Register Manually.
Step 7: Lastly, enter your one-time code into the field, and you’re all set.