Animal Crossing: New Horizons lets players channel their inner creativity, giving them the building blocks to craft some truly incredible works of art. Even better, the game features a robust photo mode so they can capture their masterpieces in the best possible way. Taking photos in New Horizons is a simple process with a surprising amount of depth — and thanks to Update 2.0, photo mode is better than ever. Here’s what you need to know about taking photos in Animal Crossing: New Horizons.
Further reading
- How to find iron in Animal Crossing: New Horizons
- How to get the ladder in Animal Crossing: New Horizons
- Animal Crossing: New Horizons review
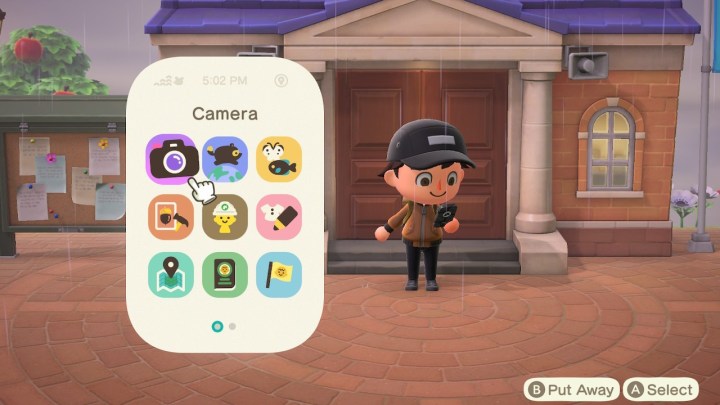
Access the camera app on your NookPhone

The first thing you’ll have to do before taking pictures is unlock the NookPhone. It’s one of the first things you’ll receive upon setting foot on the deserted island, and it gives you access to several different apps. Pull up your NookPhone by pressing ZL and navigate to the Camera app. Once the Camera app is selected, your game will enter Photo Mode and allow you to take screenshots.
How to adjust the camera settings

Manipulating the camera is incredibly simple — in fact, the game tells you what each button does while the camera is open. Here’s a quick rundown of all the features:
- Press ZL to cycle through the different filters. These include Normal, Sharp, Pop, Soft, Dramatic, Film, Monochrome, and Antique. Try messing around with these settings until you find a look that suits your style.
- Press L to change the frame of your picture. You can choose between No Frame, Frame, Cinema, Time, Date, and Frame + Date.
- You can manipulate the camera location using the directional buttons on the Joy-Con. This allows you to adjust both the horizontal and vertical camera position.
- The right analog stick can be used to tilt the camera — the same way it functions during regular gameplay.
- Press R to make your villager look at the camera.
- If you’ve unlocked Reactions, you can use ZR to access these while in Photo Mode.
- You can zoom in on the action by using the X and Y buttons.
- When you’re happy with your setup, press the plus sign (+) to capture the image. This will remove all UI graphics, allowing you to take clean screenshots of your Animal Crossing town.
Upgrade to the Pro Camera

With Animal Crossing: New Horizons‘ 2.0 update, Nintendo brought additional functionality to the basic camera app. Before you can use the powerful feature, you’ll first have to unlock it by following these steps:
- Ensure your software is up to date.
- Load your game and head over to the Town Hall.
- Access the Nook Stop Terminal.
- Redeem your Nook Miles for the Pro Camera App (1,500 Miles).
- Your Camera App will automatically update to the Pro Camera App.
With your new Pro Camera, there are two features you’ll want to explore:
- Handheld Mode: Walk around in first-person and snap photos.
- Tripod: Place the camera on a tripod, which allows you to walk into your close-up photos.
Accessing these new features is simple — just press the “–” button on your Joy-Con to toggle through the available viewing modes.
Photopia is a robust photo studio

If you’re looking for a bit more control over your photoshoots, head on over to Harv’s Island and check out Photopia. Harv’s Island becomes accessible after you meet Harvey, who will arrive on your island once you’ve invited three residents to live in your town. After meeting them, head on over to Dodo Airlines to book a flight to his home.
Here, you’ll still have access to the same nifty camera app, but you can also invite other villagers, pose them, and deck them out in all sorts of different outfits. Plus, any villager you invite to the island will then pose for their own pictures — which will become available for purchase in the form of posters at your local Nook Stop. You can also add your own furniture to Photopia during each shooting, giving you incredible control over each picture.


