Monster Hunter World: Iceborne brings new monsters, subspecies of pre-existing monsters, and new spins on old monsters. Our monsters guide outlines every creature in the Iceborne expansion, with helpful tips on how to defeat them. We’ll also go through the details on their weaknesses and inflicted ailments. There’s much to get excited about in this fresh adventure in the New World, and as always, the monsters are the stars of the show. Master Rank monsters are no joke! Hopefully, our guide will help you get to know these colossal challenges a bit better. Happy hunting!
- Acidic Glavenus
- Banbaro
- Barioth
- Beotodus
- Blackveil Vaal Hazak
- Brachydios
- Coral Pukei-Pukei
- Ebony Odogaron
- Fulgur Anjanath
- Glavenus
- Namielle
- Nargacuga
- Nightshade Paolumu
- Ruiner Nergigante
- Savage Deviljho
- Scarred Yian Garuga
- Seething Bazelgeuse
- Shara Ishvalda
- Shrieking Legiana
- Tigrex
- Velkhana
- Viper Tobi-Kadachi
- Yian Garuga
- Zinogre
- Master Rank World monsters
Here’s how to defeat every monster in Monster Hunter World: Iceborne.
Recommended reading:
- Tips and tricks to mastering the hunt in Monster Hunter World: Iceborne
- Everything we know about Monster Hunter World: Iceborne
- How to play the Monster Hunter World: Iceborne beta
Acidic Glavenus

- Weak points: Head, tail
- Elemental weaknesses: Fire (best), Dragon, Thunder
- Element: N/A
- Status afflictions: Defense Down
Capcom obviously knew how popular Glavenus is in the Monster Hunter community. Meet Acidic Glavenus, who has several substantial changes to its fighting style. While Glavenus used its tail as a sword, Acidic Glavenus uses its tail more like a dagger. Its sulfuric acid-coated tail pierces your armor, debuffing it in the process.
Extraordinarily feisty, Acidic Glavenus’ tail makes quick, precise slashes after sharpening with its fangs. Once that happens, acid evaporates and this large monster turns into an absolute beast. Acidic Glavenus moves faster after sharpening and will repeatedly try to stab hunters with its tail. Dodging is paramount, so conserve your stamina as much as possible.
If you can equip the Iron Skin skill beforehand, you can reduce the duration of Defense Down by 50 percent, 75 percent, or nullify it entirely. If you don’t have Iron Skin, bring Armor Skins to counteract the ailment. Adamant Seeds also work, but Armor Skins are preferable since they boost your defense even more.
Banbaro

- Weak points: Head, legs
- Elemental weaknesses: Dragon (best), Fire
- Element: Ice
- Status afflictions: Iceblight
A brand new moose-like monster, Banbaro is an absolute unit. But don’t let its stature intimidate you. You can take advantage of the new mechanics, namely Clutch Claw, in the fight.
Banbaro’s has one main attack when there’s some distance between you two. It charges, digging its antlers into the ground, and picks up whatever is in its path. This often means snow boulders. If you’re hit by a snow boulder, you’ll be inflicted with Iceblight, which causes you to move slower and lose stamina at a faster clip. Use a Nulberry to cure Iceblight. Other times Banbaro will pick up broken tree branches. Getting hit by tree limbs only does damage.
It’s important to dodge to the side each time Banbaro charges. If you keep your distance, you might not even have to run or dive to avoid the charge. Conserving stamina is key, since you’ll often have to cover ground quickly to start attacking.
At the end of a charge (or multiple successive charges), Banbaro will slam the ground. As Banbaro lifts up to hit the ground, start running towards its backside to get some hits in. Once again, Banbaro’s head is the best spot for dealing damage, but it can be dangerous. Getting under Banbaro and hitting its legs is a more conservative play that works. If you’re under Banbaro, it will usually lift one leg and try to kick you. Simply dodge to the other leg and keep attacking. Banbaro also has a spin attack that it uses when you’re underneath it. You can usually avoid this if you stick close to its legs.
Banbaro is a good monster to practice the new Clutch Claw move on. After each charge and bash, you can Clutch Claw onto its head and either perform a standard attack combo, claw attack, or Flinch Shot. During one of our runs, the majority of the damage we dealt to Banbaro started with a successful Clutch Claw. As Banbaro is susceptible to poison and paralysis, we recommend bringing Poison Knives and Paralysis Knives to the hunt.
Barioth

- Weak points: Head, tail, legs
- Elemental weaknesses: Fire (best), Thunder
- Element: Ice
- Status afflictions: Iceblight
Coming to Iceborne from Monster Hunter 3 and Monster Hunter Generations Ultimate, Barioth has a similar nature as Nargacuga. Also a flying wyvern, Barioth sticks near the ground, favoring long leaps and nimble slashes with his arms, legs, and wings. The first thing you’ll notice about Barioth is its huge protruding fangs and sharp claws. Up close, Barioth is extremely aggressive. Dodging is paramount, but his fighting style is unpredictable. It’s tough to get hits in without taking damage in the process.
Barioth will scoop up snow and fling it at you from afar. If you’re not careful, his ice attacks will inflict Iceblight, causing your stamina to drain rapidly.
Once again, Nulberries are a great item to bring along with you. Concentrate your attacks on Barioth’s head and legs to inflict the most damage. Barioth is one of the monsters that is easiest to defeat once you learn its attack patterns. At first, you should focus on defense, learning when you have a moment to attack without fear of getting more ice shoved in your face.
Beotodus

- Weak points: Head, tail, legs
- Elemental weaknesses: Fire (best), Thunder
- Element: Ice
- Status afflictions: Iceblight
The first monster you fight in Hoarfrost Reach, Beotodus follows in the tradition of Lavasioth and Jyuratodus as a piscine wyvern. Beotodus swims through the lush snow with the help of a large fin on its back. To get Beotodus out of the snow and onto its stubby legs, you have to knock all of the snow from his body. For a quicker method, you can bring Sonic Bombs with you. Beotodus moves quickly while beneath the surface, occasionally pummeling deep below before thundering up with a powerful attack. When out of the snow, he has a side bash move similar to Jyuratodus.
Beotodus’ most dangerous moves involve him burrowing deep into the ground. When up close, he’ll sometimes go under and then shift around below the surface. You’ll see the ground below you shaking right before he throttles upwards. Make sure to dodge. From far away, he’ll almost stand on his feet, then leap long distances, using the ground as a springboard. Beotodus is one of the easiest monsters to deal with in Iceborne, but you have to be both patient and accurate with your strikes. Once he’s on his legs, it’s time to lay into him with everything you’ve got.
Blackveil Vaal Hazak

- Weak points: Head
- Elemental weaknesses: Fire, Dragon
- Element: None
- Status afflictions: Effluvial Buildup
As its name suggests, this creature is an enhanced version of the Vaal Hazak — featuring a fungus that generates a cloud of spores around its body. This means you’ll be infected when the spores vent, keeping you on your toes as you work to defeat the beast. This effect is called Effluvia, and it greatly decreases your health if you get hit by it. With that in mind, it’s a good idea to bring Effluvia Resistance with you, just in case you get hit with the monster’s spore attacks.
The other major difficulty is that the Blackveil Vaal Hazak doesn’t have any elemental weaknesses, meaning you should bring non-elemental weapons with you to this battle. You should aim to break the monster’s green spores found on its head and across its body, which will allow Flash Pods to be more effective. Once you use a Flash Pod, you can stun the monster, leaving it vulnerable to your attacks.
Brachydios

- Weak points: Face, tail, arms
- Elemental weaknesses: Ice (best), Water
- Element: N/A
- Status afflictions: Blastblight
Coming to Iceborne from Monster Hunter 3 Ultimate, Brachydios is an extremely volatile brute wyvern. Brachydios has stumpy fists that are coated with slime. It will jog across the locale and smack its fists into the ground, leaving a puddle of slime each time. After it’s done making its rounds, the slime will gradually shift colors and then explode. If you get caught in the slime, you have to roll out of it quickly. Brachydios also creates huge pools of exploding slime around it that almost instantly explode.
On top of the slime attacks, Brachydios runs fast for such a large monster, and can leap through the air. Because of its sturdy body, getting solid hits in on Brachydios isn’t easy, especially when contending with its slime attacks.
Nulberries can cure Blastblight, but you can also remove the status effect by rolling three times. The key to Brachydios is avoiding its slime attacks. Watch him work for a bit, dodge the pools of slime, and wait for him to tucker out. You’ll need patience and proper timing to make maximum use of his less aggressive state.
Coral Pukei-Pukei

- Weak points: Head, tail
- Elemental weaknesses: Ice (best), Thunder
- Element: Water
- Status afflictions: Waterblight
A subspecies of everyone’s favorite dumb bird, Coral Pukei-Pukei loves shooting water at you. Found in the Coral Highlands, Coral Pukei-Pukei uses its tail to suck up water and then spray it in all directions like a Super Soaker, inflicting damage and Waterblight. The big guy also uses his massive tongue as a weapon. Generally, though, Coral Pukei-Pukei is a more aggressive version of the original — just with some serious water attacks.
Avoiding the water blasts is tough because Coral Pukei-Pukei shoots them in straight lines and side-to-side with his tail, while also vomiting globs of water from his mouth. We recommend staying as close to him as possible to get hits on its weak head. You can sever Coral Pukei-Pukei’s tail, which eliminates some of his water attacks. When up close, Coral Pukei-Pukei is largely benign. He does a slow tail whip and will flail up and down. Both of these moves are easy to avoid, though. Bring Nulberries and a raincoat (kidding of course).
Ebony Odogaron

- Weak points: Head, forelegs, tail
- Elemental weaknesses: Water (best), Fire, Thunder, Ice
- Element: Dragon
- Status afflictions: Dragonblight, Bleeding
Ebony Odogaron is among the most challenging subspecies monsters in Iceborne. Not only is Ebony Odogaron faster and stronger than the already imposing original, the fanged wyvern now deals Dragon elemental damage. Dragon damage is pretty unique in that its status effect temporarily renders all of the elemental perks of your weapon null and void. This is a huge deal if your weapon’s damage is tied into an element. A Cleanser Booster or Nulberry will cure you of Dragonblight.
Other than the dragon damage, Ebony Odogaron is a familiar foe — if that foe moved twice as fast. Seriously, Ebony Odogaron runs wild around you, swiping, slashing, and leaping with its talons and munchers ready to strike. Concentrate your attacks on its head, if possible, and water elemental damage is your best bet. Ebony Odogaron is a monster that gets easier the more you successfully evade its attacks. Tiring it out, even just a little bit, will create more openings.
Fulgur Anjanath

- Weak points: Head, tail
- Elemental weaknesses: Ice (best), Water
- Element: Thunder
- Status afflictions: Thunderblight
Fulgur Anjanath is a variant of the T. Rex-esque Anjanath found in the Ancient Forest. If you remember, Anjanath was the first large monster to pose a serious threat in World. The Fulgur subspecies is bigger and badder, with more aggressive attacks and the ability to inflict thunder damage and the Thunderblight status effect. Regular Anjanath does fire damage, which is already hard enough to deal with. But Fulgur Anjanath’s thunder attacks are even more troublesome. If it catches you in its jaws, you’ll lose a lot of health. You aren’t safe from afar either, as Fulgur Anjanath’s ranged electric attacks can barrel towards you in a hurry. The ranged attacks explode when they reach their destination.
Bring Nulberries to the fight. If you have thunder resistant armor, it will help a lot with the damage from his thunderous projectiles. His weak spot is his head, but beware when he starts chomping at the bit. Getting caught in his jaws can lead to you being carted real quick — sometimes instantly. Defeating Fulgur Anjanath comes down to avoiding his devastating jaw attack while getting in your hits.
Glavenus

- Weak points: Head, tail, belly
- Elemental weaknesses: Water (best), Ice, Dragon
- Element: Fire
- Status afflictions: Fireblight, Bleeding
A fan favorite from Monster Hunter Generations, Glavenus is one of the coolest and toughest monsters Capcom has created. The brute wyvern has a massive, spiked tail that it uses as a fiery sword. Glavenus will reach back with its fangs to sharpen the tail and imbue it with fire. You really cannot be anywhere near Glavenus when it telegraphs this move, as it quickly turns into a sweeping attack that deals massive damage and potential burn damage. When heated up, its tail can also create explosions when it smacks against the ground.
Overall, Glavenus has a moveset that is fairly speedy for a monster this large. It’s always smart to focus your efforts on the tail in the early going. Breaking off its tail makes Glavenus much less formidable.
Bring Astera Jerky for Bleeding and start rolling around when you catch on fire. Aim for its head after severing the tail. Hanging out right below his head is typically a smart play, as you can usually avoid attacks from the lower half of his body.
Namielle

- Weak points: Head, forelegs, tail
- Elemental weaknesses: Fire (best), Dragon
- Element: Water
- Status afflictions: Waterblight, Thunderblight
One of Iceborne’s Elder Dragons, Namielle uses a combination of water and thunder to produce a terrifyingly formidable fight. Taking place in the Coral Highlands, the Namielle fight is challenging because the Elder Dragon has answers for both close and long range. Namielle creates water simply from moving, so you’ll often be sliding around sloshy ground to hack at its weak spots (head, forelegs, and tail).
Namielle can spew water in a variety of different ways. A piercing jet of water inflicts maximum damage, while it can also shoot globs of water and more steady streams as well. Essentially, it adapts to the situation. When up close, Namielle’s body sometimes becomes electrified. Combine thunder with water and you have a recipe for two blights at once.
Thankfully a Nulberry will cure you of both afflictions. You also have to watch out for its wings, which are unusually wide and have jagged edges that can damage you when Namielle rocks back and forth. Overall, we’d say Namielle is easier than Velkhana, but this is still an Elder Dragon fight. It’s certainly tough.
Nargacuga

- Weak points: Head, tail, hind legs
- Elemental weaknesses: Thunder (best), Fire
- Element: N/A
- Status afflictions: Bleed, Poison
Nargacuga, a popular flying wyvern from Monster Hunter Freedom Unite and Monster Hunter Generations, makes its return in Iceborne. You’ll find it in the Ancient Forest. Though technically a flying wyvern, Nargacuga doesn’t hang out above the ground too often. However, its wings and powerful legs let it leap long distances.
Nargacuga mainly uses vicious physical attacks, but also shoots spikes that can inflict bleeding from its tail when enraged (Its eyes are deep red when enraged). Nargacuga frequently tries to swipe hunters with its spiked tail and can cover ground in a hurry. This monster makes it tough to take a breather to sharpen your weapon or use items.
Astera Jerky and Antidotes are a must to recover from status afflictions. Weapons with Thunder or Fire elemental damage can help a ton if you’re having trouble with Nargacuga.
Nightshade Paolumu

- Weak points: Head, mane
- Elemental weaknesses: Water (best), Fire
- Element: N/A
- Status afflictions: Sleep
This Paolumu subspecies has a knack for singing sweet lullabies. Well, it doesn’t actually sing, but it will put you to sleep with the dangerous fumes it releases from its mouth. Like regular Paolumu, the Nightshade version takes in deep breaths and then bobs around like a balloon. But the air filling its body induces sleep. Best to have some sleep resistance jewels equipped, and a few Energy Drinks on hand to shake off the drowsiness.
Nightshade Paolumu is at its easiest when its mane isn’t filled with sleepy time fumes. Make sure to get your hacks in on its head and belly when Nightshade Paolumu is all out of air. We’ve also found that Clutch Claw works well when Nightshade Paolumu is airborne, since his ballooned mane is a weak spot already. Bring some Flash Pods to stop his sleeping powers before they start. You can do this twice per hunt in Master Rank. When used right, Nightshade Paolumu will fall from the sky.
Ruiner Nergigante

- Weak points: Head, forelegs
- Elemental weaknesses: Dragon (best), Thunder
- Element: None
- Status afflictions: Bleeding
Ruiner Nergigante serves as yet another enhanced version of the base monster, but features metal spikes across its body, along with an updated moveset. The main things to watch out for are its slam attacks, which deal devastating damage. It dishes out physical attacks that you’ll want to avoid by rolling around to its side. A great technique is to roll at the right time to strike it on the side while its animation is still active. This way, you can completely avoid being hit.
In general, it’s recommended to stay away from the Ruiner Nergigante’s front, as this will leave you open to take a tremendous amount of damage. The other move you should look out for is its charged slam attack, which is telegraphed by the creature growing metal spikes around its body. Most importantly, you should avoid the follow-up attack — a metal explosion that can hit you if you fall within a radius of around 90 degrees. In short, we advise bringing Dragon & Blast elemental weapons to the fight while aiming to destroy its metal spikes.
Savage Deviljho

- Weak points: Head, belly, tail
- Elemental weakness: Thunder (best), Dragon (best), Fire, Water
- Element: Dragon
- Status afflictions: Dragonblight, Defense Down
Savage Jho is predictably relentless with both his elemental breath attacks. He also loves to hop up and down, smashing his feet and body and swinging his tail around at you. Savage Deviljho is a tough monster to slay, so we recommend bringing along traps. Pitfall Traps are great for this large monster — just mind his flailing head when he’s trapped.
Nulberries will help for Dragonblight, and you absolutely need to get rid of that ailment to re-buff your elemental attacks. The Iron Skin skill can reduce the duration of Defense Down or even offer complete resistance to this pesky ailment. Otherwise, bring Armor Skin and Adamant Seeds to counteract Defense Down and keep your defenses up for this tough showdown.
Scarred Yian Garuga

- Weak points: Head
- Elemental weakness: Water (best), Dragon
- Element: Fire
- Status afflictions: Fireblight, Poison
Once again, the Scarred Yian Garuga is a variant of the base monster, but with enhanced attacks and an altered moveset. The most important thing to watch out for is its poison attacks, so we highly recommend stocking up on Antidotes before the fight. Most notably, its tail dishes out poison if it connects, but it can also emit poison from its mouth. If you prioritize cutting its tail off, you’ll have a much easier time avoiding being poisoned.
Of course, this monster’s weakness is Water and Dragon, so come equipped with weapons that fall into those categories for maximum effectiveness. We advise aiming to break its head, though keep in mind, many of the monster’s moves are done from the front. For that reason, it’s a good idea to focus ranged attacks on its beak, while melee users should prioritize dealing damage to its tail. Once the creature slows down, it’s much easier to hit it from the front with melee, but at the start, it’s best to play cautiously.
Seething Bazelgeuse

- Weak points: Head, tail
- Elemental weakness: Ice (best), Thunder
- Element: Fire
- Status afflictions: Fireblight, Blastblight
This Bazelgeuse variant is a formidable foe, with a deadly moveset that will keep you on your toes. One of the main moves to watch out for is its colorful bomb attacks, which are dropped periodically as it moves around. With that in mind, it’s a good idea to use ranged attacks to damage the glowing scales around its body. If you do enough damage to the scales, you’ll have a chance to topple the creature, leaving it open to attacks.
The main piece of advice is to not get greedy when dealing attacks. It’s quite easy to get stuck within its bomb attacks, so keep your distance and play it safe. It’s also possible to stay safe from its attacks if you’re directly beneath the beast, but this strategy is much less consistent. Still, if you’re going for a melee strategy, staying below the monster is something you should familiarize yourself with, as it can be wildly effective. Bring an Ice elemental weapon with you to deal high amounts of damage and be careful not to get caught beneath it when it slams down from the ceiling.
Shara Ishvalda
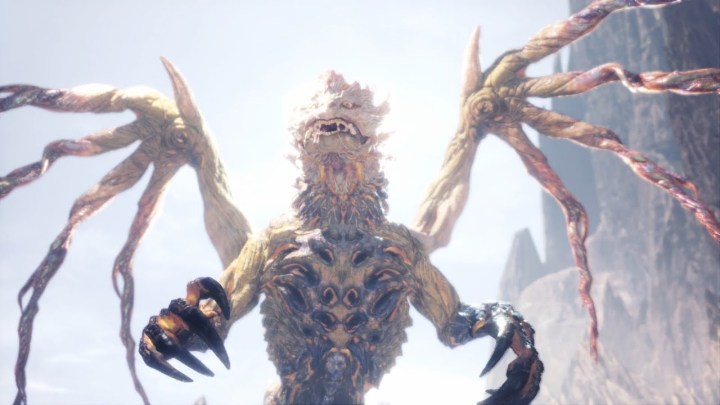
- Weak points: Head, wings
- Elemental weakness: Ice (best), Water
- Element: None
- Status afflictions: Stun
The Shara Ishvalda fight plays out in two phases: Its rock phase that slows it down and its unarmored phase, when it’s much faster and harder to attack. While fighting Shara Ishvalda, you should prioritize using the Partbreaker skill to reach the monster’s second phase, when it loses its armor, making it much more vulnerable to your strikes. During its first phase, you can actually use Flint Shots to topple the walls around the creature, dealing lots of damage and breaking its armor. If done correctly, this method can topple the beast, giving you an easier means to attack.
Once you get to its second phase, when the monster sheds its armor, you’ll need to be careful of its ranged attacks. Though, just like the first phase, you can still use the environment to your advantage, knocking down the mountains around you onto the enemy. For best results, we recommend sticking behind the monster, just beneath its tail. Wail on it from this position to stay safe from most of its attacks while dealing moderate damage — more so if you use an Ice weapon.
Shrieking Legiana

- Weak points: Head, forelegs
- Elemental weaknesses: Thunder (best), Fire
- Element: Ice
- Status afflictions: Iceblight
A variant of Legiana, Shrieking Legiana embodies the persona of Hoarfrost Reach thanks to the chilly winds it creates by flapping its wings and the ice attacks that cover the ground, dealing both ice damage and inflicting Iceblight. As a large, flying monster, Shrieking Legiana moves quickly, using both its elemental attacks and long tail to try to catch you off guard. When you combine the winds and ice attacks with Legiana’s already aggressive physical nature, you’ve got yourself a recipe for a tough hunt.
Shrieking Legiana is made even harder due to the presence of at least one other Legiana all throughout the mainline quest. Bring Dung Pods to get regular Legiana to leave, or else you’ll have a hard time concentrating on Shrieking Legiana. Also bring Flash Pods to knock Shrieking Legiana from the sky. You can do this twice. Nulberries are a must. Wind resistant skills and earplugs for the shrieking will certainly help, too.
Tigrex

- Weak points: Head, forelegs, tail
- Elemental weaknesses: Thunder (best), Dragon
- Element: Ice
- Status afflictions: Iceblight
Featured in previous Monster Hunter games, Tigrex comes to World for the first time in Iceborne A quadrupedal wyvern, Tigrex is incredibly fast, making it a formidable foe.
Tigrex’s moveset consists of several hard-to-avoid attacks. Its most frequent move sees it lift one arm and then lunge forward. It also has a charged leap. If you keep your distance from Tigrex, it will quickly scamper towards you, performing one of the aforementioned moves when it gets within range. When you’re right next to Tigrex, it will often perform a spin attack. We’ve found that if you’re in front of its head during this attack, you can dodge it fairly easily. Otherwise, you’ll likely get hit.
Since all of Tigrex’s attacks can deal considerable damage, you may find yourself trying to maintain your distance and only attack during the brief opening between attacks. In our experience, this is a bad idea. You want to remain as close to Tigrex as possible throughout the fight. The closer you are, the easier it is to avoid and negate some of its attacks. The more you have to flee to heal, the more you’re probably going to get hit. If you absolutely need to heal, you should consider moving into a different area of the map to give yourself time. The same goes for sharpening your weapon with the whetstone.
The exception to this rule is when Tigrex is enraged. While angry, Tigrex will punctuate its leap attack with a spin. It’s best to just completely avoid enraged Tigrex altogether.
Center your attacks on Tigrex’s head and front legs to deal the most damage. It helps to bring a Health Booster into Hoarfrost Reach. This way you can remain close and withstand Tigrex’s attacks. The Clutch Claw coupled with the Flinch Shot also can come in handy. Aim for its head with the Clutch Claw (L2 + Circle). Once latched on, press R2 to unload all of your Slinger ammo into Tigrex’s head to disorient it. Tigrex’s feisty nature makes it a prime candidate for capturing rather than slaying. Bring a Shock Trap along to end this hunt early once you see a limp.
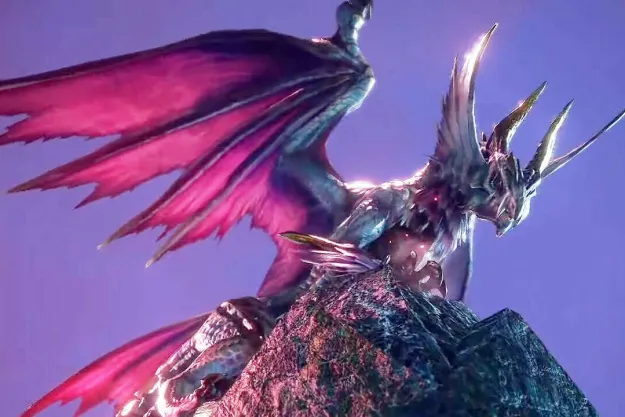
Velkhana

- Weak points: Head, tail, wings
- Elemental weaknesses: Fire (best), Thunder, Dragon
- Element: Ice
- Status afflictions: Iceblight
The main antagonist of Iceborne, the Elder Dragon Velkhana looks like it will give hunters fits. Velkhana is the master of Hoarfrost Reach, capable of producing dastardly ice attacks that freeze large swaths of the ground. Velkhana spews ice from its mouth, both in a circular motion when you’re close and across long distances when you’re trying to take a breather. On top of the ice attacks, Velkhana will often try to stab you with its tail and performs quick sweep attacks to knock you off your feet. Velkhana is fast and relentless, which is to be expected from the big baddie of the new campaign.
Velkhana is tough, and rightfully so as an Elder Dragon. Velkhana can conjure ice from practically anywhere: Above, below, left, right, in front of its head or behind its tail. It really doesn’t matter. The key to this fight is to always be on the move. Watch out when Velkhana is looking right at you, as it typically means tail attacks are coming. Those tail swipes can be adjusted whether you’re right under Velkhana or a dodge roll away. And when Velkhana creates a swirling gust and rockets upwards, get out of the way. Velkhana’s signature attack, which is pretty much an ice storm, can one-hit cart you. Bring a full stack of Nulberries and make sure you have extras in your item box in case you need to head back to camp. Fire damage is your best bet by far here, though Thunder and Dragon are also decent options.
Viper Tobi-Kadachi

- Weak points: Head, forelegs
- Elemental weaknesses: Thunder (best), Ice
- Element: N/A
- Status afflictions: Poison
The subspecies of Tobi-Kadachi, rather obviously, can inflict poison if you aren’t careful. The fanged wyvern’s long tail should be avoided. Similar to how the regular Tobi-Kadachi dealt thunder damage after its aerial somersaults, Viper Tobi-Kadachi does poison damage. It also has the power to release noxious fumes, which can inflict poison and somewhat obscure your field of view. Expect Viper Tobi-Kadachi to be a lot faster and more aggressive with its attacks. Have a full stack of antidotes on hand, because completely avoiding Viper Tobi-Kadachi’s venomous attacks will be a challenging ask.
Viper Tobi-Kadachi is nimble. Once you see it leave the ground, it’s best to stay clear. Our hunts with Viper Tobi-Kadachi have led us to believe that he is even more aggressive when he senses you’re poisoned.
Yian Garuga

- Weak points: Head, neck
- Elemental weakness: Water (best), Dragon
- Element: Fire
- Status afflictions: Fireblight, Poison
Much like the Scarred Yian Garuga, the base version deals deadly poison attacks and is vulnerable to beak strikes. Once again, you should bring Antidotes to this fight, while focusing on destroying its tail, which can dish out poison attacks if you aren’t careful. It’s highly recommended to bring a Water elemental weapon, as these are the most effective against the Yian Garuga. Try to prioritize breaking its beak, which will eventually slow the beast down, leaving it much more vulnerable to your strikes.
As with the Scarred version, we advise bringing Flash Pods with you, which are especially useful when the monster flies around. You’ll probably have a tough time landing attacks on this foe when you first attempt the fight, as the Yian Garuga is incredibly fast and agile. For that reason, we recommend not staying still throughout the fight and attacking only when it’s safe. Typically, this means waiting for the monster to strike, and at the very end of the animation, it will be open for an attack. This is when you should focus on hitting the creature — especially after its plunge attack.
Zinogre

- Weak points: Head, belly
- Elemental weakness: Ice (best), Water
- Element: Thunder
- Status afflictions: Thunderblight, Paralysis
A fan favorite, the electrifying Zinogre is a tough monster that you won’t encounter until you’ve put some serious time into Iceborne. For good reason. Zinogre has a unique moveset that includes harnessing the power of Thunderbugs to give his claws electrifying abilities. When charged, Zinogre will be more agile and aggressive. He has two charge states, with the latter signaling that it’s time to run for the hills. He can leap far, swing around in a hurry, and swipe at your face faster than you’d think for a monster his size.
However, you have about five seconds to stop Zinogre from taking hold of the Thunderbugs. He’ll remain stationary during this process. If you concentrate on the head, you can sometimes stagger him, blocking his charge. You’ll want to do this as much as possible since Zinogre is tough to deal with when in his more aggressive forms.
The best time to attack Zinogre is when he’s not charged up with electricity, as this means he won’t move around as quickly or string together as many physical attacks in a row. Zinogre is weakest to Ice, but Water elemental damage will also serve you well.
Master Rank World monsters
Many monsters from World also appear in Master Rank quests. For the most part, World monsters have a similar moveset as their low-/high-rank counterparts. However, they are more aggressive, faster, and have minor tweaks to their fighting styles. We’ve listed each monster who makes a return in Master Rank below, along with their weaknesses, weak points, and ailments they afflict.
Anjanath

- Weak points: Head, tail
- Elemental weakness: Water (best), Thunder, Ice
- Element: Fire
- Status afflictions: Fireblight
Master Rank Anjanath has a great thirst for fire, and he’ll frequently demonstrate that by exhaling fireballs and streams of fire your way. In Master Rank, the best method for taking down Anjanath is to stay up close, near its legs. While he will try to stomp you more often, it keeps you safe from the flames.
Azure Rathalos

- Weak points: Head, wings, tail
- Elemental weakness: Dragon (best), Thunder
- Element: Fire
- Statu s afflictions: Fireblight, poison, stun
The Azure subspecies of Rathalos switches between air and ground attacks a ton. While that means you can get more hits on him, it makes Rathalos more dangerous. You have to force it to stay on the ground by being one step ahead of its moves. Azure Rathalos isn’t bad when he’s not jumping quickly from one airborne attack to the next.
Diablos

- Weak points: Head, wings, chest
- Elemental weakness: Ice (best), Dragon, Water
- Element: N/A
- Status afflictions: Stun
Diablos flails around a ton, making him a hard monster to pin down. In Master Rank, he ups the unpredictability, frequently attacks from below the surface, and makes ample use of both his long tail and horned head. His roar is more frequent, so bring earplugs to nullify being stun.
Dodogama

- Weak points: Head, tail
- Elemental weakness: Thunder (best), Water, Ice
- Element: Fire
- Status afflictions: Blastblight
Dodogama is tricky no matter what, but Master Rank brings the rock-eating wyvern to a new level. Though docile in nature, once provoked Dodogama will frequently eat rocks and spew them at you, inflicting Blastblight in the process. Avoiding these projectiles is key — along with staying out of his path when he charges with a vengeance.
Great Girros

- Weak points: Head, forelegs, tail
- Elemental weakness: Water, Ice
- Element: N/A
- Status afflictions: Paralysis
Master Rank Great Girros uses his piercing fangs to inflict paralysis more often. He also closes distances quicker, so be careful. His speed is what will get you if you aren’t smart with evasive maneuvers.
Great Jagras

- Weak points: Head, belly, abdomen
- Elemental weakness: Fire (best), Thunder, Ice
- Element: N/A
- Status afflictions: N/A
Great Jagras was the first large monster hunters fought in Monster Hunter World. The big iguana-like monster doesn’t pose too much of a threat. You can get a handful of hacks in before it even fights back. Aim for its head as often as possible. It’s weak to both fire and thunder. Once the Great Jagras realizes you’re a foe, it will employ several different moves that can deal mild to moderate damage. It will swipe at you with its arms, spin its tail around, and scurry towards you to knock you down.
Most Great Jagras encounters see it feed at least once, which turns its belly into a balloon. The Great Jagras will vomit its food on occasion. Simply keep your distance and avoid the nasty meal. When the Great Jagras tries to flee, sheath your weapon and use your Slinger to conk it with a stone. This will stop the fleeing process, allowing you to get more hits in.
As long as you aren’t too reckless, you shouldn’t have a problem taking out the Great Jagras.
Jyuratodus

- Weak points: Head, tail
- Elemental weakness: Water (covered in mud), Thunder (not covered in mud)
- Element: Water
- Status afflictions: Waterblight
Master Rank Jyuratodus resembles Beotodus in terms of moves and aggressiveness. Just watch out for Waterblight and focus on getting the giant fish out of the mud.
Kulu-Ya-Ku

- Weak points: Head
- Elemental weakness: Water (best), Fire, Thunder, Dragon, Ice
- Element: N/A
- Status afflictions: N/A
Master Rank Kulu-Ya-Ku is more agile and jumps around quite frequently. Other than that, Kulu-Ya-Ku is still a fairly basic fight, with no status effects or devastating moves to avoid.
Legiana

- Weak points: Head, wings, tail
- Elemental weakness: Thunder (best), Fire
- Element: Ice
- Status afflictions: Iceblight
This nimble flying monster presents problems simply because you have to spend much of the fight avoiding its ice attacks and quick swoops from the sky. Legiana doesn’t like to be on the ground, so whenever its legs touch down, you need to go in and hammer its head or tail. Clutch Claw makes this fight easier, but be careful since Legiana moves a lot. You might get thrown off of its wings before you even get a hit in.
Paolumu

- Weak points: Head, mane
- Elemental weakness: Fire (best), Thunder
- Element: Water
- Status afflictions: Wind pressure
After inhaling, Master Rank Paolumu will let out gusts of air that will make you stumble if you don’t have wind resistance. The flying monster will also bounce on the ground, trying to smash you. This move is new to Master Rank. When Paolumu is on the ground, though, it’s open season. Flash him with Flash Pods and get to work.
Pink Rathian

- Weak points: Head, wings, tail
- Elemental weakness: Dragon (best), Thunder
- Element: Fire
- Status afflictions: Poison, Fireblight
The subspecies Pink Rathian does far more harm with its tail than anything else. She wields it like a precise dagger, and her tail flip is much harder to dodge since she can change directions with it to catch you off guard. Also, she has sturdier scales, so if aiming for the tail, make sure to hit the very end of it. If aiming for the head, try to stay clear of the neck.
Pukei-Pukei

- Weak points: Head, wings, tail
- Elemental weakness: Thunder (best), Fire, Ice
- Element: N/A
- Status afflictions: Poison
Master Rank Pukei-Pukei seems to have more range with its poison vomit and its tongue attack. It’s still a lovable dumb bird, though. Hang out near its head and hack away to deal the most damage. You can also sever its tail and render some of its most critical moves useless. Antidotes are a necessity, while poison resistant gear and skills also help if you’re having trouble.
Odogaron

- Weak points: Head, tail, front claws
- Elemental weakness: Ice (best), Thunder
- Element: N/A
- Status afflictions: Bleeding
The mantra for Odogaron is to avoid its claws, which inflict bleeding. Bring Astera Jerky to cure yourself and focus on tiring this fast monster out. Odogaron moves quickly, especially while enraged. You can slow it down by moving about the area, forcing it to cover long distances. What’s Odogaron is tired, he’s much less imposing. Focus your initial attacks on the claws, and wail away on its head for maximum damage when Odogaron takes a breather.
Radobaan

- Weak points: Head, belly
- Elemental weakness: Dragon (best), Ice
- Element: N/A
- Status afflictions: Sleep
In Master Rank, Radobaan rolls around far more, so stay clear of him and be ready to dodge. When stationary, Radobaan uses its full body to strike you when you get in close. One great strategy is to position yourself just below his head to whack away at his belly, which allows you to avoid attacks from his back legs and tail.
Rathalos
- Weak points: Head, wings, tail
- Elemental weakness: Dragon (best), Thunder
- Element: Fire
- Status afflictions: Fireblight, poison, stun
The male version of Rathian, Rathalos is more annoying to fight simply because he stays in the air. Avoiding his poisonous talons is tough. He’s more aggressive in Master Rank, but once he’s on the ground, you have to outmatch his aggressiveness. Flash Pods work wonders to bring him back to the ground. When he’s in the air, your best bet is to go on the defensive. With Clutch Claw, you can get some attacks in while he’s up there.
Rathian

- Weak points: Head, wings, tail
- Elemental weakness: Dragon (best), Thunder
- Element: Fire
- Status afflictions: Fireblight, poison
Queen Rathian really is a tough challenge regardless of rank, but the Master Rank version of the flying monster uses its tail more effectively to afflict hunters with poison and breathes fire more often. Watch out for tail swipes when near her legs. Your best bet is to pick a weak spot and hone in on that, doing your best to avoid her attacks.
Teostra

- Weak points: Head, wings, tail
- Elemental weakness: Water, Ice
- Element: Fire
- Status afflictions: Blastblight, Fireblight
The Elder Dragon Teostra is available in optional quests in Iceborne. The Master Rank version of Teostra doesn’t feel all too different from high rank, but this Elder Dragon is quite a bit faster and stronger now. Blastblight and Fireblight are real issues here when you consider this Elder Dragon’s newfound speed and tighter control of its body. Approach with caution and ideally hunt with a group, so Teostra won’t focus its entire attention on you.
Tobi-Kadachi

- Weak points: Head, tail
- Elemental weakness: Water (best), Fire, Ice
- Element: Thunder
- Status afflictions: Thunderblight
Master Rank Tobi Kodachi is more aggressive. It frequently gets airborne to do its acrobatic flip attack, which can really trip you up due to its ability to shock/stun you and inflict Thunderblight.
Tzitzi-Ya-Ku

- Weak points: Head
- Elemental weakness: Thunder (best), Ice (best), Water, Fire, Dragon
- Element: N/A
- Status afflictions: Stun
In Master Rank, Tzitzi-Ya-Ku’s flash move that stuns hunters is harder to dodge. Once initiated, the small monster will hop around, repositioning itself alongside your movements. It’s still possible to avoid getting stunned, but you have to work a little harder. Tzitzi-Ya-Ku also hops around and kicks you far more often in Master Rank.
Uragaan

- Weak points: Head, belly
- Elemental weakness: Water (best), Ice, Dragon
- Element: Fire
- Status afflictions: Blastblight, Sleep
Uragaan moves around more freely in Master Rank, spreading his pesky explosives at every turn. This can make for a tough fight. The key here is to avoid them as best as possible, wait for him to stop, and dive in for attacks on its head and belly. Beware, though. Sensing trouble, Uragaan will sometimes create explosions around him as a defense mechanism or unleash a mist that will put you to sleep. Be ready to step away when he starts shimmying.
Editors' Recommendations
- Monster Hunter Wilds: release date speculation, trailers, gameplay, and more
- Street Fighter 6 gift guide: the best gifts for every World Tour master
- Monster Hunter Rise won’t support cross-progression between PS4 and PS5
- A Monster Hunter mobile game by the Pokémon Unite team is in the works
- Sonic Frontiers and Monster Hunter cross over with free DLC