Resident Evil: Raccoon City and Asura’s Wrath given release dates

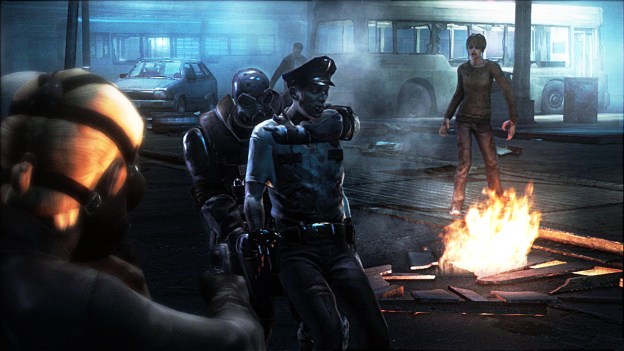
Yesterday Capcom put on their announcing hat and got with the announcing. The developer/publisher officially handed out release dates for two of its biggest titles of 2012, Resident Evil: Operation Raccoon City and Asura’s Wrath.

Even if you aren’t specifically familiar with Resident Evil: Operation Raccoon City, you probably have a rough idea of what to expect. See zombie, kill zombie. You are the scourge of the undead, and you hand out justice one bullet at a time. The format should seem familiar, so will the setting. The game takes place in Raccoon City (which makes sense, what with the name and all) during the events of the second and third Resident Evil games.

Recommended Videos

But instead of stepping into the familiar, and well-worn shoes of Leon Kennedy, one of the stars on Resident Evil 2, you can change history by shooting him. You play as a member of the Umbrella Security Service, tasked with destroying all evidence of Umbrella’s involvement, and killing any survivors you come across.

Resident Evil: Operation Raccoon City will be available for PC, PS3 and Xbox 360 on March 20, 2012.

Asura’s Wrath is a bit more unusual. After being stripped of his powers by his god-like peers, Asura doesn’t exactly take it well. He heads out to try and save his daughter, and along the way kick a few skulls in on his quest for revenge.

Asura’s Wrath will be released on PS3 and Xbox 360 on February 21.

Ryan Fleming
Former Digital Trends Contributor
Ryan Fleming is the Gaming and Cinema Editor for Digital Trends. He joined the DT staff in 2009 after spending time covering…
Resident Evil 4 Separate Ways DLC: all Bug Buster bug locations
Ada Wong holds a gun in Resident Evil 4.

Much like in the main campaign of Resident Evil 4, the Separate Ways DLC features a variety of merchant requests to complete and turn in for some Spinel, which can be used to purchase useful upgrades, keys, and more. You'll stumble upon two of these requests asking you to find and kill bugs – once in Chapter 5 and again in Chapter 6. In this guide, we'll tell you where to find them.
Chapter 5 bug locations
The first Bug Buster merchant request can be found as a blue note in plain sight near the merchant toward the end of Chapter 5. After you accept the request, you'll find yourself tasked with tracking down and eradicating this chapter's three hidden bugs. When you're ready to take them out, begin by heading further into the caverns with your gun at the ready.
Bug No. 1
A little way into the caverns will be a lever you have to pull to make some giant pillars move up and down. Carefully make your way between the first and second pillars here, then look up at the ceiling to see the first bug.

Bug No. 2
After making your way through just a bit more of the level, you'll eventually head up a long flight of stairs that will lead you out of the caverns. After taking out the group of enemies on the landing here, turn around and look back at the stairs you just came up to see the second bug on the ceiling.

Read more
Resident Evil 4: Separate Ways leaves me hopeful for a Resident Evil 6 remake
Ada Wong holds a gun in Resident Evil 4: Separate Ways.

This year’s Resident Evil 4 remake was an important victory for the horror series. Not only did it successfully reimagine a beloved classic, but it finally concocted the perfect action formula for the series at large. That’s an important milestone considering that Resident Evil has historically run into trouble when fully dropping survival horror in favor of blockbuster action (see the misunderstood, but undeniably sloppy Resident Evil 6). The remake paves the way for Capcom to once again evolve its series, taking another crack at the third-person shooter genre it struggled to nail.

In that sense, Resident Evil 4’s new Separate Ways DLC feels like a taste of what’s to come. Capcom uses Ada Wong’s solo chapter to push its action formula even further, weaving in some exciting new tricks that are already leaving me hungry for a true spinoff. It’s not the series’ finest DLC, playing more as an asset-reusing victory lap, but it gives me hope that Resident Evil’s second decent into pure action will be much more successful this time.
Grappling forward
Separate Ways follows Ada Wong, the anti-hero mercenary on a quest to retrieve a Plaga sample for Albert Wesker during the main game. The lengthy bonus episode is a remake in itself, but it's perhaps even more radical than the base game’s reinvention. Right from its completely new opening scene, it's clear that Separate Ways is diverting pretty far from the original DLC. That’s a sensible decision considering how much the new version of Resident Evil 4 reworks Ada Wong. She’s no longer a careless hired gun, but a nuanced character struggling to balance her professional responsibilities with her moral ones.

Read more
Resident Evil 4 Separate Ways DLC: How to solve the shield wall puzzle in Chapter 4
A wall of shields

As you progress through Resident Evil 4's Separate Ways DLC, you'll eventually need to help Luis score some ingredients for a fresh batch of medicine to aid in fending off the infection ailing both Leon and Ada. As you begin your quest to find the ingredients, you'll first have to solve a lithograph puzzle to open a door leading into a room filled with shields on the wall. In this room, you'll have to shoot specific shields in a specific order to open a cabinet revealing your first ingredient: red ink. Here's how to solve the shield wall puzzle.
How to solve the shield wall puzzle in Chapter 4
After solving the lithograph puzzle and opening the door, you'll enter an area where you can interact with a printing machine to get a piece of paper that hints at interacting with (shooting) the shields hanging all along the walls of the room. The problem is that, well, there are a lot of shields in this room. To find the correct shields, turn around from the printing machine and look at the fireplace along the wall behind you. To the left of this fireplace are the five shields from the picture that you printed.

You need to shoot three of these shields in the following order:

Read more