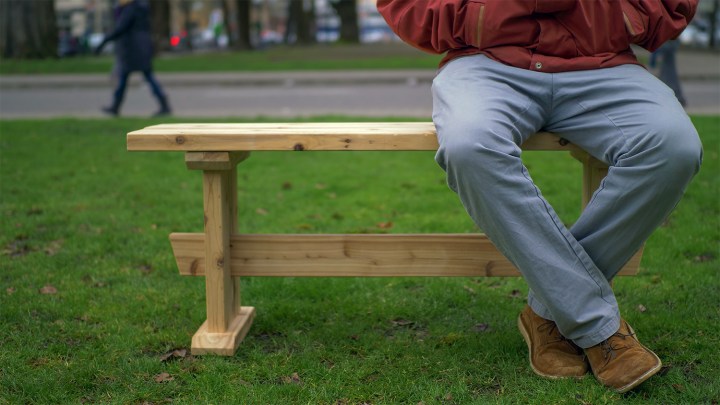
This sweet little bench is from my new book of simple but stylish woodworking projects, Build Stuff with Wood. It’s straightforward in every way — you can make the bench with a miter saw and a cordless drill using just a few common cedar deck boards and a single box of deck screws. It’s also deceptively simple to build, considering how nice it looks and how durable it will be outdoors. It’s really the best of all worlds.
What makes it all possible is the way the lower beam passes through a rectangular hole on both legs. Normally that “mortise” would be made by drilling out the waste wood and then using a chisel and mallet to chop the hole square to fit the beam, but here we use a slick trick to make the square hole: gluing and screwing separate boards together to create the exact opening we need. There is no drilling or chopping required.
Note that it’s mostly the screws that hold everything together, plus some glue in a few spots. But these are hidden on the underside and inside of the parts, so you won’t see any of them.
This bench is comfortable on a porch, patio, or deck, on grass or in a garden — but it looks so good, I would even let it sneak indoors. If you bring it inside, I recommend sanding it a bit smoother and adding a couple coats of oil finish to make it look more refined. If you plan to keep it outdoors, the cedar will eventually weather to a silvery grey whether you oil it or not, and it will resist rot regardless, so I wouldn’t bother.
Tools and materials

You really only need a handsaw and a cordless drill to tackle this project, but a miter saw will make things a lot easier. You’ll also need a pair of clamps that can reach at least 18 inches.
The cool part of this bench is how the four pieces in each upright are screwed and glued together to create the hole for the beam. That works because the pieces of 2×2 in the legs are the same thickness as the 2×4 that passes through, or at least they should be. The 2x2s probably won’t be perfectly square, so flip them around at the store to make sure at least one dimension matches the thickness of the 2×4 you choose.
These deck boards have smooth surfaces and nice rounded edges, so they create furniture that is friendly to the hand, butt, and eye. By the way, the parts are called 2x2s, 2x4s, etc., but they are actually 1/2 in. smaller than that in each dimension.
Materials list
- Cedar 2×6 deck board, 8 ft. long
- Cedar 2×4 deck board, 12 ft. long (or you can buy two 8-footers)
- Cedar 2×2 deck board, 8 ft. long
- 2-1/2-in.-long deck screws, one box, tan color
- Wood glue
Pro tip for buying cedar: Like many weather-resistant woods, the heart of a cedar log is the most rot-resistant part. The heartwood has the rich tan color you are probably familiar with. To cut costs, however, some suppliers offer cedar boards with cream-colored sapwood inside, from the outside of the log. That part of the wood lacks the chemicals that resist rot, and will start crumbling in just a few years outdoors. So look for boards without much of that creamy white wood in them, if any.
Quick note about wood glue: Cheap and available everywhere, yellow (or white or tan) wood glue creates a powerful bond. In general, Titebond III is your best bet. It gives you more working time than other versions (before it starts to seize up), and it also happens to be rated for both indoor and outdoor use, which is great for this brag-worthy bench.
Project plan

The diagram below has all the dimensions you need to build this project. Feel free to play with the size and design details. For example, you can make it as long as you want. But 18 inches high will be about right for most body sizes.
Step-by-step instructions
Step 1: Grab the project plan and cut every part to length. You can do this with a handsaw or circular saw, but a miter saw will make a bunch of square, smooth, and accurate cuts in a jiffy. Start by cutting a clean end on each workpiece, then make a pencil line at the other end and chop it off there. You could set up a work stop to make identical parts the exact same length, but working to a pencil mark is plenty accurate for this project. Note that the long 2×4 beam needs angled cuts on the end (at 15 degrees).
Step 2: Assembly starts with the uprights. By screwing and gluing four pieces together in the following sequence, you’ll create a perfect hole for the long beam to pass through, and a pair of strong uprights to support butts large and small. If you watch closely, you’ll see I broke this assembly into two parts: I used screws and glue to attach the small pieces to one of the big ones, and then just glue and clamps to add the other long piece.
- Attach one of short 2x2s to one of the 2×4 pieces. First flip the 2x2s (usually not perfectly square) to match their thickness with the thickness of the 2×4 used to make the beam, so it will pass through the hole in this finished assembly with a snug fit. Mark the faces you’ll be gluing with a check mark to keep track of them. Also sand those faces for a stronger glue joint with the outer pieces of the trestle. These small pieces need clearance holes for the screws so they don’t split. Drill two holes in each piece, spread some glue on one of them, and then drive screws to attach it to one of the 2×4 pieces, even with the end.
- Screw on the other 2×2 and use a piece of the 2×4 as a spacer. Take a cutoff piece of the same 2×4 used for the beam and use it to space the next piece you are attaching, so the hole for the beam ends up the right size. Press that second 2×2 piece firmly against the 2×4 spacer as you screw it on. Use glue and the long screws as before.
- The last piece gets clamped on. Take away the 2×4 spacer block, spread glue on the two pieces of 2×2, and clamp on the last section of 2×4, using any type of woodworking clamp that is long enough. Try to keep the parts flat as you clamp them. If they are curving one way or the other, it might help to put one of the two clamps on the opposite side.
- Rinse and repeat. Wipe off any glue that has squeezed out of the joints, and repeat the process to make another one of these uprights that will form the legs of the bench.
- Trim the ends. Let the glue dry for an hour or so, and then use your miter saw to trim the ends square and even (they probably won’t be). If the saw can’t quite make the width, cut as much as you can and then flip the assembly, line up the blade with the first cut, and nip off the last bit.
Step 3: Add the top and bottom of the uprights to complete the bench legs.
- Bevel the tops and bottoms. The bottom and top pieces are 2x4s with little angles on the ends to jazz them up a bit. These bevels are simple to cut on the miter saw. Start by marking a line 3/4 in. from the ends to guide your cuts. Next, tilt the saw over to 45 degrees, line your mark up with the inside edge of the blade, and make the cut.
- Drill clearance holes. Place these pieces against the upright assembly to mark the best locations for screws, then drill clearance holes so the screws will pass through freely.
- Use a spacer to line up the parts during assembly. The top and bottom pieces overlap the center section about 1 inch on each side, so place a 1-in.-thick spacer of some kind below the uprights to line them up while you drive in long screws. I used a piece of rigid foam insulation, which is cheap at home centers.
Step 4: This is a good time to soften the corners on all the workpieces. Furniture looks much better if the sharp edges and splinters are replaced by nice little bevels or roundovers. Use 120-grrit sandpaper to break all the edges, backed by any sort of flat block.
Step 5: Drill through the tops of the pedestals. This is where you will drive screws to attach the top boards of the bench. It’s fine to drill at a slight angle here.
Step 6: Now insert the beam to complete the base. If you were careful lining up the parts for the uprights, the long 2×4 beam should slide right into them. Check the drawing to see how far it should stick out at both ends. Make sure everything is square, and drive long screws into the side corners of the joints at an angle so they pass through the 2×4 beam into the part of the upright assembly just behind it. Watch this part of the video closely, and you’ll see me driving these screws in from each side.
Step 7: Attach the top boards and you’re done. Figure out which sides of the top (seat) boards look best, and lay those sides face-down on your work table. Now clamp the three boards together so they stay lined up as you attach them. Flip the base over onto the top boards, so you can drive screws through the top of the uprights into the top boards. The 2-1/2-in.-long screws should not pop out the top. Before you drive them, measure the seat overhang at each end to be sure the base is located in the center. Make sure the center 2×2 receives a screw at each end to hold it down. Now flip your finished bench right-side-up and put it where people can see it!
The Weekend Workshop is our weekly column where we showcase a badass DIY project that you can complete with minimal skills and expertise.