How to remove a Nest thermostat from the wall

Your Nest thermostat is one of the easiest pieces of smart home tech you can install in your home. If you have central air, central heating, or both, a smart thermostat is a great way to maintain the temperature in your home. It’s also smart enough to learn your habits and even save you a little money. Sometimes though, it has to go.

Maybe you’re painting the room, and you want to paint around it. Maybe you’re moving house, and you want to take it with you. Whatever the case, it’s easy to remove your Nest thermostat from the wall. You will need a Phillips head screwdriver to complete this process, so be sure to have one on hand. We’ll walk you through it step by step.

Step 1: Turn off the power

The Nest thermostat comes with installation instructions in the box.
Image used with permission by copyright holder

It’s very important to turn off the power to your Nest thermostat to ensure that you don’t get a short circuit. Your Nest thermostat is being fed power from a live wire, and if that wire touches any of the other wires connected to your thermostat, it could cause a short circuit and/or damage your system.

You can turn off the power in one of two ways. First, look on the side of your HVAC system and see if there is a light switch. If there is, turn it off. That light switch probably serves power to your thermostat, so turning it off will kill the power. Otherwise, you can shut down your entire HVAC system by turning off the breaker. 

Step 2: Pull it off
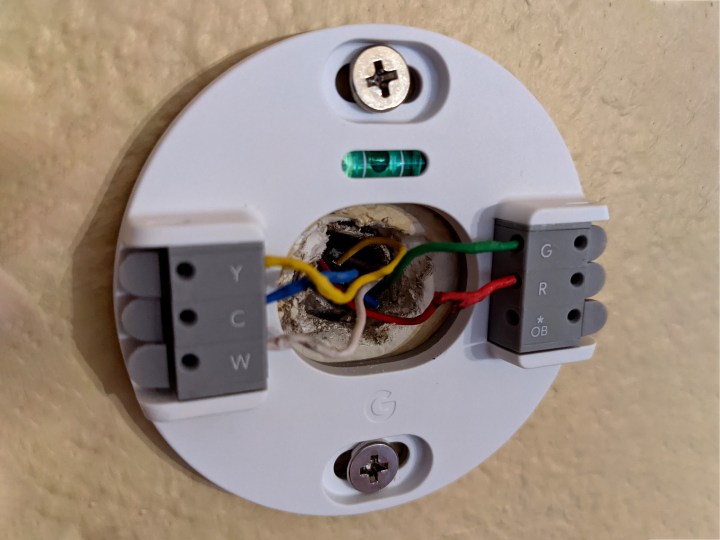
to remove the nest from the wall, press the levers and pull the wires out.
Image used with permission by copyright holder

Once power has been turned off, it’s really easy to remove the Nest thermostat from the wall. Just pull. The Nest thermostat is held by four plastic clips around the periphery of the Nest ring. A simple pull will disconnect the Nest from the wall, leaving behind the base with the aforementioned wires. There are also two screws attaching the Nest base plate to the wall. We’ll talk about those in a moment.

Before you do anything else, take a photo of the wires and the places where they’re attached. The wiring of a thermostat is critical to its proper function, so when you replace the thermostat back on the wall, it’s important to know what goes where. Alternatively, you can screenshot your wiring diagram before you disconnect the Nest from the wall. Open the Nest app, tap the Settings cog in the upper-right corner, then select Equipment > Wiring.

Step 3: Disconnect the wires and unscrew the base

It's important to get the wiring correct.
Image used with permission by copyright holder

Once you have saved your wiring diagram, you can disconnect the wires from the base plate. For each connection, use your finger or screwdriver to press the lever and pull each wire from the connector. Once all the wires have been disconnected, you can unscrew the screws attaching the base to the wall. Once those are unscrewed, you can pull the base from the wall, and you are all set.

When you want to replace the thermostat, just reverse the steps. The Nest thermostat base has a level built into it so you can make sure your Nest base plate is level when tightening the screws.  Then, reconnect the wires to the base, being careful to connect them to the same places. Make sure any excess wire is pushed and flattened as much as possible, then just place your Nest ring back onto the base, and give it a firm but gentle push.

Editors' Recommendations

Topics
Adam Doud
Former Digital Trends Contributor
Adam had been writing in the tech space for nearly a decade. When not hosting the Benefit of the Doud podcast, he can be…
How to clean the Roborock S8 MaxV Ultra
The Roborock S8 MaxV Ultra vacuuming.

The Roborock S8 MaxV Ultra is a highly automated robot vacuum. Capable of vacuuming, mopping, and cleaning itself after each cycle, the premium gadget lets you go for days (or even weeks) without providing any manual input. However, like all electronics, it still needs regular maintenance. And while maintenance is fairly simple, there are still a lot of tasks you'll need to keep track of.

Here's how to clean the Roborock S8 MaxV Ultra. This includes everything from checking its brushes and mops to cleaning its sensors and checking on its water reservoirs.
Check all the brushes, mops, wheels, and filters on the robot

Read more
Best Instant Pot deals: Pressure cookers, air fryers and grills on sale
A stew cooks in the Instant Pot Precision electric Dutch Oven.

Instant Pot is such a widespread brand that if you've ever owned an air fryer, pressure cooker, or toaster oven, you've probably had an Instant Pot at some point. Given that it's a brand that's known for making some of the best air fryers and the best pressure cookers, it makes sense to stick to the brand when looking to buy new small kitchen appliances. That's why we've gone out to find our favorite Instant Pot appliances, whether it's a pressure cooker or a Dutch oven, and collected them all below to help save you some extra legwork.
Instant Pot RIO 7-in-1 Electric Multi-Cooker -- $88, was $100

Not all Instant Pot devices need to cost a lot of money, and this budget-friendly Instant Pot Rio will give you a lot of functionality for less than $100. While it primarily functions as a pressure cooker, you can also use it for cooking rice, making yogurt, warming food, and even sauté. The controls are also pretty simple, so you don't have to worry about pressing through complex menus, and the fact that the lid and internal pan are dishwasher safe means it's really easy to wash as well, which is a huge plus.

Read more
Best air fryer deals: As cheap as $25
The Costway 16-in-1 15-quart air fryer oven on a table with plates of food spread out around it.

Air fryers are probably some of the best smart kitchen appliances because they not only make frying a lot easier but can also keep you much healthier in the long run compared to a deep fryer. Some of the best air fryers on the market have a ton of great features, giving you the variety of doing things like rotisserie or even having dual baskets to fry two things at a time. So, if you're looking to grab yourself an air fryer, you may want to check out these air fryer deals; they're some of our favorites that we've collected from around the internet.
Bella Pro Series 4-quart digital air fryer — $40, was $70

The Bella Pro Series 4-quart digital air fryer is equipped with a 1,500-watt heating system with an adjustable cooking temperature of up to 400 degrees Fahrenheit, which you can adjust through its digital touchscreen that also offers several preset cook modes. The air fryer offers enough capacity to cook meals for about four to six people, so it’s perfect for small families and intimate gatherings. The Bella Pro Series 4-quart digital air fryer also features a 60-minute automatic shut-off timer and a dishwasher-safe basket.

Read more