“It's smarter than ever, more gorgeous than ever — and it adds even more functionality.”
- Gorgeous, space-age design
- Comes with separate temp sensor
- Works with Apple HomeKit, too
- Excellent setup process
- Google Home app a tad wonky
- Not inexpensive
There have been certain times in my life in which I’ve seen some new tech product and immediately fallen in love. Or lust. Whatever you want to call it, I had to have it. The Apple IIe in my kindergarten class all those many years ago. A Sony Discman. A Palm Treo 750. The Logitech Harmony Companion universal remote. (I really miss that last one.)
I don’t know if the Nest Thermostat falls into that same category, but it’s close — if only because I’m old enough to have lived in homes whose thermostats used mercury tilt switches to turn things off and on. Those beige boxes were awful in so many ways. So when the original Nest Thermostat came out in late 2011, I knew I’d get one at some point.
More than a decade later, we’re now at the fourth generation of the Nest Thermostat. Much has changed, even if the basic functionality remains the same — it still controls your home heating and cooling system.
I need to preface this review with a pretty big caveat, though: every home is different. Every HVAC setup is different, and what you have can vary pretty greatly depending on where you live. I’m in Florida, which basically has four seasons that are varying degrees of hot and humid. (And three of those seasons last a total of 14 days.) You might not have such problems. And we do heat pumps here. On the other hand, I’ve never had to live with a radiator of any sort. So what you’re about to read is my basic take on the latest Nest Thermostat as it lives and breathes in my home. Your edge cases may — and will — be different.
But one thing will remain constant: Damn, this thing looks beautiful.
About this review
I’ve been using the fourth-generation Nest Thermostat as sent for review from Google, and it’s been on my wall for more than a month. I’m not new to the Nest ecosystem. This fourth-gen model replaced a second-gen model on my wall, and I had a first-gen before that.
I also have a Nest Protect smoke alarm, and various Nest cameras and doorbells and locks and other things that tie into the Nest ecosystem. I’ve also been using all this long before and long after Google bought Nest and eventually started integrating the products into the Google Home app. That’ll play a fairly big part in this review, actually.

The setup
HVAC units are (to me, anyway) simultaneously simple and daunting. I basically know how they work. And at the same time I have no idea how they work. I’ve got a thing on the wall that controls another thing in a closet somewhere, and also a thing outside that has a big fan and makes a little bit of noise.
That thing on the wall that controls how hot and how cold (and at the same time, how humid) my house is at any given time is called the thermostat. Simple enough. Open it up and you’ll find a bunch of low-voltage wires that go … somewhere. Probably back to the thing in the closet, right? (And at this point I’ll apologize to any HVAC professionals for my terminology.)
Setting up the latest Nest Thermostat is as easy as it’s ever been.
That’s what a Nest Thermostat is tackling. You’ll take the wires off the old thermostat, take it off the wall, and replace it with the new Nest hotness. In theory, it’s pretty simple. Nest has always done an excellent job at walking you through the process. And, actually, before you even purchase a thermostat. I can’t stress enough how important it is to use Nest’s compatibility checker. Because if your system simply isn’t compatible — maybe it’s too old, or just too different — then everything else is moot and you should save your money.
But assuming you’re good to go and have a system that’ll work, it’s time to set things up. There are two ways I want to address setup here. First, a short version for those familiar with Nest, Google Home, and just smart home stuff in general. Then one for everyone else, for those who might need a little extra reassurance.
For those familiar with the Google Home ecosystem and Nest
If you already have a Nest Thermostat, this is going to be pretty simple. If you don’t, but you have other devices that work inside the Google Home app, you also should feel right at (apologies) home.
It took me maybe 10 minutes to take down my old second-gen Nest Thermostat and replace it with this new fourth-gen. You’ll note the faux-slate backer plate on my wall — I’ve had it for years. Amazon is lousy with them. This new thermostat also comes with a boring plastic backing plate, if you need one, as well as required mounting hardware like screws and anchors. (The days of a Nest-branded screwdriver included in the box are, sadly, long gone.) Or if your wall allows, you can go straight in.
I took a quick picture of the wires in my old Nest setup, killed power to my HVAC unit, then stripped everything down. The mounting holes in the new thermostat matched closely enough, so I didn’t even bother using the new screws or anchors. I plugged all the wires into the new thermostat — and double-checked things, since this new model actually has more options for wires than the old ones. (That’s a good thing!)
Then I connected everything through the Google Home app — just like any other device from the past couple of years — and everything was up and running. Simple.

For those new to Google Home and Nest
If you’ve never used a Nest Thermostat before or are a youngling in the ways of smart home products, you’re in for a ride. And there are a couple of ways you can proceed:
If you’re relatively comfortable with home improvement-type projects, installing a Nest Thermostat is a relatively simple one. Nest has always had a really good setup process, and that continues in this fourth-generation device.
Start by taking your time unboxing everything, and actually read through the instructions. You’ll note how sparse they are. That’s because you’ll get the full walkthrough in the Google Home app.
I’d also recommend reading through Google’s support docs, which also walk you through every step of the process — including with some great videos.
The hardest part of the whole process is mounting everything on the wall properly — take your time! — and matching the wires to the right places. Assuming you’ve done that right, your Nest Thermostat should power on once you connect it to the base on the wall. (If you want to cheat a little, you can charge it via USB-C before sticking it on the wall, which actually is a little helpful because there’s a QR code on the thermostat itself that you’ll need to scan.)
Just take your time and read through the instructions.
That’ll get you going in the Google Home app. From there you’ll set up virtual rooms in the app, which you’ll want to roughly match where things are in your home, just so you can keep it all straight. You’ll then go through the process of setting up the thermostat itself, along with schedules and minimum and maximum temperatures.
One part to pay a little attention to is setting up your phone to serve as a mechanism to determine if you’re at home, or away from home. The thermostat then adjusts things accordingly. If nobody’s around, it won’t heat or cool the house. But if you’re home, it will. It’s a handy feature.
Again, take your time. Read the words. Watch the videos. (Old ones basically have the same hardware install process.) And don’t be afraid to ask someone for help if you need it. And if all else fails, a reputable HVAC company can help. (Though that, of course, will cost a little bit of money.)
Against the competition
- The fourth generation vs. the previous model
- Nest Thermostat vs. Ecobee Smart
- Nest Thermostat up against Amazon Smart Thermostat
Big change No. 1
This brings us to the first of the two biggest changes in this fourth-generation Nest Thermostat. It no longer requires — or even uses — the legacy Nest app. At all. That’s both good and bad.

It’s good because Google has been consolidating all of its smart home products in the Google Home app for a while. So putting the new Thermostat there makes total sense.
It’s maybe a little less good because the Google Home app isn’t as elegant as the Nest app — in design as well as in the way it functions. It works, and most everything is there, but it’s not a looker.
This also means that I now have one device — and one device only — that requires the old Nest app. That’s the Nest Protect smoke alarm. My advice at this point would be to have anyone else who lives in your home just kill their Nest app and let you deal with it. (Assuming you’re the keeper of all the nerd things at home.)

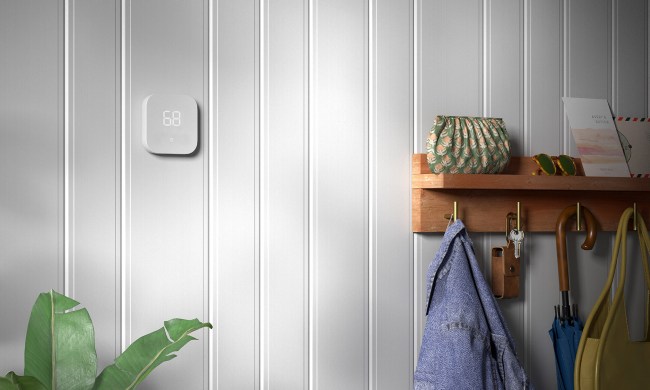
The gorgeous new design
I’ve gone this far without gushing over the new design. Gone is the silver ring that turned around the outside of the older Nest Thermostat. It’s been replaced by a bit of sorcery that has you turn the entire face of the Thermostat to adjust the temperature or make your way through the user interface.
This fourth-gen model is available in three color: polished silver, polished gold (which is maybe more brown than yellow), and the none-more-black polished obsidian, which is what I had Google send over. It’s gorgeous. For as sophisticated as the previous versions of the Nest Thermostat were, this is something completely different. Less industrial and more futuristic. It feels a little weird talking about a thermostat in the same way we might the latest phone, but here we are.

The entire thing is just shy of 4 inches in diameter and stick about a little more than 1 inch. The display itself, though, is just 2.7 inches. So it doesn’t take up the entire face, but that’s fine. Depending on what phone you carry around on the daily, you might actually be a little disappointed in the screen at first. It’s a 600×600 LCD display, or not as good as what’s in my iPhone 15 Pro. And I’ll admit, I was a little disappointed at first. And then I reminded myself that I was complaining about the 2.7-inch display on a thermostat. I got over it pretty quick.
The new display also houses a “Soli” sensor. That in and of itself isn’t new — it’s what’s baked inside the second-generation Nest Hub for a feature called Motion Sense that it track your sleep and recognize gestures. In this context, though, it’s used to light up the display when it sees you coming.

The temperature sensor
Along with this completely new design is a new, second-generation external temperature sensor. It’s a little puck-like device, about the size of an Oreo. Double Stuf. (Which is the only acceptable answer.) Stick it on a desk, or a dresser, or wherever. Just maybe not a windowsill, since that’ll get exceptionally hot or cold. There’s a little notch on the back if you want to affix it to a wall via a screw or hook.


- 1. The second-generation Nest temperature sensor.
- 2. The second-generation Nest temperature sensor.
- 3. The second-generation Nest temperature sensor.
You don’t have to use the sensor if you don’t want, but it’s a handy little device if you have a room that’s always too hot or too cold, but you want to be able to cool it or heat it appropriately. Two of my home’s three bedrooms have that problem, actually. (Thanks, 1980s construction!) So I stashed the puck in the worst-offending room and make sure I don’t boil/freeze the person there at the expense of everyone else.
One feature you might want to consider is only using the sensor at a certain time of day, which is a thing you can do.
The sensor comes with a removable CR2 battery, which probably isn’t something you have lying around. I can’t tell you how long it’ll last, but Google says it should be good for up to three years.
You can have up to six sensors in a home. I seem to have lost my first-generation sensor, but Google tells me the OG will work with this new Nest Thermostat, too. If you need additional second-gen sensors, you can snag one for $40, or three for $99.

Big change No. 2
Here’s another cool improvement that gets its on section: Farsight. Again, it’s not a new feature. Nest Thermostats have always awakened to show you information once they realize you’re within view. But this bigger full-screen display comes with some new toys.
You now have four Farsight options from which to choose. And I’m not too proud of a nerd as to say that this maybe has been the hardest part of the whole new Nest experience: picking which option to use. As of this writing, there are four.
- Temperature: Shows the current temp (light face on top), and the target temp beneath it.
- Weather: Shows you the reported temperature outside, and whether it’s sunny, stormy, etc.
- Analog clock: That’s the kind with hands.
- Digital clock: Numbers only.
It’s maybe a little silly, but I’m kind of disappointed. But I don’t know what I expected. Temperature seems kind of boring, albeit important. I really wanted to use weather all the time, but there was something extremely unnerving about seeing temperatures in the high 90s on my thermostat, which has always shown the indoor temperature. And I don’t need another clock in my life (or in that room), though those certainly are functional and look just fine and might well work for you.
There also is some secondary information that will pop up as you get closer. But I’ve found it to be so small that I can’t really see if unless I’m purposefully in front of the thermostat and not just walking by.
In the end, I’ve settled on the temperature option and decided this is just a problem with my brain, and not something that Nest did badly. It’ll be interesting to see if any other options emerge, though. (Hurray for thermostats that get software updates over the air!)

Using the Nest Thermostat
OK, the bread and butter. You can use the Nest Thermostat as much or as little as you want. Again, every home is different, as is everyone’s tolerances for heat and cold. But this Nest Thermostat — like all that came before it — really wants to take over for you. It doesn’t want you to have to worry your pretty little head about the temperature. In fact, it goes so far as to automatically setting a schedule.
You can actively manage the Nest Thermostat, or just let it do its thing.
I’m still hit and miss on this. But I don’t consider that a big strike against the Nest Thermostat. My use case has always been a little weird because I work from home. I don’t mind if things are a little hot during the day in the summer, or cold during the day in the winter. It’s just me at home, and I’ll be a tad uncomfortable in the name of saving a few bucks on my electric bill.
That said, the Google Home app handles schedules so much better than the legacy Nest app. (Those who know, know.) There’s no more fat-fingering individual temperatures at individual times on individual days. By default, the app sets two scheduled “events”: Comfort and Sleep. Those are triggered by time.

You don’t actually have to ever touch the thermostat on the wall, if you don’t want to. It works great with a phone or tablet. It works great via voice, though unlike, say, an Ecobee, it doesn’t do so directly through the thermostat itself. More on that in a second.
There is a lot to explore in the Nest Thermostat, though. Press the glass face to get into the extensive menu system, then rotate to scroll through the options. That pretty much works the same as before, though I found myself trying to press in specific places on the screen, as if it were a phone’s touchscreen. It’s not. There are a lot of options available in the settings section, too.
Especially important is the option that will lock the thermostat — that’s handy if you have kids, or if you plan on putting this thermostat in a public place.
Big change No. 3
Perhaps the most important part about any Nest Thermostat is that it’s a smart thermostat. That is, it connects to the internet. That’s how it talks to Google. That’s how it does a lot of what it does.

This fourth-generation model also includes a smart home protocol called Matter. It’s not the first Nest Thermostat to include that — the 2020-year model got Matter support via a software update in 2023.
If you’re new to Nest, or if like me you’re coming from an version from before 2020, this is a big deal because it allows the Nest Thermostat to work natively with Apple’s HomeKit system. And that means I no longer have to use a bridge service like Home Assistant (plus a little hackery) to connect my thermostat to HomeKit. And because it’s now in HomeKit, you can use your voice to have Siri control the Nest Thermostat.


- 1. The fourth-generation Nest Thermostat supports Matter, and that means it works natively in Apple’s HomeKit ecosystem.
- 2. You don’t have to do any hackery to get the fourth-generation Nest Thermostat to appear in HomeKit — it’s just one step during setup.
If you only use Google products, cool. Everything already works just as expected. So long as your Google devices are all on the same Google account, they’ll talk to each other just fine. Control it with a Nest Hub using the screen or your voice. Same goes for a phone. Or Google TV. Anything that has Google Assistant or Gemini or whatever Google wants to rename things to this week.
But Matter support is important for anything outside the Google ecosystem.

Should you buy it?
A flagship Nest thermostat is not an inexpensive device. This one retails for $280 as of this writing. That’s $30 more than the previous generation, though this new model comes with the external temperature sensor. How long it’ll take you to recoup that money via any sort of monthly savings on your electric bill depends on your usage.
Nearly $300 (before tax) to control your HVAC remotely is a lot of cash. That needs to be said.
But so does this: This fourth-gen Nest Thermostat is gorgeous. I can’t say that enough. It looks great on a wall. Maybe too nice, actually. (My faux-slate plate helps a lot.) The setup process is still very well done — extremely helpful for beginners, and easily skipped for those who have been here before.
The inclusion of Matter is important, and should be expected in a device of this caliber in 2024. You don’t need to know the Matter name — just know that it’s what lets devices from different manufacturers play nice with each other.
I don’t think I’d recommend tossing a perfectly good Nest Thermostat for this one, unless you have $300 to burn and can gift the old one to a new home. It’s just not necessary. And if you just want a thermostat that allows for remote control, you can get one for less than this — including from Nest itself.
But if you’re in the market for a new smart thermostat and want to play in the Nest space, I can’t recommend this fourth-gen Nest Thermostat enough.