“The Safe monitors your home alarm system while saving you money”
- No monthly fees
- Uses your existing system
- Easy installation
- IFTTT integration with voice assistants coming soon
- Some features need improvement
- Not compatible with all systems
Though still far from ubiquitous, home security systems are becoming increasingly common. That’s partly because homeowners feel safer when they have one installed. But it doesn’t take a genius to realize there’s a massive financial incentive for alarm companies to get you to install one. The recurring monthly revenues from alarm monitoring services are significant and are often attached to a long-term contract. Whether you actually need professional monitoring is an open question and subject to much debate.
But breaking up with your monitoring company isn’t easy. If you decide to cut the cord, how will you know if there’s trouble at home, and how will you call for help? The $249 Safe by Hub6, by the Canadian company Hub6, is one possible answer. By wiring the Safe by Hub6 into your existing home security system, it acts as a virtual monitoring center, keeping you apprised of your system’s state by using Wi-Fi when it can and 3G data when it can’t. The best part? There’s no monthly bill. Is the Safe too good to be true, and what — if anything — do you give up when using it? Read our Digital Trends review to find out.
Not for everyone (yet)
First things, first: Though the Safe by Hub6 is compatible with many home alarm systems, it won’t work with all of them. It’s intended to be used by homeowners who have had professional alarm systems installed, not those who have installed their own self-monitored DIY systems. At the moment, Safe works with DSC systems, and as of July 11, 2019, Hub6 has added Honeywell system compatibility too. Before you consider buying a Safe by Hub6, check the company’s compatibility pages on its website. Our test home’s system was not compatible, so Hub6 offered to install an entirely separate DSC system, complete with 22 sensors, so that we could perform this review.
Tiny but mighty
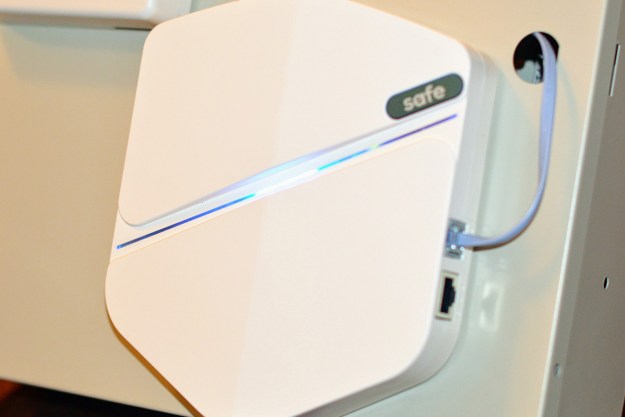
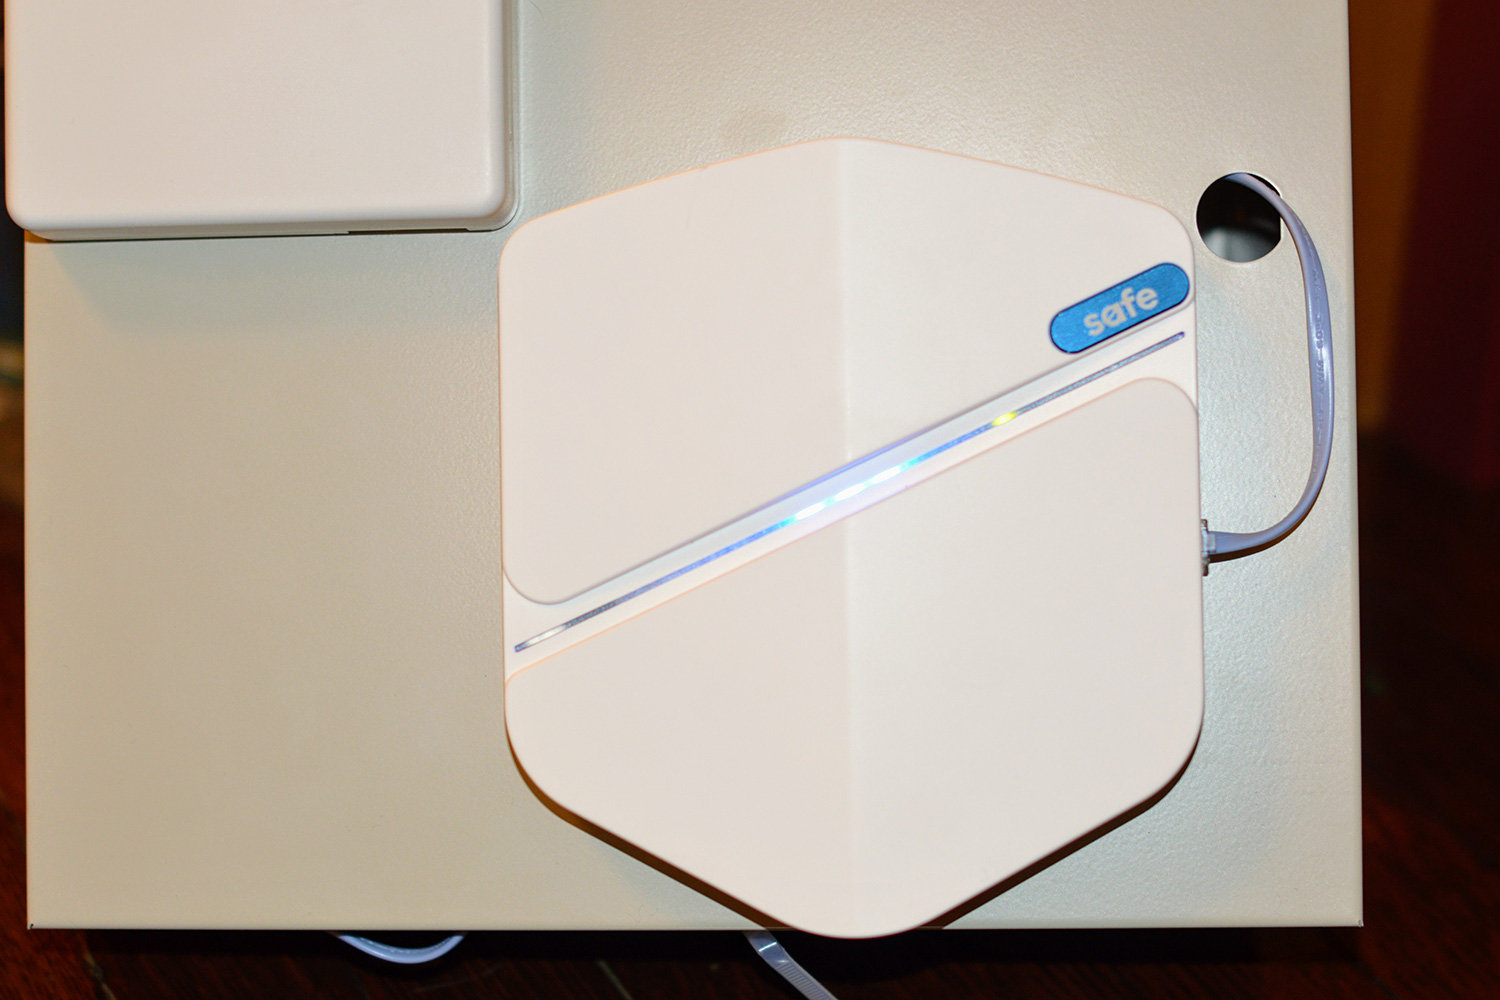
Though appropriately shaped like a shield, the small, white Safe by Hub6 doesn’t really look like a high-tech security device. It looks friendly and approachable, more French poodle than Rottweiler, which is a clever bit of product design. After all, you’re going to have to wire this thing into your home alarm system or possibly have it mounted on your wall for all to see. If it looked sinister and scary, you wouldn’t want it.

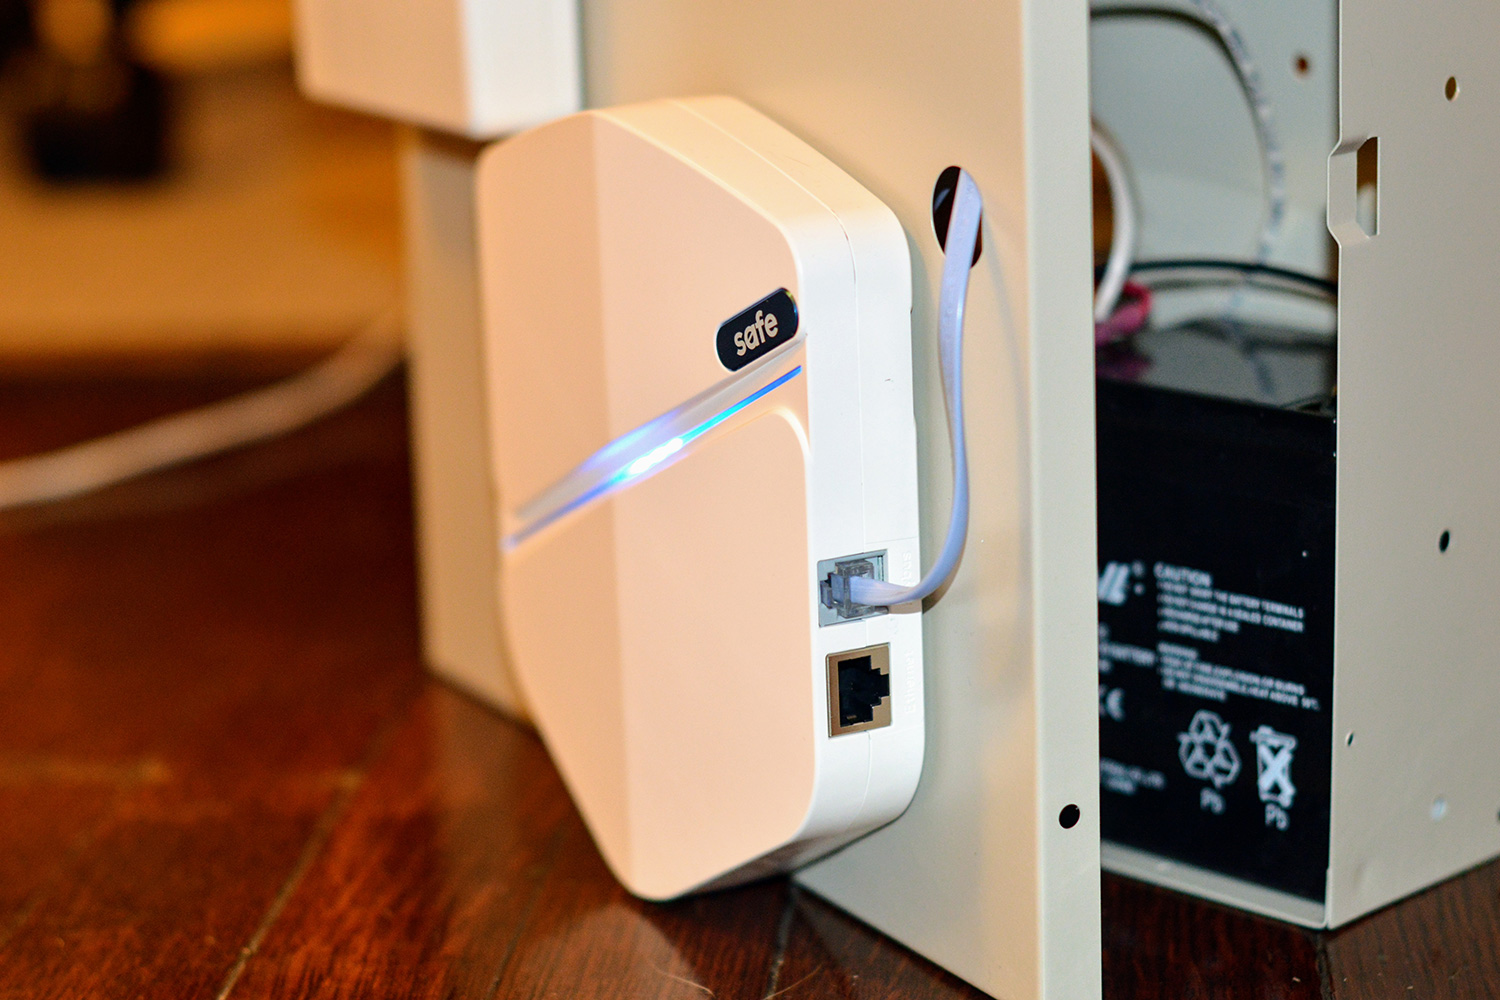
Under that unassuming exterior is a specialized set of chips designed to interact with your alarm system that use Wi-Fi, Ethernet, or 3G to communicate with the outside world — specifically your smartphone.
In the box, you’ll find the Safe, two kinds of alarm wires, and an Ethernet cable.
Where goes the wire?
To install the Safe by Hub6, you physically wire it into your alarm system. This can be done in one of two ways: Either directly into your alarm’s master control panel or into one of your existing wall-mounted keypads. If you have access to your control panel (typically housed in a beige metal box often in a basement or concealed in a closet) this is your best choice. Once it’s installed, there’s no need to interact with the product physically, so you might as well keep it out of sight. If for some reason you can’t get to your master control panel or its location prevents decent 3G and Wi-Fi, you’ll have to go with option two.
It took less than three minutes to wire the Safe into our alarm system.
Wiring the Safe by Hub6 into a keypad isn’t any harder than wiring into the master panel, but it is less attractive: You’ll end up with it mounted to the wall next to your keypad with a visible gray wire connecting the two devices.
The Safe by Hub6 app (simply called Hub6, on iOS/Android) helps you make the final call by showing you the 3G and Wi-Fi signal strength when you’re standing next to your master control panel location. If neither of these are sufficiently strong, you have your answer.
Snip or clip
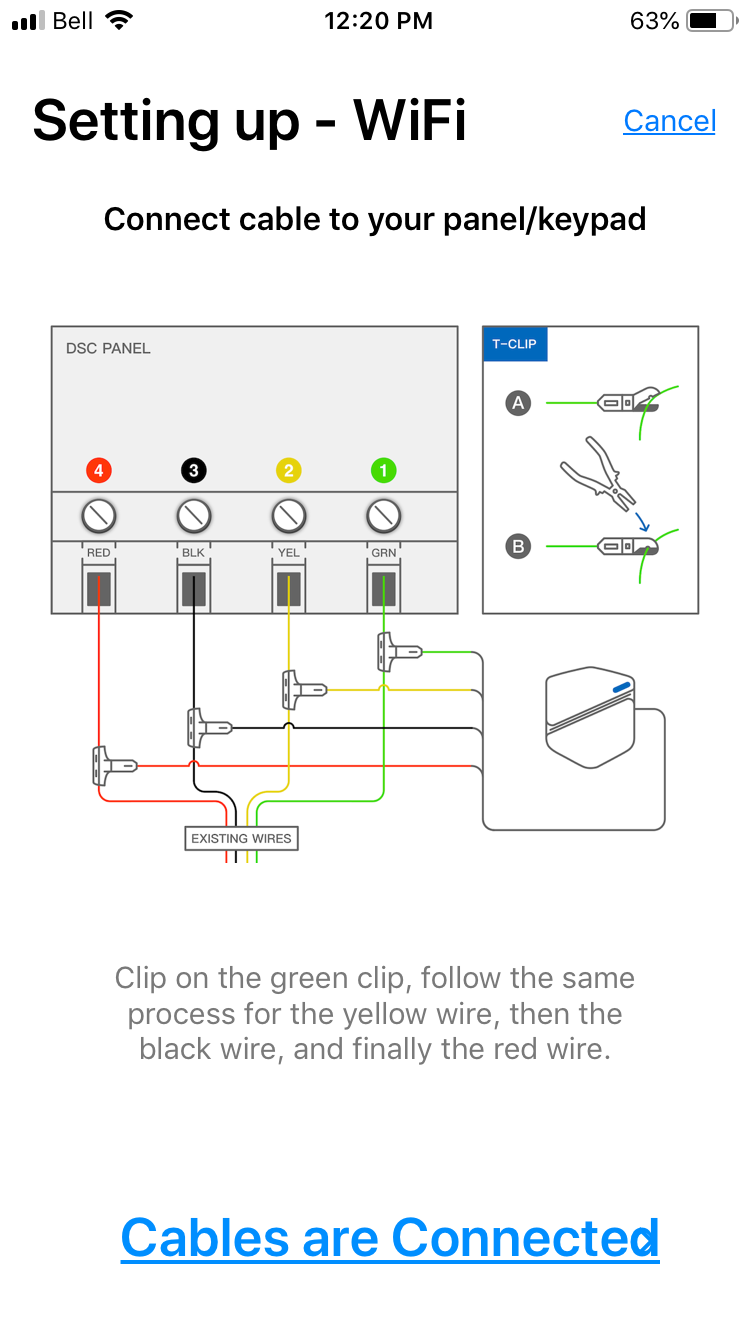
Because our test alarm system was installed for the purpose of the review, we had a lot of say over where the master board would be located and naturally we chose a spot that would offer good signal strength. That meant the next step was wiring the Safe by Hub6 into the board. Once again, the app guides you through the process, indicating which of the two types of alarm wires you should use and how to connect them.
We opted for the recommended T-clip wires, which makes for the easiest install. It took less than three minutes to match up and clamp the four T-clips to the corresponding wires emerging from the control panel. The four wires’ distinct red, black, yellow, and green colors makes it unlikely you’ll get it wrong, but pay attention to the app’s instructions because you must use a set of pliers to fully close the T-clip jaws. These plastic snap closures look like they can be easily closed with just firm finger pressure, but unless you’re Dwayne Johnson, you’ll need the pliers. Unfortunately, the T-clips don’t always issue an affirmative “click” sound when you’ve closed them correctly, so you’ll have to look closely at the jaws to make sure they’re indeed sealed shut.

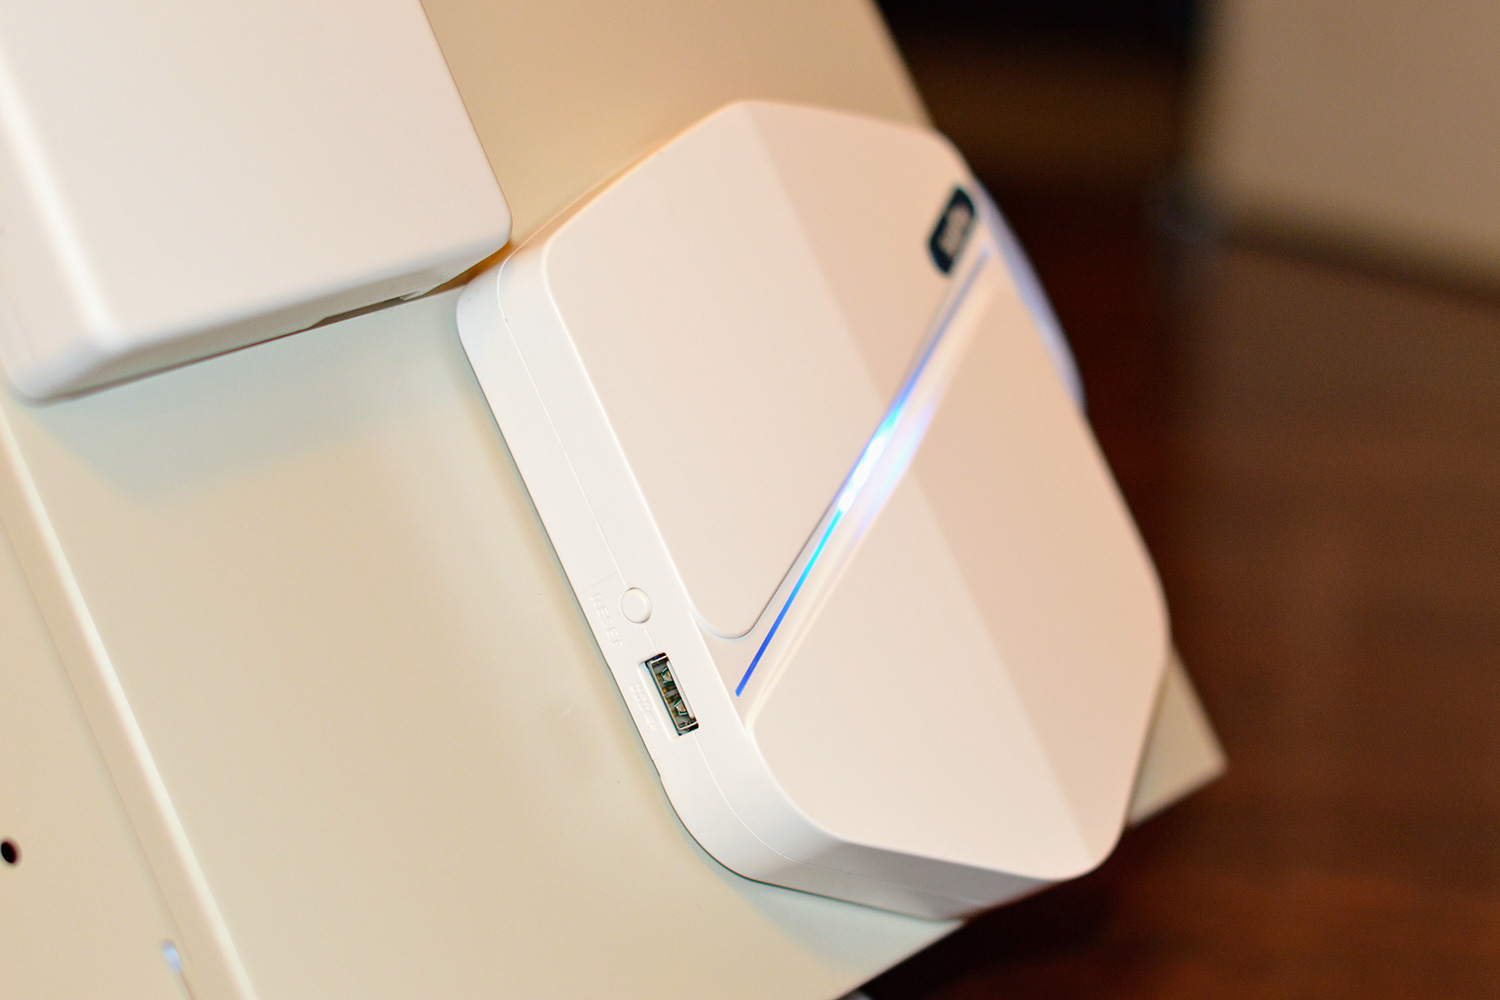
Once that’s complete, you plug the other end of the T-clip wires into the matching RJ-11 receptacle on the Safe by Hub6. You’ll notice there’s also an Ethernet jack, but as long as you’ve got decent Wi-Fi, you won’t need to use it. Cleverly, there’s no separate power supply. Much like the existing keypads, the unit draws its power directly from the alarm system.
Your last duty in your role as installer is to mount the Safe by Hub6 near the panel box. Do not give in to the temptation to place the it inside the box, even if there’s plenty of room: The metal box will act as a Faraday cage, effectively blocking both 3G and Wi-Fi signals. Use the self-adhesive backing on the back of the Safe by Hub6 to stick it to the outside of the panel box door or an adjacent surface.
No pain, no gain
The remainder of the set-up procedure happens in the app. Following the steps to get the Safe by Hub6 connected to your home Wi-Fi is eas, and will be familiar to anyone who has setup similar smart home devices. Where it becomes a bit of a slog is the setup of the alarm zones.
The app helps out by giving you a list of the most common locations and sensor types.
Once activated, the Safe by Hub6 becomes instantly aware of all of the sensors (zones) attached to your system. But these zones are simply numbered; there’s no description of where the zones are located or what kind of sensor is being used. This chore falls to you, and you’re going to rely on the zone map that was hopefully printed out and attached to one of your keypads. It ought to say something like “Zone 1: Front Door, Zone 2: Kitchen Window, etc.” If it doesn’t, or you don’t have a printed map, you’ll have to create one. Depending on the number of zones you have, this could take some time and will involve opening each door or window, or tripping a motion sensor, and then going back to your keypad to see which zone has been identified.


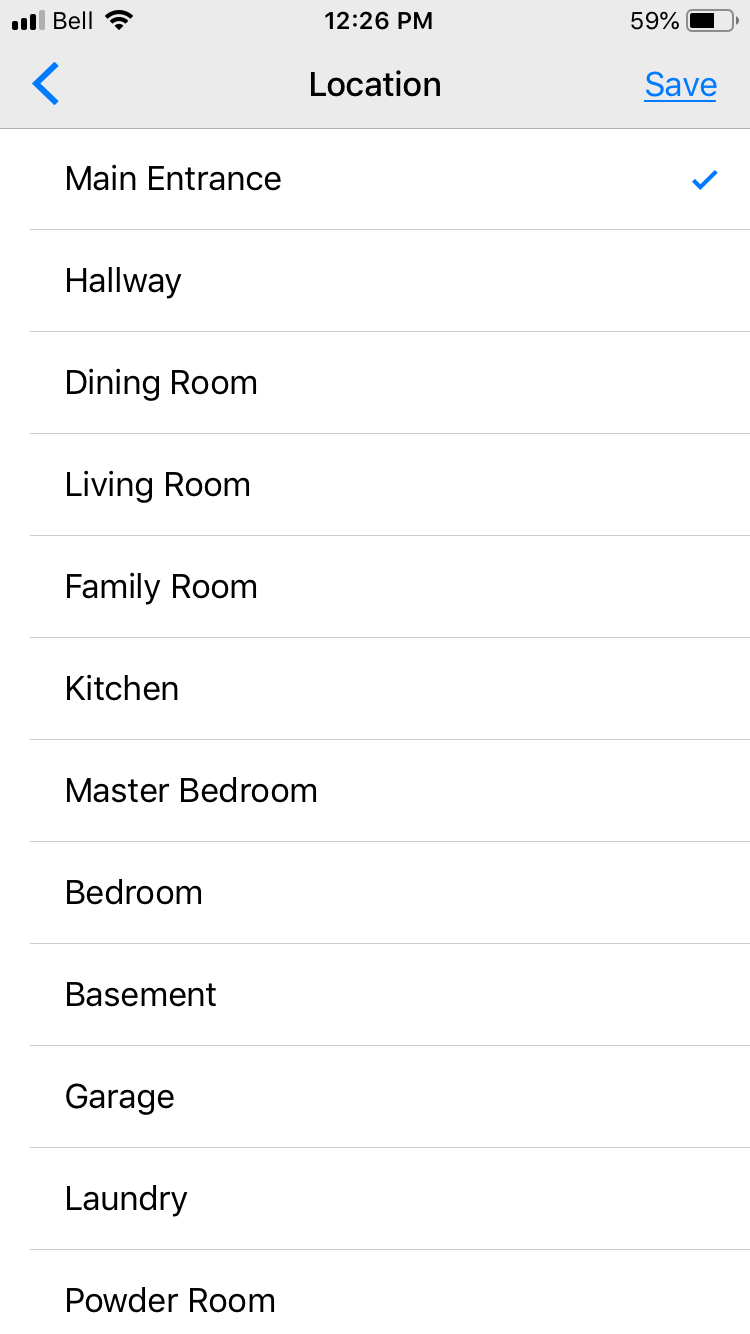
Hopefully, you can avoid this step and move on to entering info into the app. The app helps out by giving you a list of the most common locations and sensor types. If your actual locations don’t match, you can call them whatever you like. Keep in mind, this step won’t affect the Safe by Hub6’s ability to do its job, but you’ll be glad you did it when you get an easy to read message like “there is an alarm in 2nd floor hallway,” instead of “there is an alarm in Zone number 18.”
Knock, knock, neighbor
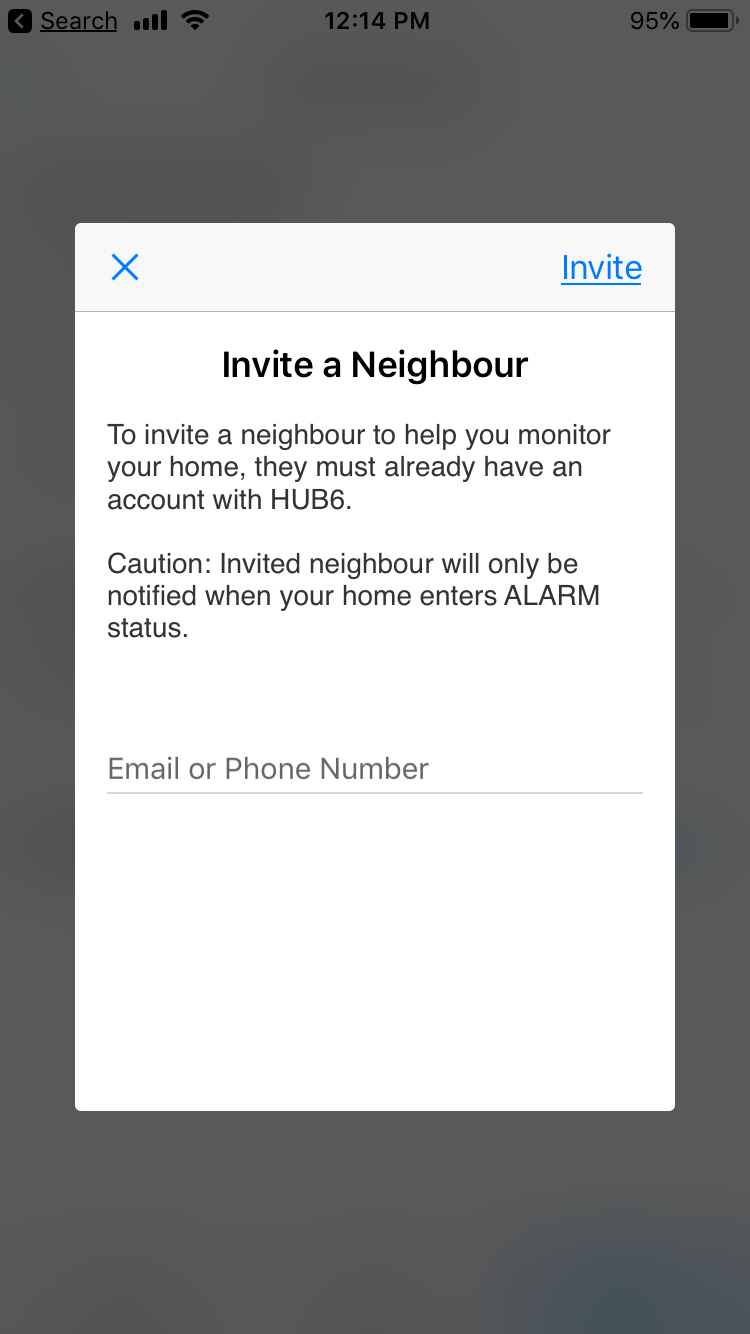
When all of your zones are set up, the Hub6 app asks if you’d like to invite a neighbor to join you. Invited neighbors download the Hub6 app too and are given visibility over the status of your alarm. If the alarm goes off, they’ll be notified via SMS, email, or a push notification — the same three options you get as the homeowner.
The Neighbor function serves the same purpose as a call list with a traditional monitoring service. It’s an important feature because if you can’t respond to an alarm, someone needs to decide what the next steps should be.

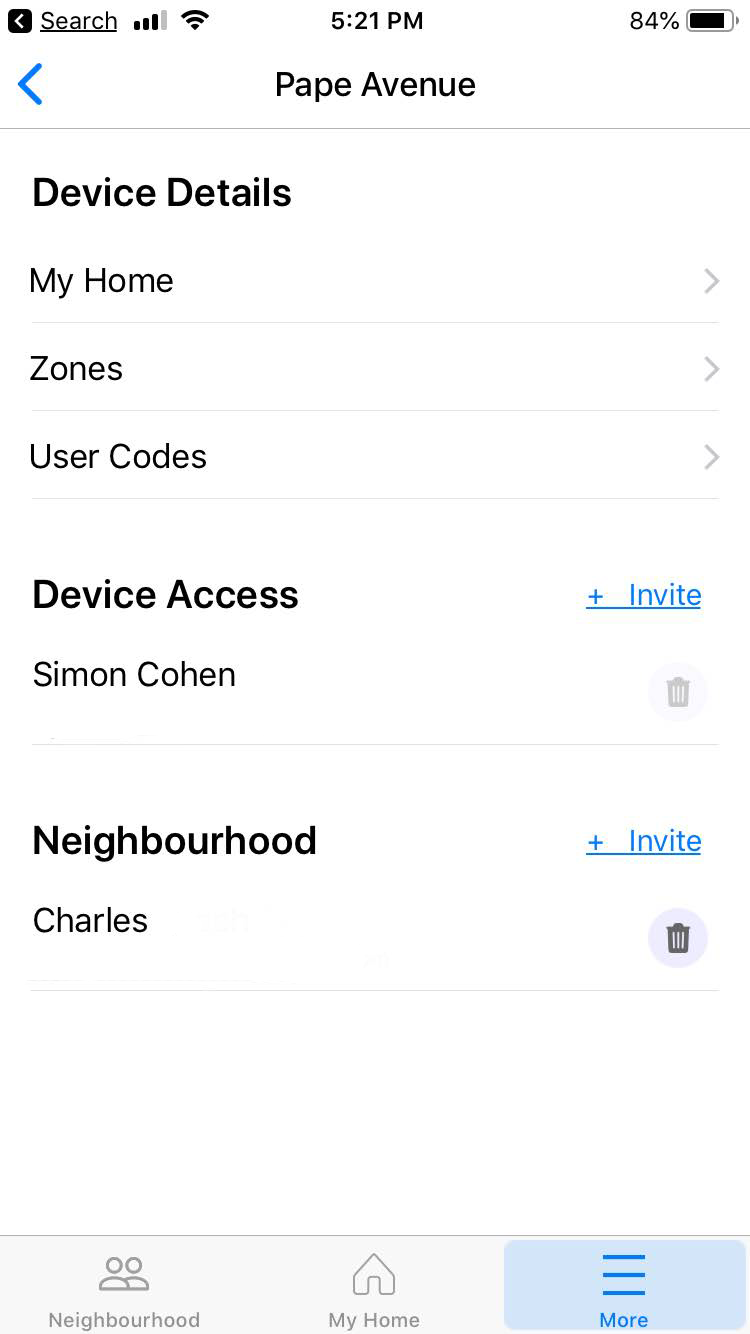
Unfortunately, for the moment, it’s a feature that lacks some much-needed control. There’s no way to create neighborhood tiers or issue status notifications after the initial alarm. In other words, if someone is invited to your neighborhood, they’ll get alarm messages, regardless of how many other people get them too. This will inevitably cause confusion; how can each neighbor know if the other has received the alarm, and if so, if they’ve taken action, or will take action? Currently, if you accidentally set off your alarm, your neighbors will be notified, but they won’t get a similar notification letting them know you’ve disarmed the system. For that, they’d have to keep a close eye on the app’s home screen to see if the Safe’s status changes back to “Ready to Arm,” and in the meantime, they won’t know what they should do.
Again, Hub6 is aware of these limitations, and expects to have a better solution in place with a soon-to-be-released software update, including the ability to call a homeowner directly from within the app.
From basic to bonus
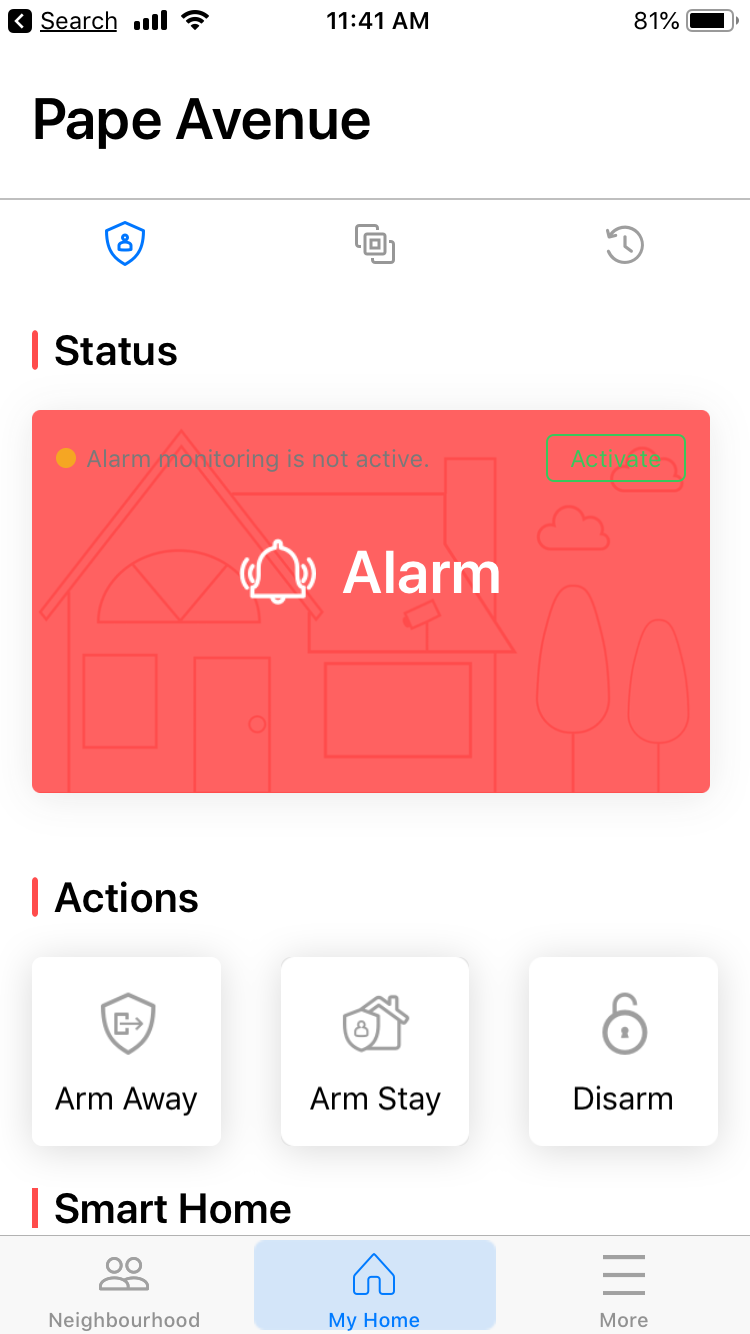
In day-to-day use, the Hub6 app is very straightforward. The home screen shows you the current status of your system, for example, “Ready to Arm,” and lets you choose the two main arming modes: Away and Stay. Once armed, you can disarm it using the same code that you use on your keypad.
Additional users can be added with their own key codes, which saves you the hassle of trying to do this through the keypad.
It’s the only product that lets you ditch your monitoring company fee but keep your existing professional alarm system.
There’s no way to bypass an open window or door however, something that can only be done using the alarm keypad. The zones tab will show you the status of each zone (open/closed), which may make the task of bypassing these sensors a little easier.
There’s also no automation features like geo-fencing. With some of the newer smart home security devices, your phone can be set to automatically disarm a system through its GPS proximity or via Bluetooth. Hub6 tells us this is by design. Were someone to steal your phone, they couldn’t gain access to your house simply by walking up the front steps.
However, the Safe by Hub6 isn’t without promising extras. It’s IFTTT compatible, which gives it the ability to auto-arm when you leave the house and lets you integrate both Alexa and Google Assistant. Direct compatibility with these devices will be added in the next few weeks.
Humans optional
As much as you might be itching to ditch your alarm monitoring fee, Hub6 understands there may still be times when you want the extra peace of mind that having a human being watching your system provides. Within the app, you can activate a 30-day monitoring period for $10, which is outsourced to one of Hub6’s contracted monitoring companies. It’s a nice option for those times when you’ll be away for a prolonged period and can’t necessarily count on your neighborhood members to jump to the rescue. The availability of this service varies from state to state, so if it’s important to you, you may want to contact Hub6 before making your decision. We did not test this optional monitoring as part of our review.
Rough around the edges
Safe is a very new product, and a number of times during the install and while using the app, we were confused by the wording of instruction, or prompts to continue to the next step. Some functions, like adding a neighbor, are buried deep within the app, making them very tough to find.
We also ran into a glitch when we tried to add a neighbor. The text message they received contained a broken link, which stopped the process in its tracks. Hub6 told us to get the neighbor to install the app directly, which they did. Unfortunately, there was no visible notification that we had invited them — this was buried inside the Neighborhood tab, silently sitting there.
We expect the software to get better over time, but for now, it’s a work in progress.
Warranty information
The Safe comes with a one-year warranty from Hub6.
Our Take
No one likes to pay their monthly alarm monitoring fees, but if you have a professionally installed system, there’s no other way to know if your alarm has been triggered. The Safe by Hub6 provides the ability for your alarm to talk directly to you via your smartphone, without the middleman, and with no fees, giving homeowners the possibility of ditching their monitoring expenses for the first time.
Is there a better alternative?
For now, the Safe by Hub6 occupies a special place in the market. It’s the only product that lets you ditch your monitoring company but keep using your existing professional alarm system. Plenty of DIY alarm systems exist that offer the same features as the Safe by Hub6, but none let you commandeer a professional system. Some pro systems will let you forego the monitoring service, giving you similar app-based notifications, but there’s still a monthly fee associated with this option. By including the lifetime cost of the 3G connection in the purchase price, Hub6 has created a unique, no-fee alternative.
How long will it last?
The Safe by Hub6 itself relies on very simple and proven technology, and we don’t anticipate that hardware failure will be a significant concern. However, should Hub6 ever go out of business, the Safe by Hub6’s ability to communicate with the outside world over 3G will be impaired, because no one will be paying the bill for the 3G connection. It will still work using your home’s internet connection, but in the event of a power failure, or a thief cutting your cable or phone line, it won’t have a cellular backup.
Should you buy it?
If you’re tired of paying monthly monitoring fees, especially if you live in a municipality that refuses to send the police at the request of your monitoring company, the Safe by Hub6 is guaranteed to save you money, while still maintaining most of the peace-of-mind that a monitored system offers. It’s not perfect, and you’ll have to get used to relying on your neighbors to help out in the event of an alarm, but we think the potential savings of between $300-$420 a year is worth it. Even if you decide to use the Safe by Hub6’s optional monitoring service, at only $10 a month, it’s probably cheaper than what you’re currently paying. You’ll need a compatible alarm system, and some patience as Hub6 works out the remaining kinks in its software.
If you don’t already have an alarm system, or if you really can’t bear the idea of cutting the ties to your monitoring company, the Safe is not for you.
Editors' Recommendations
- SimpliSafe is now using AI to prevent burglars from entering your home
- Echo Hub vs. Echo Show 15: Which is the best smart home gadget?
- Echo Hub vs. Echo Show 8: Which is the best option for your smart home?
- Do Arlo Essential cameras require the Arlo Smart Hub?
- The 6 best desks for a home office in 2024