If you recently got a new iPhone or a new email address, connecting your email account to your phone is probably a top priority. Apple makes this process as painless as possible — that is, assuming your Mail app hasn’t disappeared from your home screen — but it’s still important to know where to go so you can link your account when you have a couple of spare minutes.
Here’s everything you need to know about adding your email, either automatically or manually.
Further reading
- Best emails apps for the iPhone and iPad
- How to send a text message from a computer
- How to create disposable email addresses
Option 1: Add email automatically
Apple makes it easy to set up email by connecting to a popular provider via the settings. The key is that this process only works with major email platforms like Google, iCloud, Microsoft Exchange, and Yahoo, which can also integrate other information like calendar events with your phone. Unless you use a smaller, lesser-known email client, this is the best place to begin.
Step 1: Make sure your iPhone is on and connected to the internet before you begin. Start at the home screen, and select the Settings app to begin.

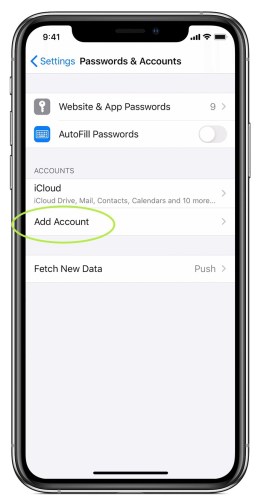
Step 2: In Settings, scroll down until you see the option for Passwords & Accounts with the key logo. Select this. On the next screen, you will be able to see any connected accounts you may already have (iCloud, for example, may already be there based on how you set up your iPhone). Choose Add Account to begin the process of adding your email.

Step 3: Apple will now show you several of the top email providers that it can connect with automatically — currently six in all. Choose your email platform from this list, or head down to our section on manually entering an email.

Step 4: Enter your email address and the password for your email account on the new screen. Each provider will have their own separate login process, so this will look a little different based on what you choose. Microsoft Exchange, for example, will give you a basic form to fill out and an Exchange Device ID for your Exchange administrator to use. Yahoo will simply take you to a version of its login webpage. Whatever the screen looks like, sign up with the right information, and select Next.

Step 5: Apple Mail will then verify your account and link your email. You will now have the option to import and use specific information from your calendar or email contacts. It’s generally a good idea to have this info sync across devices, but you can pick whichever is right for you. Save your email when finished, and you are done!
Option 2: Add email manually
This option works if you want to connect an email address that isn’t one of the several big providers that Apple has listed or if your email isn’t available online in the same manner. Fortunately, it’s still very easy to set up and won’t take that much longer, although you may not have the option to link your contacts and calendar.
Step 1: Just as with the automatic option, start by going to Settings. Scroll down to Passwords & Accounts, then choose Add Account.

Step 2: Here, you will see Apple’s list of compatible automatic providers, but at the bottom, notice there is an option for Other. Choose Other to begin.

Step 3: You will now have a number of options to add various accounts, but you want the first option at the top, Add Mail Account. Apple will give you a form to fill out with your name, email address, password, and description (you might want to label it a work or school email, for example). Fill out all this information, and then select Next.
Step 4: Wait for the app to verify your email information. If something goes wrong, make sure your address and password are completely accurate. If everything goes according to plan, your email will be located, and you can select Done to finish the process.
Your email account should now be linked! Head to the Mail app and wait for it to update, which could take a couple of minutes. When finished, you should be able to access all of your email messages, along with basic functions for creating and managing emails. Remember to refresh the app to make sure that it’s searching for any new emails when you use it!
You can also check out our guides on how to unlock your iPhone without face recognition or how to move photos between iPhones if you get a new model.


