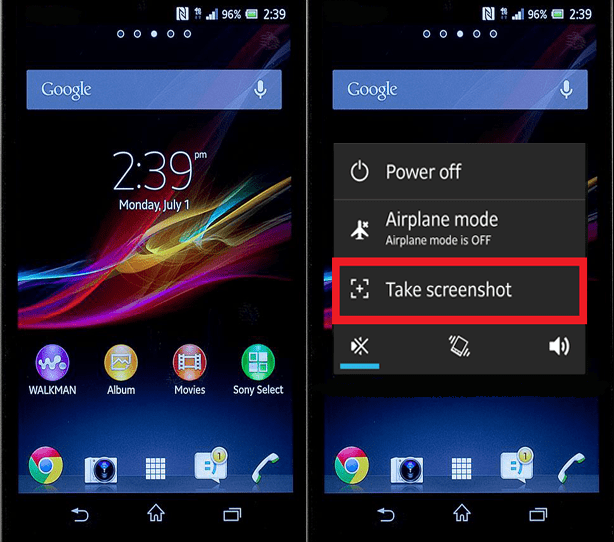
Without a doubt, having the basic ability to capture a screenshot on your smartphone remains a crucial hallmark when it comes to your device’s native features. Whether you want to immortalize a strain of text messages and one-off Snapchats, or need to record important data and information for customer service purposes, having the ability to snap a quick screenshot of your display is an important tool.
Fortunately for users of Sony’s Xperia Z line of smartphones, there are a multitude of different ways for accomplishing the simple task. To help, we’ve put together this comprehensive walkthrough detailing each method, which also conveniently applies to any version of Sony’s popular device, whether talking the Xperia Z2 or Z3. Before long, we’ll have you snapping screenshots on your Xperia Z, so you can release all those outrageous Autocorrect fails you’ve been saving in your inbox into the world.
Method #1: Using the Power/Lock button
For nearly every Sony Xperia Z smartphone — aside from those using Android 4.3 — the first method for capturing a screenshot is the most straightforward. Simply press and hold your phone’s Power/Lock button until a pop-up window opens before selecting Take a screenshot from the resulting drop-down menu. The phone will then automatically save the screenshot to your device’s Screenshots folder, conveniently housed within the Pictures or Gallery application. You’ll also have the ability to edit the image via the Sketch application, share it among various social media outlets, or email it to family and friends once you locate the shot.

Method #2: Using the tried-and-true Android technique
Like any Android-based smartphone, the Sony Xperia Z allows you to capture screenshots with a quick press of your smartphone’s Power/Lock and Volume Down buttons. Simply press and hold each button for roughly two seconds, and afterward, the device will snap an image of the phone’s display. Just like in the aforementioned method, your smartphone will then save each image to the Xperia Z’s Screenshots folder, located within the Pictures or Gallery application.

Method #3: Using the Capture Screen button
The third and final method for capturing screenshots on the Xperia Z may require a few extra button pushes, but it remains an easy way to snap a screenshot. To accomplish this, simply press the Menu button and select the Active Clip icon from the Small App menu at the bottom of the screen. Once the resulting window opens, click Capture Screen and allow the Xperia Z to take a screenshot and open it within your phone’s Sketch application. Similar to the other methods, you’ll then have the ability to edit the photo, share it on various social media outlets, or email it to anyone you choose.

