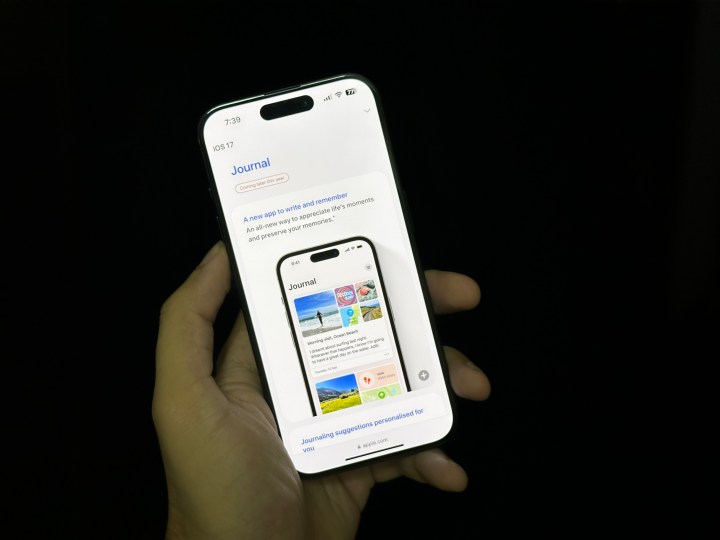
When Apple unveiled iOS 17 in June, it came with the announcement of Journal, a surprising new first-party app to help you record your life’s journey.
Although Apple made it clear that Journal wouldn’t be making the cut for the initial release of iOS 17.0 in September, it did promise that it would arrive later in the year — and now it’s here in iOS 17.2.
Of course, there are plenty of other journaling apps on the App Store, some of which have been around since the early days of the iPhone. That leaves Apple’s app entering a somewhat crowded space, but it still brings a somewhat unique spin on the journaling experience, and the best part is that it’s not only tightly integrated into the iOS ecosystem, but it’s also simple, secure, and — perhaps most importantly — free.
The biggest catch right now is that Journal is only available for the iPhone. Your data will get saved in iCloud (if you allow it in your settings), but there’s no iPad or Mac counterpart yet. This means you’ll need to do all your journaling in the palm of your hand. Nevertheless, it’s an ideal way to record quick thoughts on the go, and Apple has included some clever features to help you get going. Let’s take a look at how to get into Apple’s new take on journaling.

How to start a new journal entry
The Journal app installs automatically as part of iOS 17.2, although whether it lands on your home screen or gets buried in your App Library will depend on how you had your iPhone set up before the update.
Step 1: Locate and open the Journal app on your iPhone.
Step 2: If this is the first time you’ve used the app, you’ll see a welcome screen explaining what it’s all about. Select Continue and you’ll be taken to a blank page to start journaling.

Step 3: Choose the plus button in the bottom center of the screen to begin creating your first journal entry.
Step 4: Select the New Entry button at the top and start writing.

Step 5: Optionally, select one of the five buttons at the bottom if you want journal suggestions (more on this in the next section), or to add one or more images from your photo library, take a picture with your iPhone’s Camera, add an audio clip, or tag your entry with a location.
Note that any photos or audio clips you add will be grouped in the heading of the current journal entry; Journal does not provide the ability to place images in line with the flow of your text.
Step 6: Choose Done when you’re finished.
How to create a journal entry from another app
You can also create a new journal entry from nearly any app that supports the standard iOS system-wide share sheet. While what goes into the journal entry will depend on the app you're starting from, this is particularly handy for using a web page in Safari as a basis for a new journal entry, where you'll get a colorful rich link to the web page at the top. It also works for sharing content that you can pull into Journal directly, such as pictures and videos from the Photos app or songs from Apple Music.
Step 1: Open the app and content you'd like to create a journal entry from, such as a web page in Safari.
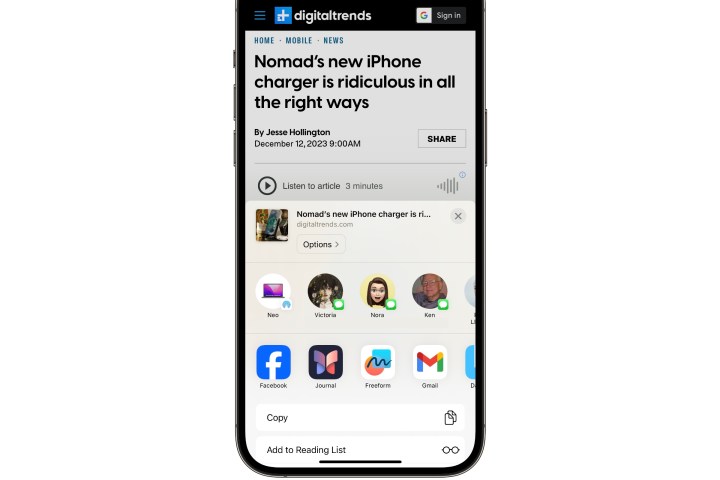
Step 2: Select the Share button in the app to bring up the iOS Share Sheet. The location of this will vary depending on the app you're using, but it typically looks like a square box with an arrow pointing upward. In Safari, it's located in the center of the the bottom menu bar.
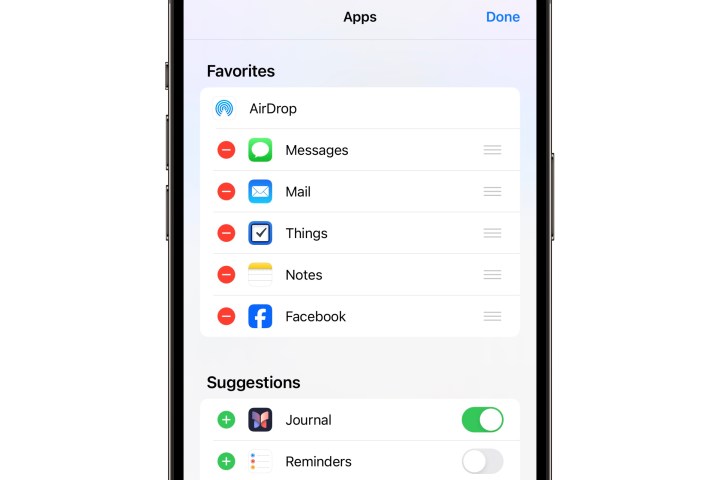
Step 3: In the second row of the Share sheet, locate and select the Journal app. If Journal doesn't appear here, select More and locate it on the list of apps.
You can also choose the Edit button in the top-right corner and then select the green plus beside Journal to add it to your Favorites.

Step 4: A new journal entry is created with the web page or oher selected item as the top. Write whatever you want to add and choose Save when you're finished. The new entry is saved into Journal in the background and will be waiting there for you the next time you open the app, where you can edit it and add more content like any other journal entry.
How to set journaling reminders
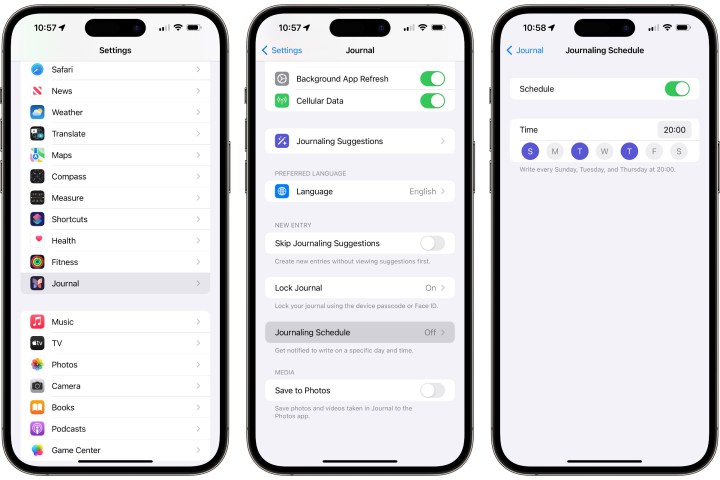
During the initial trip through the Journal app’s welcome screens, you may also be asked to set a schedule for when you’d like to be prompted to write journal entries. Regardless of what you choose during setup, you can change these at any time. Here’s how:
Step 1: Open the Settings app on your iPhone.
Step 2: Scroll down and select Journal.
Step 3: Scroll down and select Journaling Schedule.
Step 4: If necessary, toggle on the switch beside Schedule.
Step 5: Select the time when you’d like to be reminded to journal and the specific days on which you’d like to get those reminders.
Unfortunately, the time you choose here will apply to all selected days; there’s no way to choose separate reminder times for different days of the week. Of course, you can use Apple’s Reminders app or another third-party app for that, but the advantage of Journal’s built-in reminders is that you can start a new entry directly from the notification.
How to secure your journal
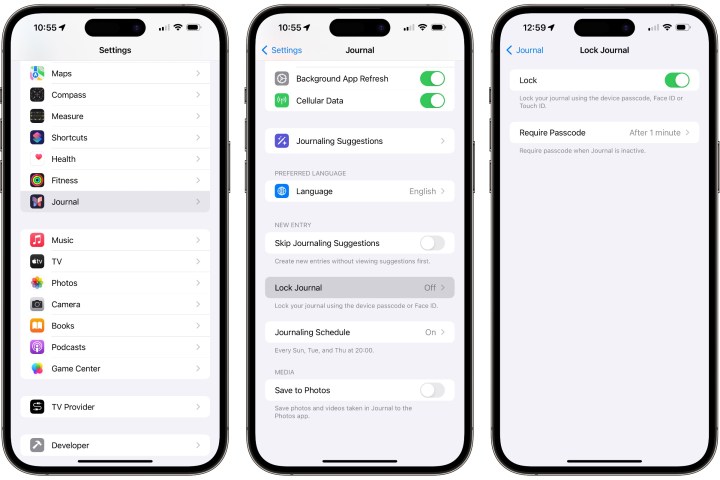
When you first open the Journal app, you should be asked whether you want to secure your journal with Face ID or Touch ID. That’s probably a good idea for an app where you may be recording your most intimate thoughts, but if you missed this prompt the first time, you can easily toggle it on later. Here’s how.
Step 1: Open the Settings app on your iPhone.
Step 2: Scroll down and select Journal.
Step 3: Scroll down and select Lock Journal.
Step 4: Enter your iPhone passcode when prompted.
Step 5: Toggle on the switch beside Lock.
Step 6: Optionally, select Require Passcode and choose the length of time Journal has to be inactive before the passcode, Face ID, or Touch ID are required to open it again.
How to use Journaling Suggestions
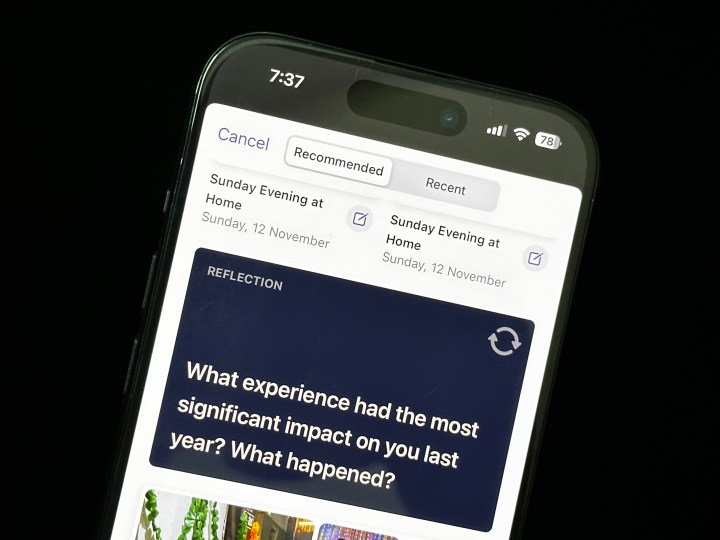
The real magic of Apple’s Journal app is in its Journaling Suggestions. With iOS 17.2, Apple has created a new interface that digs into your daily activities and uses them to surface suggestions to inspire your journaling.
In iOS 17.2, your iPhone uses machine learning to analyze recent photos, memories, calls, messages, workouts, and music and podcasts you’ve listened to, grouping them into relevant recommendations. For example, if you listened to a particular playlist during a workout, Journal will combine these into a single group and may ask you to talk about how the music inspired you during a recent workout. Similarly, photos taken during an excursion will be grouped together, along with the locations you traveled to, prompting you to reflect on your trip.
The best part is that these Journaling Suggestions are also available to third-party apps that want to take advantage of them; they’re a feature of iOS 17.2 and not just Apple’s Journal app. However, they work the same way whether you’re using Journal or a third-party app that’s been updated to incorporate them. Here’s how to use them in Journal:
Step 1: Locate and open the Journal app on your iPhone.
Step 2: Select the plus button in the bottom center of the screen to create a new journal entry. A list of suggestions should appear under “Select a Moment & Write.”
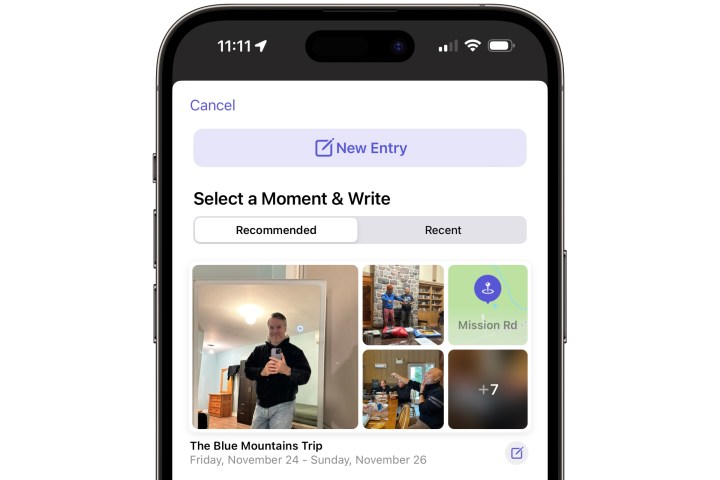
Step 3: Choose Recommended to see the activities your iPhone thinks are most relevant or Recent to see an unfiltered list of all recent activities.
Step 4: To select an entire group and begin writing about it, choose the small New button in the bottom-right corner of the group. Everything will be added to the top of a new journal entry, and you can jump right into writing with a relevant prompt to get you going.
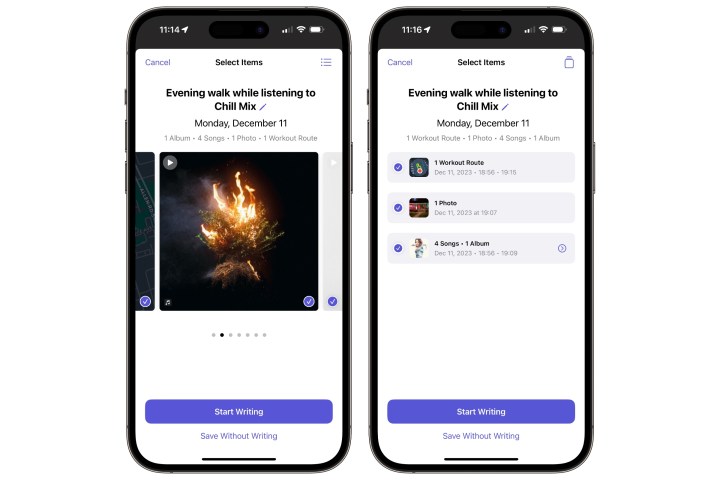
Step 5: Alternatively, you can select an individual item in a group to bring up a carousel view where you can choose what you want to include in the new journal entry. * Swipe left or right to see individual items such as photos, locations, songs, albums, and more. * Included items are indicated with a blue checkmark, which can be toggled on or off by selecting it. * You can also choose the three-line menu in the top-right corner to switch to a list view and rename the group by selecting the pencil beside the name. * When ready, choose Start Writing to be taken to a new journal entry with the selected items or Save Without Writing to save the selected items to a journal entry without going into writing mode.
How to customize your Journaling Suggestions
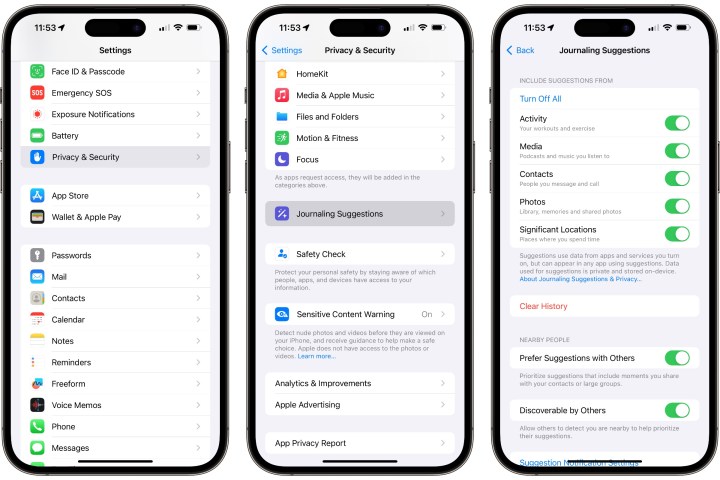
By default, your iPhone will offer Journaling Suggestions for workouts, music, podcasts, contacts you call and message, photos, and significant locations. It will also prioritize suggestions that involve other people and allow others to detect when you are nearby so you can be included in their Journaling Suggestions.
However, you can customize most of these settings, turning off categories that you don’t want to include and even clearing your suggestion history so you can start over. Here’s where to find these settings:
Step 1: Open the Settings app on your iPhone.
Step 2: Scroll down and select Privacy & Security.
Step 3: Scroll down and choose Journaling Suggestions.
Step 4: Under Include Suggestions From, toggle off any categories for which you don’t want to receive Journaling Suggestions.
Step 5: If you want to clear the history of suggestions that have been shared with Journal and other journaling apps, choose Clear History. Note that this may cause suggestions for entries you’ve already created in Journal to reappear.
Step 6: Under “Nearby People,” you can toggle off Prefer Suggestions with Others and Discoverable by Others if you’d rather your iPhone not use the presence of friends and family to influence your suggestions or advertise its presence to those folks.
When these features are enabled, your iPhone uses Bluetooth to detect the number of devices and contacts around you — that is, those devices belonging to people you have listed in your Contacts. This information is used to improve and prioritize your suggestions without storing the details of which devices or contacts were near you at any given time. This detection also only occurs if both devices have the “Discoverable by Others” setting switched on.

How to bookmark and filter journal entries
Sadly, Apple’s Journal app is a bit limited right now when it comes to filtering, sorting, and searching. Your journal entries are presented in reverse chronological order, and there’s no way to search for individual entries by contents or even by date.
However, you can bookmark important entries to make them easier to find later and also filter your list by content type to show only entries that contain locations or photos, for instance. Here’s how this works.
Step 1: To Bookmark an entry in the Journal app, select the Bookmark icon in the top-left corner while creating or editing an entry, or choose the three-dot menu in the bottom corner of the journal entry in the list view and select Bookmark from the pop-up menu.
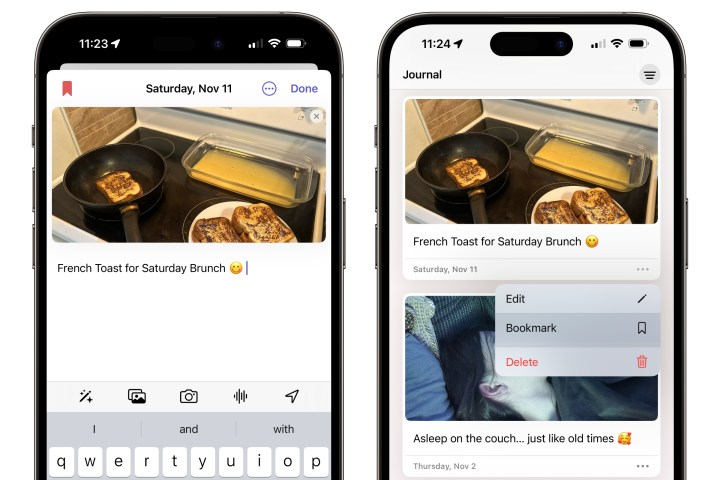
Step 2: To filter items in the Journal list, select the three-line menu in the top-right corner and choose the category you’d like to filter on.

Step 3: Only categories used in your journal will be shown here, so you won’t see “Activity” unless you’ve recorded some workouts or “Bookmarked” unless you’ve bookmarked one or more journal entries.
Unfortunately, there’s no way to filter on multiple criteria here. Choosing a different category switches to filtering by only that category.

How to edit a journal entry
None of the entries you make in Journal are carved in stone. You can go back and edit or delete any past entry, although Apple has designed the app to protect your entries from accidental edits, so some more specific steps are required.
Simply selecting a journal entry from the list will expand the entry to show you its contents, but it won’t go into editing mode. Similarly, choosing a photo, location, or other item merely expands that into a full-screen view. Here’s how to get into editing mode:
Step 1: In the list of journal entries, select the three-dot menu in the bottom right corner of the entry you’d like to edit.
Step 2: Choose Edit. The item opens in the same editing view you used when creating the entry.

Step 3: Optionally, select the X in the top-right corner or any photos or other cards you want to remove from the entry.
Step 4: Select one of the five buttons at the bottom if you’d like to add suggestions, photos, camera, audio, and location.
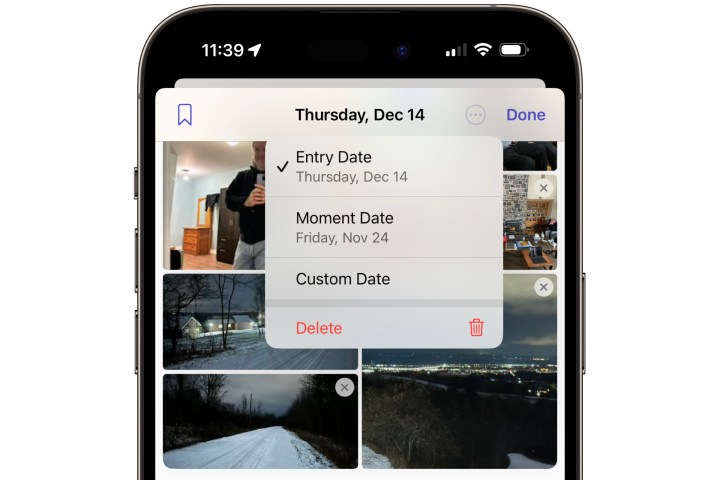
Step 5: To change the date of your journal entry, select the three-dot menu beside the Done button. From here, you can select from up to three options: - Entry Date: The date the entry was made - Moment Date: A date from the photos, locations, or other cards you’ve added - Custom Date: This will bring up a calendar picker where you can chose any date you like.
Note that there's also a Delete option on this menu. This does not remove the date; rather it will delete the journal entry entirely. Don’t worry, though; you’ll be prompted to confirm this before anything irreversible happens.
Step 6: When finished editing the text and adjusting the content of your entry, select Done to save it and return to the list view.
How to delete a journal entry
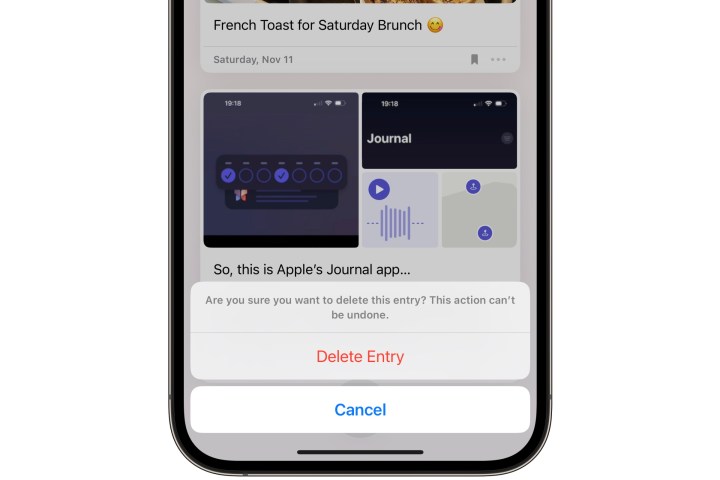
Permanently removing a journal entry is as easy as editing it. However, it should be noted that there’s no trash can or recycle bin for journal entries. Once you confirm deletion, it’s gone for good, with no way of getting it back.
Step 1: From the list of journal entries, select the three-dot menu in the bottom-right corner of the entry you’d like to delete.
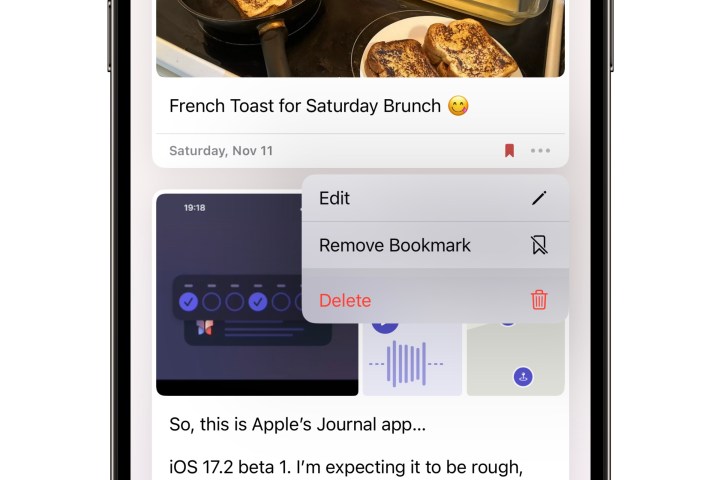
Step 2: Choose Delete from the menu that comes up.
Step 3: Select Delete again from the confirmation prompt.
You can also delete a journal entry in edit mode by selecting Delete from the three-dot menu in the top-right corner.


