Google sure knows how to make a great camera. The Pixel 4 and Pixel 4 XL boast the same amazing dual-lens camera, backed by Google’s image processing wizardry. It compares very favorably with the top camera phones available when it was released in the Fall of 2019, with stellar images that left our photographers eager to plumb its depths and learn its ins and outs. In the months since it was released, other phones have pushed phtoography further, of course: Triple-lens cameras are becoming common, such as those found on the LG V50 and new LG V60, and the hot new Huawei P40 Pro comes with a 5× optical zoom that leaves the Pixel 4’s telephoto in the dust.
Still, Google’s Pixel 4 camera is capable of capturing wonderful pictures, preserving your precious memories, and even shooting the stars in the night sky — and we’re about to explain exactly how to do all of those things. This is our Pixel 4 camera guide.
What’s new
Thanks to the power of software, Google is able to continually update its hardware, and the camera in the Pixel 4 and Pixel 4 XL is no exception. With the first update, from November of 2019, Google revealed “camera quality improvements” — though what exactly those were was unclear. In March 2020, as part of the second “Pixel feature drop,” Google announced two camera fixes, one preventing a crash when the Camera app switched to video, the other improving auto white balance in certain lighting scenarios. There wer similar improvements to Autofocus as well. Good stuff!
Camera specs
Before we dig into the details, it’s worth noting that the main and front-facing cameras in the Pixel 4 and Pixel 4 XL are identical. There’s no difference in the quality or the features, so whichever Pixel 4 you opt for, you’ll get the same awesome camera.
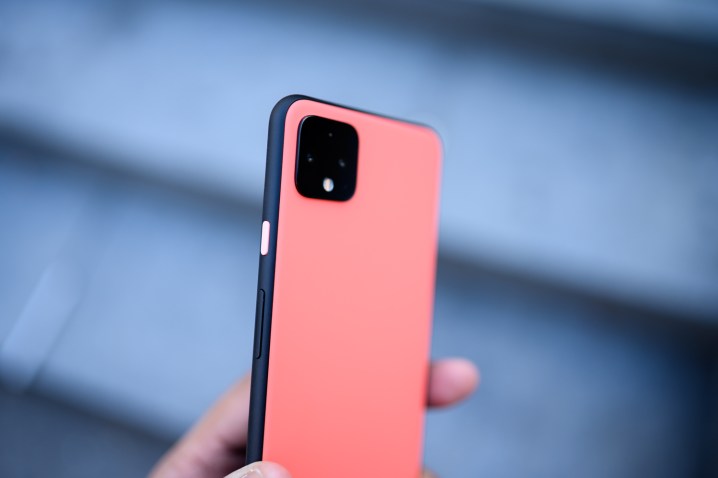
The main camera is a dual-lens affair that combines a 12.2-megapixel lens with an f/1.7 aperture capable of letting in plenty of light, and a 16-megapixel telephoto lens with an f/2.4 aperture. Both lenses have optical image stabilization (OIS). There’s also support for phase detection auto focus and HDR. The telephoto lens offers 2× optical zoom and can go up to 8× digitally with the help of Google’s Super Res Zoom feature.
Around front, there’s a single 8-megapixel lens with an f/2.0 aperture and a 90 degree field of view. It’s fixed focus, and the Pixel 4’s selfie shooter is no longer dual-lens as it was in the Pixel 3, but the wide field of view ensures that you can still cram in a decent amount of backdrop or get a group selfie.
If you want to shoot video with the Pixel 4 or 4 XL, then you can record at up to 4K resolution at 30 frames per second, 1080p at up to 120 frames per second, and 720p at up to 240 frames per second.
Getting started

You’ll find the camera icon at the bottom right of your home screen by default and you can tap it to launch the camera. You can also just double press the power button, even when your Pixel 4 is locked, to launch directly into the camera in a hurry.
If the power button shortcut doesn’t work for you then try going to Settings > System > Gestures and make sure that Jump to camera is On.
There’s also a Flip camera option in Settings > System > Gestures and it allows you to quickly switch between the front-facing camera and the main camera with a quick double-twist of your wrist, though you need to be in the camera app for this to work.
The camera app
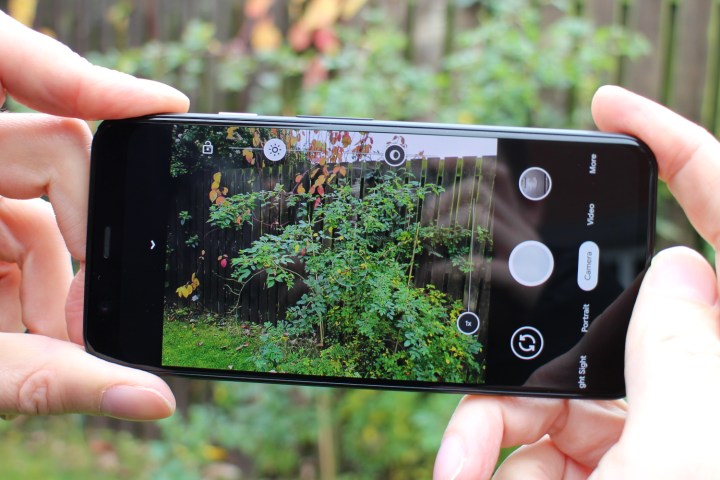
The camera app is nice and straightforward. You’ll see all the main modes along the bottom, if you’re holding your Pixel 4 in portrait, and you can simply swipe to cycle through them. Above that, there’s a central shutter button to take a snap (you can also take a photo by pressing the volume buttons when the camera app is open). You can tap the circle with the two arrows in it to the left of the shutter button to switch between front and back cameras. On the other side, there’s a preview of the last photo you took and tapping it will take you into the Photos app.
At the top, there’s a hidden menu that you can access by swiping down on the screen. The Motion option is off by default, but you can set it to automatic or have it on all the time. It captures a few frames before and after every photo you take, essentially recording a short video and we’ll discuss that further in the section below on Motion and Top Shot. Next, there’s the Timer, then the Flash, and finally the Ratio which is 4:3 by default, but can be set to 16:9. We don’t recommend you use the flash, but the timer is handy for group shots. If you tap the cog at the bottom of these options you can access more camera settings.
You’ll find support for HDR (high dynamic range) in virtually all smartphones now, but the Pixel 4 has HDR+. This enables the camera to capture bright highlights without blowing them out, but also pick up on details in the shadows. It’s an automatic feature, so there’s no setting to tweak.
How to use the telephoto lens

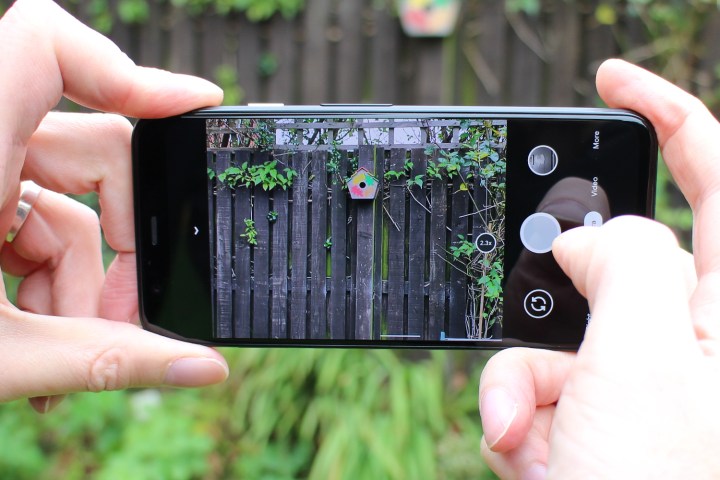
The big new feature for the Pixel 4 camera is the telephoto lens and it works beautifully. If there’s something you want to zoom in on, simply touch the screen with your finger and thumb pinched together and move them slowly apart to zoom in. You can pinch them together again to zoom out. As soon as you do this, a slider will appear on the right hand side and you can see the level of zoom indicated by the number in the circle. If you prefer, you can also just tap on that circle and slide up or down to zoom in and out, but we find it easier to get fine control using the pinch gesture.
The telephoto lens in the Pixel 4 is capable of 2x optical zoom, which means you can zoom in to that level without any loss of detail. Beyond that, Google’s software smarts are at work to ensure you still get a decent level of detail all the way up to 8x zoom, but you will often notice the quality deteriorate the higher you go. If you double tap on the screen, you’ll jump in to exactly 2x zoom. This shortcut is in the camera settings, via the cog at the bottom of the slide down menu, in Gestures.
How to use Dual Exposure

The autofocus in the Pixel 4 camera is very useful and you’ll need to make use of it if you want to access the dual exposure controls. To automatically focus on a subject and keep that subject in focus, even when you or the subject moves around, you just have to tap on it. This is very handy for photographing moving subjects. Once you have tapped on a subject to focus on, you should see a circle appear on the screen on top of the subject, and you’ll also see that two sliders appear at the top of the screen, assuming you’re holding the Pixel 4 in landscape view. The zoom slider will also appear on the right, which we just dealt with above.
On the left, there’s a brightness slider and on the right there’s a shadow slider. Slide these back and forth until you have the desired look on screen. At the top left there’s a padlock which allows you to lock in the automatic exposure (AE) and the autofocus (AF) once you are happy with both. This can be very handy if you’re planning to take a series of shots of the same subject and you don’t want to have to adjust the settings over and over.
How to take great portraits

The Pixel 4 takes stunning portrait shots and they work with the main camera and the front-facing camera. Simply swipe to Portrait mode to activate it and tap on your subject to focus on them. Watch out for warnings about distance or angle, sometimes you’ll get tips on screen to help you take better portraits. Google’s algorithm generally does a great job of blurring the background and keeping your subject in sharp relief, but with every portrait shot you take, it retains the original, just in case. When you review portrait shots in the Photos app you’ll see two thumbnails at the bottom and you can tap to look at the blur-free original.
You may sometimes want to tweak the level of blur after the fact and it’s easy to do. Find the portrait shot you want to tweak and tap the icon at the bottom that looks like three sliders, then tap it again, and you’ll see an editing screen with three sliders. You can change the Light, Color, and the Blur here. To reduce the blur, simply drag the relevant dot from right to left. If you tap the wee arrow at the right of the Blur slider you can adjust the foreground blur separately.
How to take great photos in low light

Google has separated its Night Sight mode, so you can swipe to access it in the camera app, it’s just after Portrait. You will still find that the camera app will prompt you when it’s a good idea to try Night Sight, which is basically whenever there isn’t much light. Night Sight uses a clever technique that stitches together multiple frames to boost brightness and color. Because it’s taking multiple shots, you’ll notice that it’s slower than the regular camera mode and it can take a while to process the image after you’ve tapped to capture. The vital thing to remember when using Night Sight is to stay as still as possible. Keep the camera static and the results will be much better.
How to shoot the stars

The astrophotography capability of the Pixel 4 is new, but it’s really an extension of the same principle that enables Night Sight to work. The difference with astrophotography is that your Pixel 4 camera is going to take a very long exposure. In fact, it takes around four minutes and then a few seconds to process the final image. You can’t turn astrophotography on via a setting, you simply need to be outdoors using Night Sight and pointing at the stars and you should get a pop up suggesting astrophotography. It’s important to note that this really doesn’t work unless your Pixel 4 is static and the best plan by far is to use a tripod.
Astrophotography: Google reveals how the Pixel 4 nails those night shots
Ideally, you’ll go somewhere truly dark out in the country away from light pollution and set up your Pixel 4 with a proper tripod, but you can always have a go in your back garden and see how it turns out. Just be aware, it’s not really going to work if you live in the center of a city.
How to use Motion and Top Shot

Google has chosen to turn Motion off by default on the Pixel 4. Motion takes short videos with multiple frames captured before and after you tap the shutter button to take a photo. Since it produces short videos, they take up more space and slow the camera down, so it’s likely not something you want to have on all the time. However, there are occasions, such as parties, when you should turn Motion on because it also enables Top Shot which lets you pick the best frame. Swipe down to open the menu and turn Motion on. Once you’ve taken a Motion picture, find it in the Photos app and tap the three vertical dots at the top right, then Select shots. You’ll get a timeline of the shots and you can pick the frame one you like best and save it as a separate photo. Google weighs in here with some suggestions highlighted by the white dots above the frames. This can be very useful if you’re taking a group shot and looking for a frame where everyone has their eyes open, for example.
How to edit your photos
There’s a decent set of editing tools that you can use to fine-tune your photos. Open up the Photos app and tap on any image, then tap the three sliders icon second from the left at the bottom to edit your photo.
You’ll be presented with a set of filters to begin with and you can tap to try them on for size. The three slider icon in the edit menu lets you adjust Light, Color, and Pop, or if it’s a Portrait you can adjust Blur instead of Pop. You can tap the wee arrow to the right of a slider to access more fine-grained adjustment sliders covering various elements of the photo. For example, in Color you’ll find sliders for things like Warmth and Skin Tone. The crop icon allows you to crop and rotate the photo. When you’re happy with your adjustments tap Save at the top right. The final grid icon allows you to move into markup to annotate the picture if you want to.
Final tips
The Google Camera app has recently added a feature called Frequent Faces. By enabling this feature, you can train the Pixel 4 or Pixel 4L to take sharper pictures of the people you photograph most. This setting will also ensure your most photographed friends and family are featured prominently in your Top Shot recommendations.
Serious photographers also have the option of saving RAW files on your Pixel 4 and Pixel 4L. By clicking Advanced in the Google Camera app settings, you can find the toggle for RAW+JPEG control. Enabling this control will save both RAW and JPEG photos. While these RAW images are of higher quality than their compressed JPEG counterparts, they do take more memory on your phone.
Before you go out and shoot some great photos, check out the key settings you should change on your Pixel 4.


