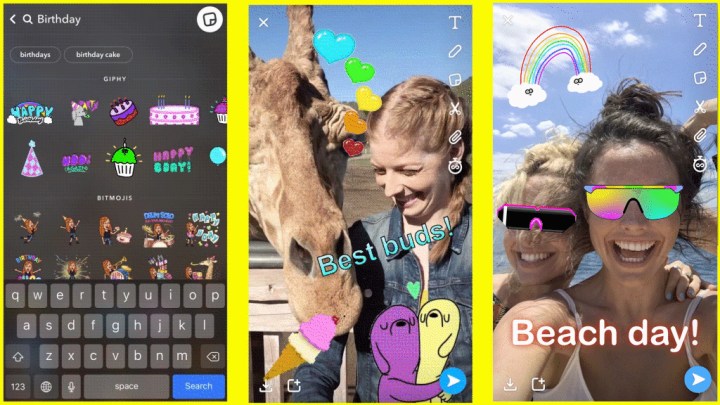
Since 2014, the social media app, Snapchat, has been updating the app with new, fun features. In addition to the drawing tool, users can apply a number of themed stickers to their snaps. Snapchat’s most popular feature by far, though, is its filters. With Snapchat’s face-detecting lens technology, you can make yourself old, add beauty filters, or give yourself cat ears and whiskers. The list of available filters goes on and on, with more added every day, especially now that users can create and upload their own. Filters are awesome, but they can seem confusing if you don’t know how to use them. Luckily, we’re here to show you!
Give permission
First things first: In order to access all of Snapchat’s filters, you first need to enable them. Head to the app’s settings (from the main viewfinder, tap your profile pic in the upper-left corner, followed by the gear icon in the upper-right corner), and then select Permissions (under Privacy). From there, enable the camera permissions. Some filters require geolocation to be enabled, so go ahead and turn that on in your phone’s settings as well.
Using filters
Once everything is enabled, you’re all ready to start filtering. Head back to the viewfinder and tap the screen. Your camera will take a second to adjust and map your surroundings, then a series of circles will appear to the right of the photo-taking button. Each of the circles contains a little preview of what the filter might be like; tap on one of these to select it (or swipe to scroll through several at once), and the app will apply the filter. The list of filters is refreshed daily, so if you can’t find one you like, check back later (some popular choices, though, are semi-permanent).
Some filters are completely autonomous, while some require you to perform an action, like tapping on the screen or looking around in different directions. Snapchat is great at giving clear instructions on how to activate filters, and many of them are downright hilarious. For instance, one filter placed a chicken on the screen, which we could then drag around in 3D space; other filters filled the screen with digital bubbles, or little floating balloons with cat faces.
Lenses
Perhaps more popular and ubiquitous than Snapchat’s area filters is the “lens” feature, which uses face detection technology to apply filters to users’ faces via the phone’s front “selfie” camera. The process here works the same way: Aim the camera at your face (it should be easy, since you’ll be displayed on-screen), tap the screen, and wait for the list of filters to appear. Here, you’ll find filters that warp your visage in creative ways and filters that add goofy aftereffects.

Some lens filters require you to open your mouth or raise your eyebrows to fully activate, while some scan your face and then insert it into a pre-rendered scene (like some sort of weird dancing Abraham Lincoln, for example).
Face swapping
One of the most popular lens filters is “Face Swap,” which is pretty self-explanatory. To use this filter, simply select it from the list (face swap filters will have two face icons), and you’ll see two circles appear on-screen, with the background dimmed. Line up two faces within the circles, and the app should automatically swap them.
Similarly, Snapchat sometimes makes available a filter that lets you swap faces with pictures in your phone’s library. Choose the filter from the list (it’s teal, and usually located near the end), make sure your face (or the face of your subject) is in the camera’s crosshairs, and the app will pull up a list of images from your library that have faces in them — or, at least, images that Snapchat thinks have faces in them. This is a great filter for those who can’t convince anyone to come close enough for a regular face swap.
How to use user-created filters and lenses
Once Snapchat’s filters and lenses get old, you’re not out of options. Tap the smiley face icon by the Discover option at the bottom of the screen and you’ll open up a list of filters and lenses created by other Snapchat users. If you find one you like, just tap on it and you’ll be taken back to the viewfinder to take your photo with the new filter.
Post-capture filters
Snapchat also offers several filters that can be applied after you capture your photo or video. Once the capture is complete, swipe left or right to access these filters. These include the sepia tone and black-and-white filters; filters that will speed up, slow down, or reverse a video you’ve taken; and Geofilters, which add fun overlays based upon location (neighborhood or city) or events — there are holiday filters, as well as more specific filters for things like music festivals and big conferences. Geofilters are only available with newly captured snaps; they can’t be added to Memories.

Other tools
OK, so, when it comes to Snapchat, the word “filter” is a little bit restrictive. The app features a host of cool features that aren’t technically listed as filters, but they’re still worth checking out, so we’ll explain those for you. First up: The scissors and sticker tools. To use the scissors tool, capture a snap (or pull up a previously captured Memory from the app or from your camera roll), then tap the scissors in the upper right — your image will dim. Next, you’ll want to use your finger to draw an outline around the part of the image you’d like to save. Once finished, Snapchat will copy the layer you’ve selected, create a sticker from it, and paste it on top of the image. Now, you can drag the new sticker around, rotate, enlarge, or shrink it using pinch controls, or delete it by dragging it to the trash can icon.

Stickers themselves are pretty straightforward. To use them on a captured image, tap the middle icon on the right side, which looks like a little square sticker with the corner folded over. From here, you’ll be taken to a screen with many different sticker options represented by icons. Here’s what each icon means:
- Star: Snapchat-specific stickers like geo stickers and time stamps
- A little clock: a list of your recently used stickers.
- A pair of scissors: all of the stickers you’ve created using the scissors tool
- Winking icon: Bitmoji stickers (if you’ve downloaded the Bitmoji app)
- Smiley face icon: emoji stickers
All these stickers can be moved, edited using pinch controls, or deleted by dragging them to the trash can icon. If you can’t find the sticker you want, tap on the star icon and use the Gif search tool to find cool, moving stickers.
Finally, there is the drawing tool. Once you’ve selected an image to edit, you should see a little pencil icon on the right side. Tap it, and drawing tools will appear on the right side of the screen. Tap on the color you want and drag your finger around your photo to create art.


